

Release note Software version 10.14.x.
Applicable for e-Series and UR-Series
For latest release notes of PolyScope 5, please refer to Release note Software version 5.26.x
For further information please see the PolyScope X Software Handbook.
Date of release: August 27th 2026.
Download HERE
SW 10.14.0 Release Notes
Release Versions:
- PolyScope X robot image: 10.14.0
- URCap X SDK: 0.20.49
- User Manuals: 10.14.0
Key Features
- Logic Programs
- Port 80 Handling
- I/O Signal in Expression Editor
- Shared Application in Program Manager
- Export and Import of modules
- Move to First Position
- Exporting of scripts
- Support for external pointing device
- Security fixes
PolyScope X User Interface
Logic Programs
Logic program is a separate program in the application. It runs in the background, simultaneously with the main robot program.
Example applications:
- Logic program can react to external sensor inputs even when the robot is in stop mode (safeguard, protective stop, estop, main program pause, stop, etc.) or before arm is powered on.
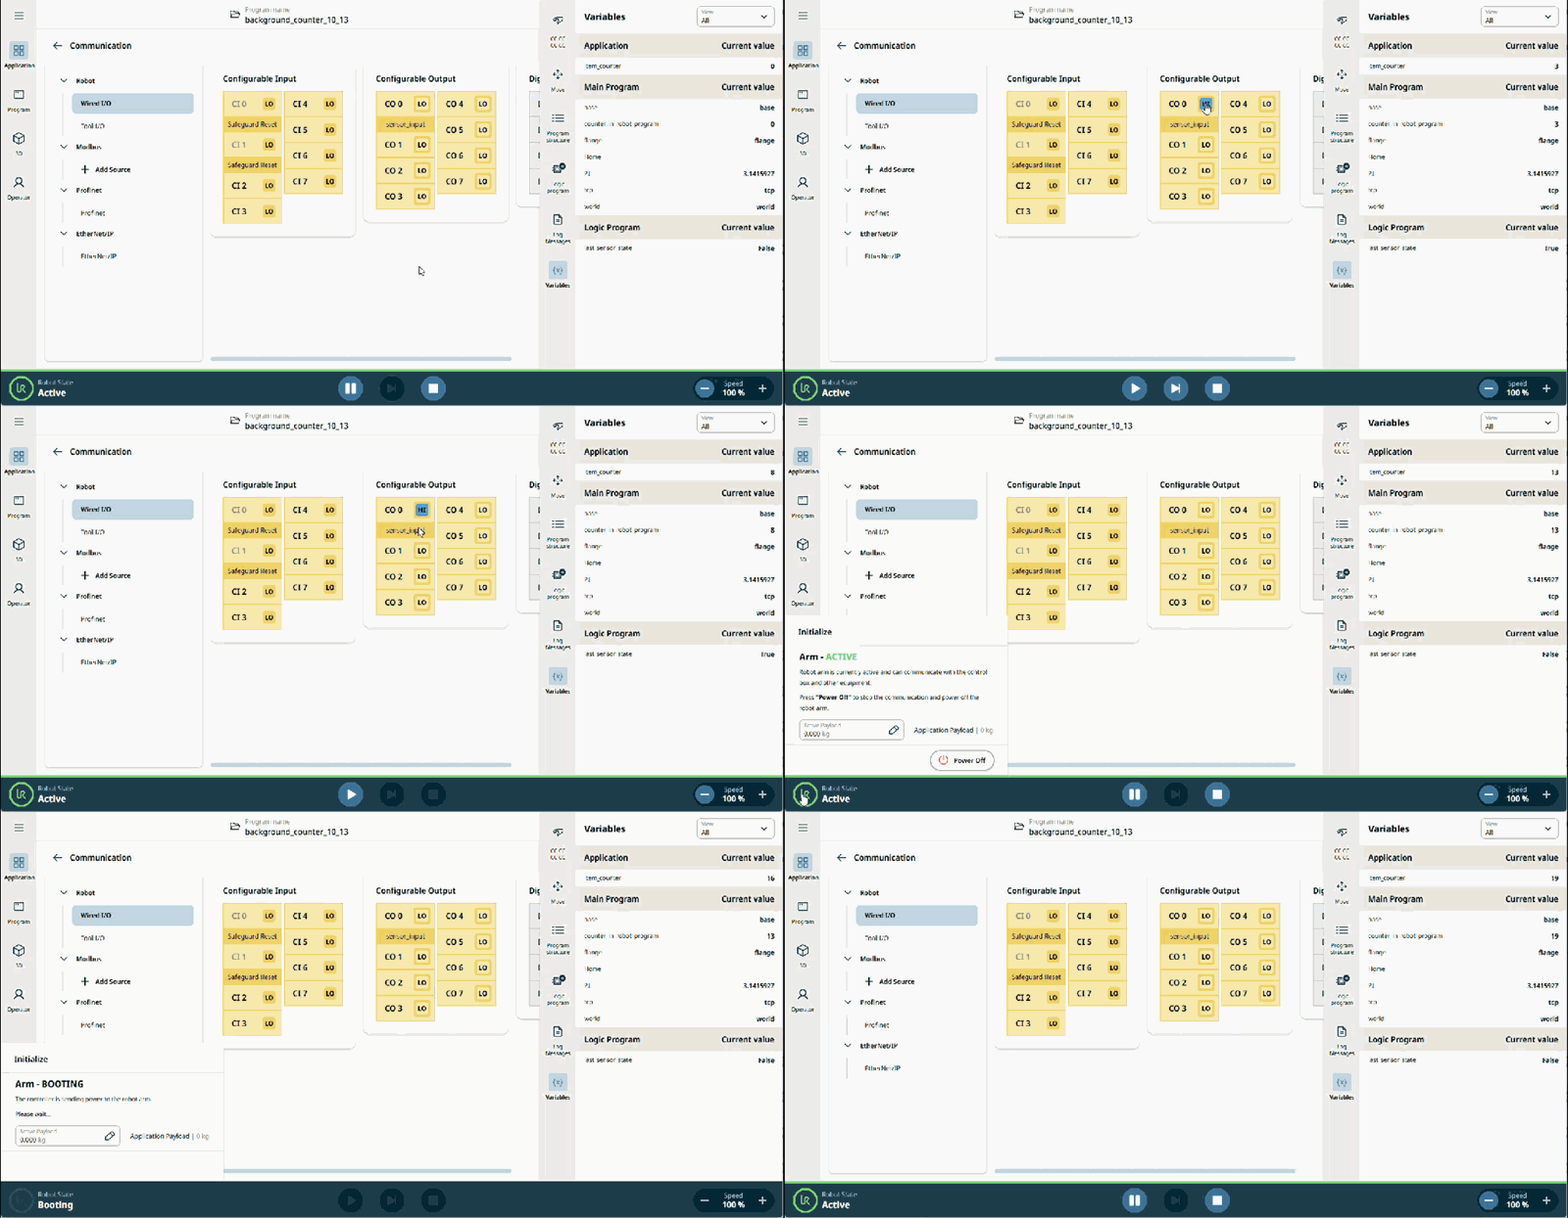
The example below counts rising edge events on the digital pin regardless of whether the robot program is running or the arm is powered on.
Number of events is saved in item_counter application variable. Actual count is used in robot program (counter_in_robot_program) when it’s running.
- Logic program can maintain fieldbus communication (Modbus, Ethernet/IP, Profinet, Socket, XmlRPC)
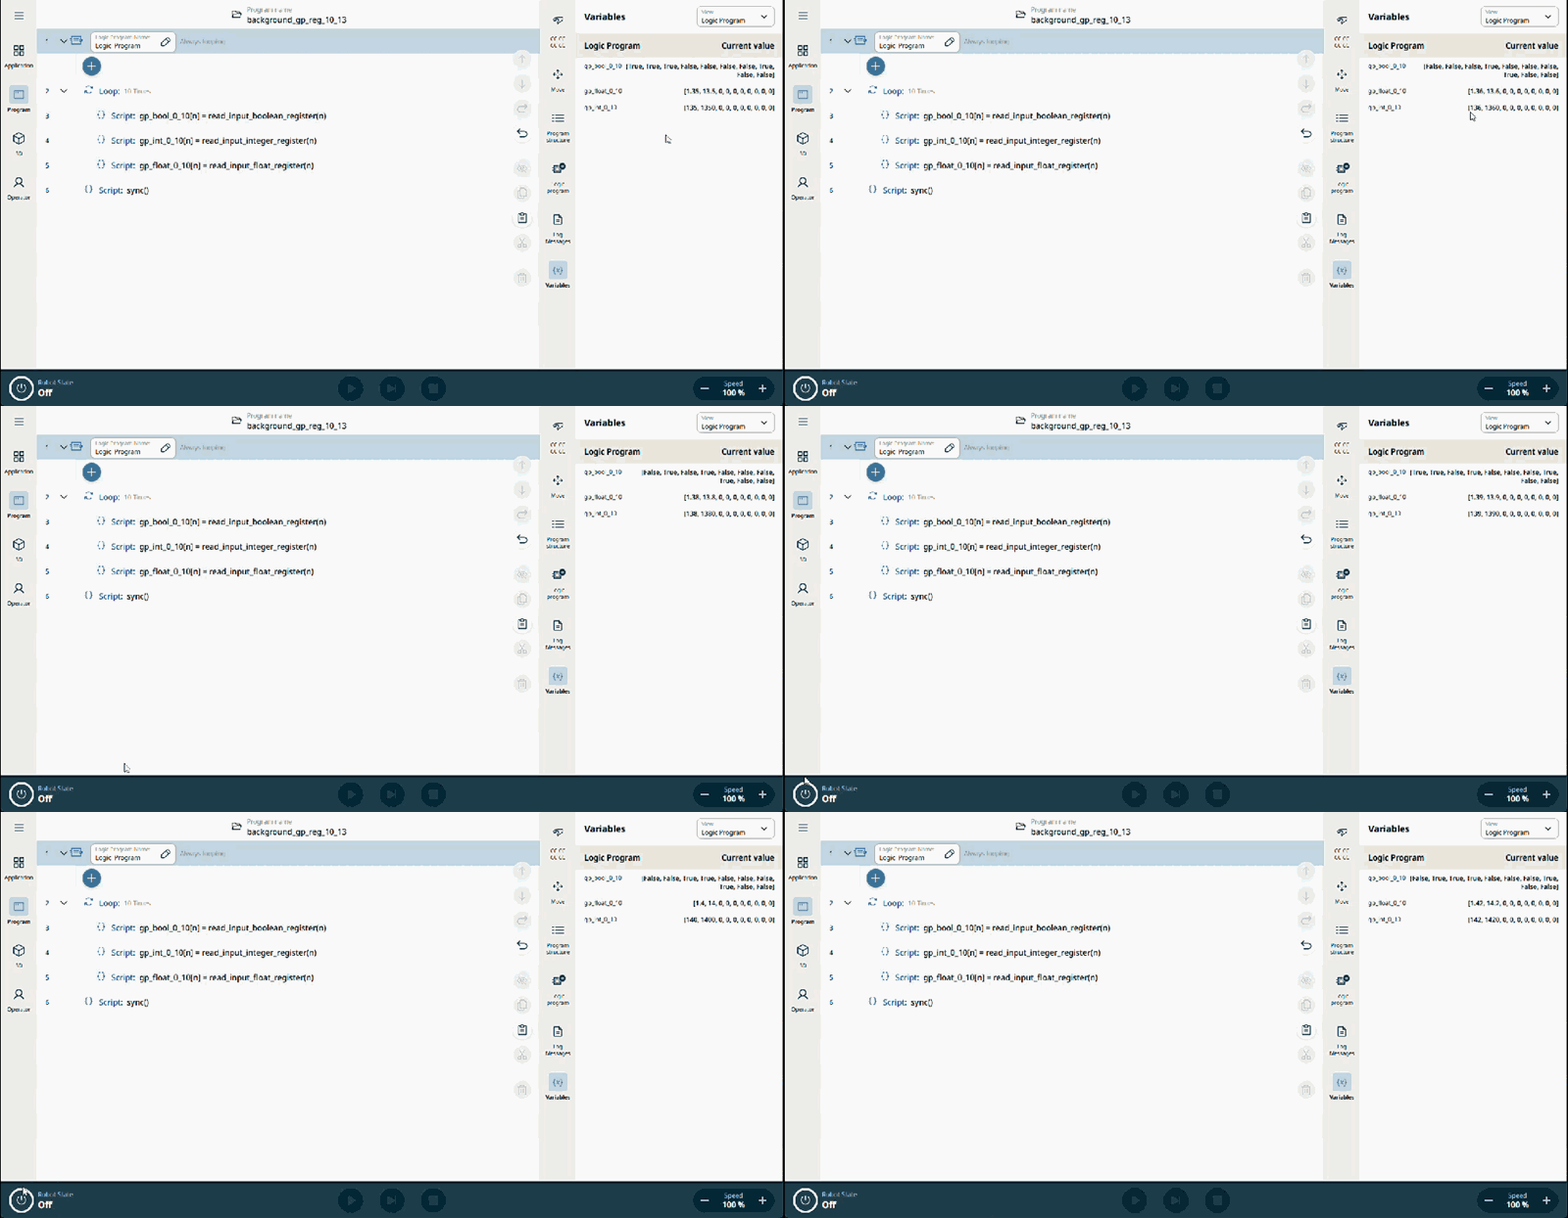
The example background_gp_reg_10_13.urpx shows the state of input general purpose register in variables view. Arm is powered off and robot program is not running.
- Logic program allows continuous cell operation while main program is interrupted by operator entering safeguard area
- Logic program can report robot state on attached light tower and actively report to production control software (Production PLC)
- Attached light_tower_10_13.urpx example shows how to read robot state and present status on light tower attached to digital outputs. Different robot states are also updated in application variables.
- Logic program can perform a controlled stop of external equipment (welding, conveyor, glue dispenser) when main program stops or pauses.
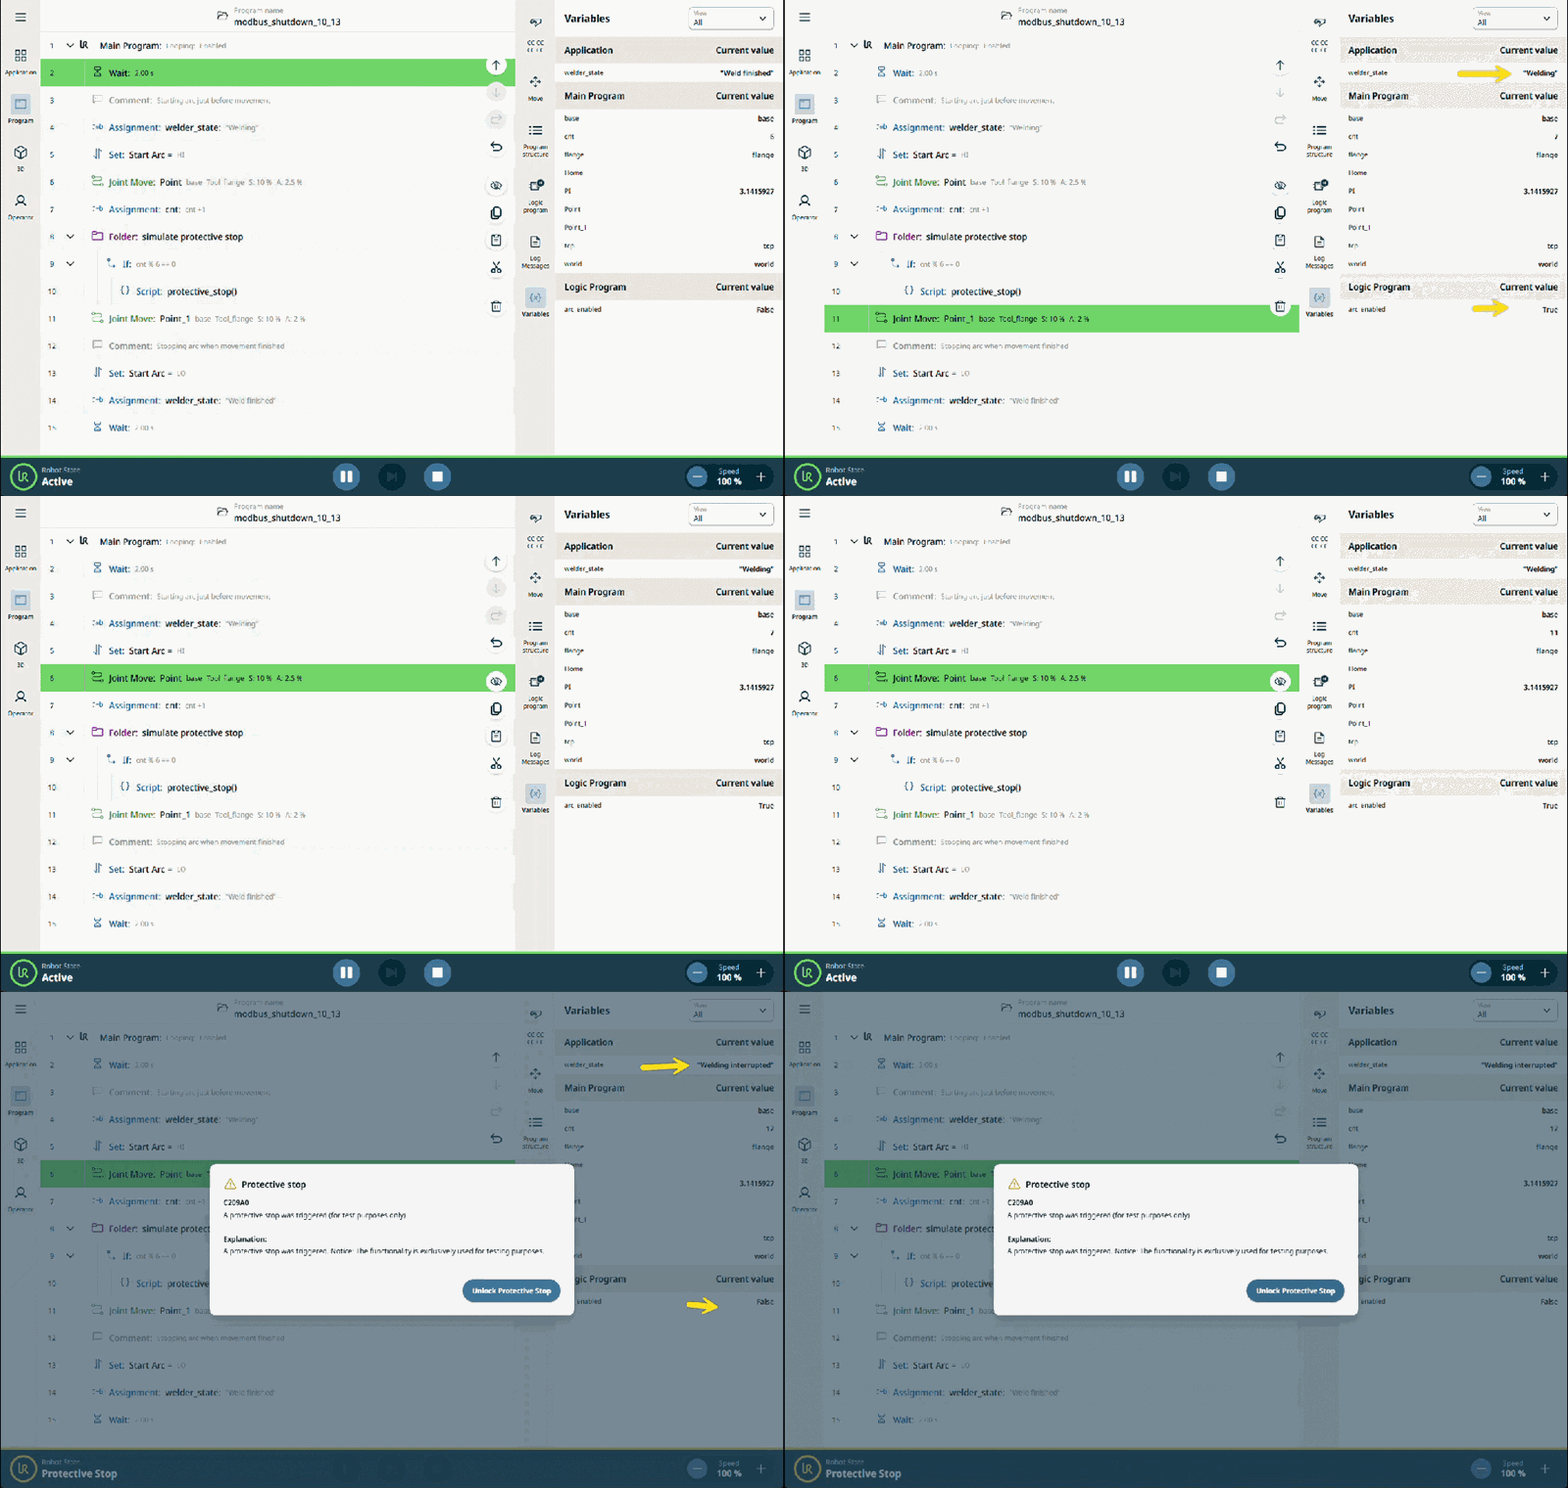
- The example modbus_welder_int_10_13.urpx is simulating welder control over modbus. Welder arc is turned off by logic program when robot program stops for any reason in the middle of the weld.

- get input from operator before the robot program is started
- customize recovery from fault conditions. Operator can decide (through i.e. dialog box or buttons) what should happen after resuming main program.
- replace external PLC controller entirely in small robot cells
Logic program cannot use functions that directly move robot arm, change payload or modify TCP parameters.
License
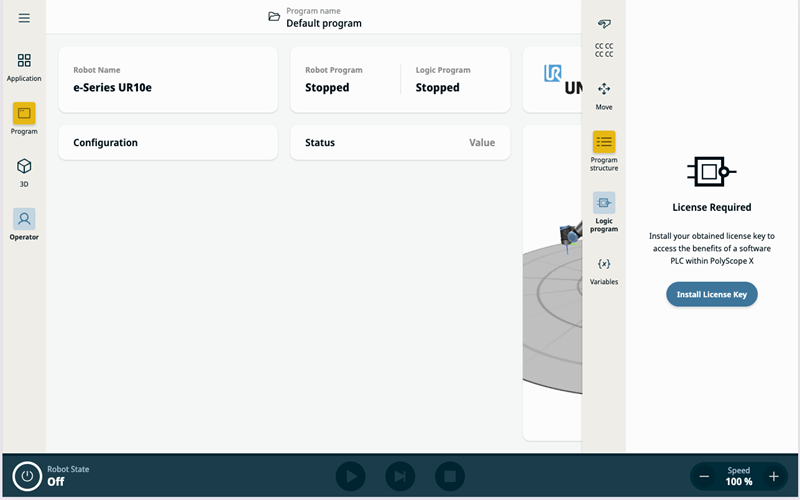
Logic Program requires a license. It can be bought through customer portal.
Creating logic program
Navigate to program page, and select logic program on the sidebar.
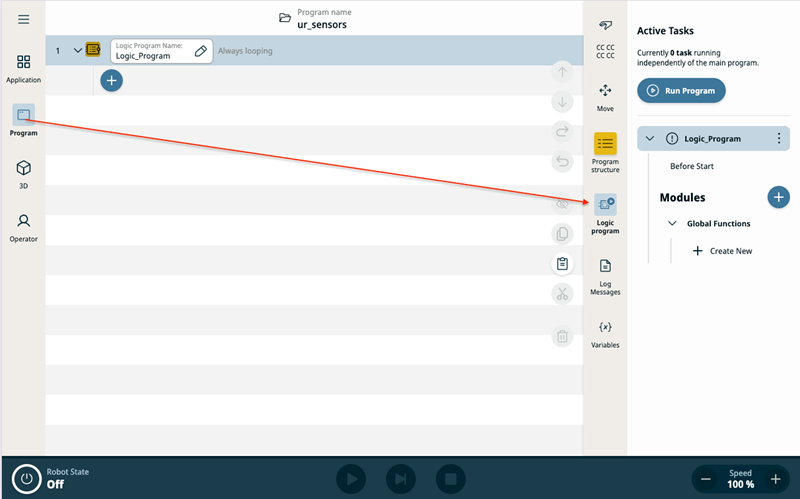
The Sidebar shows controls for navigating between different parts of logic program - similar to navigation in the robot program. It also allows to start, pause, stop and reset program.
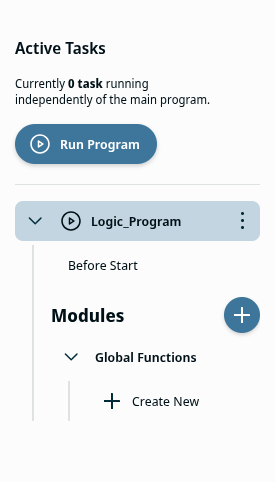
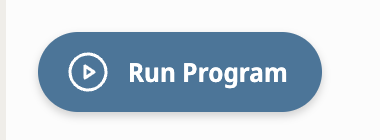
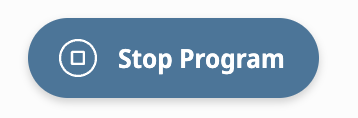
The Run Program button changes depending on the state of the logic program. It also acts as a shortcut for program control actions available in logic program context menu.
Logic program indicator shows the current state of the program. It also indicates if program is configured to start automatically when application is loaded.
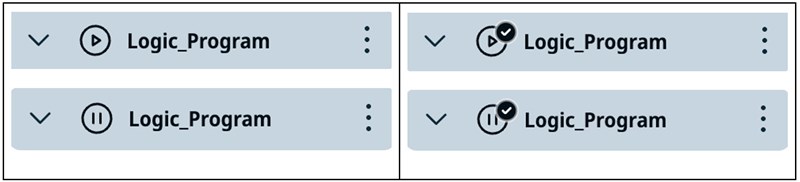
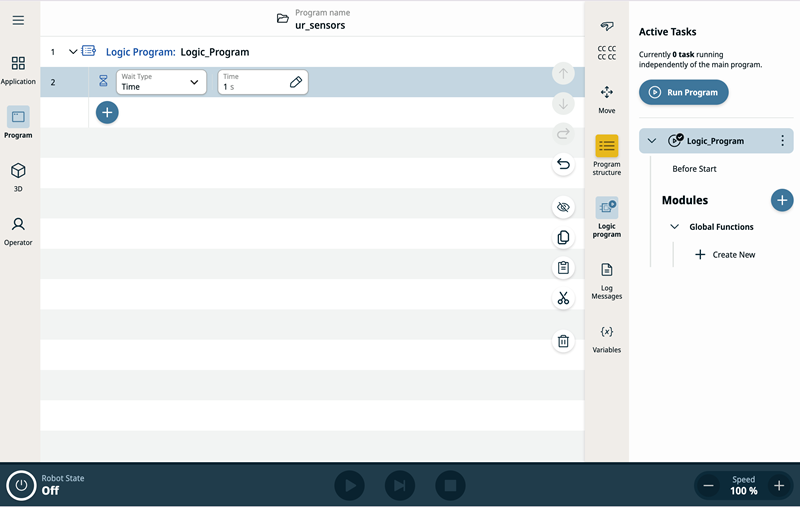
Logic Program sections
Main program body. Main program will run continuously until stopped. Program can be stopped manually, with halt script instruction or with runtime error.
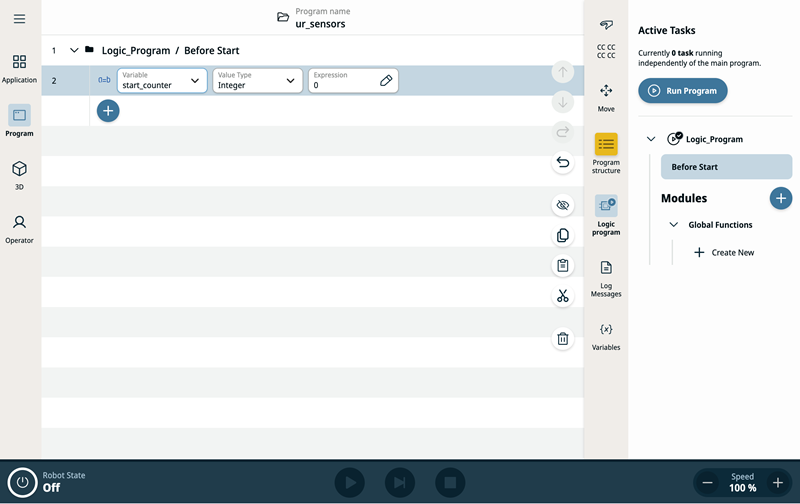
Before Start - program in this section is executed only once, before the main program body.
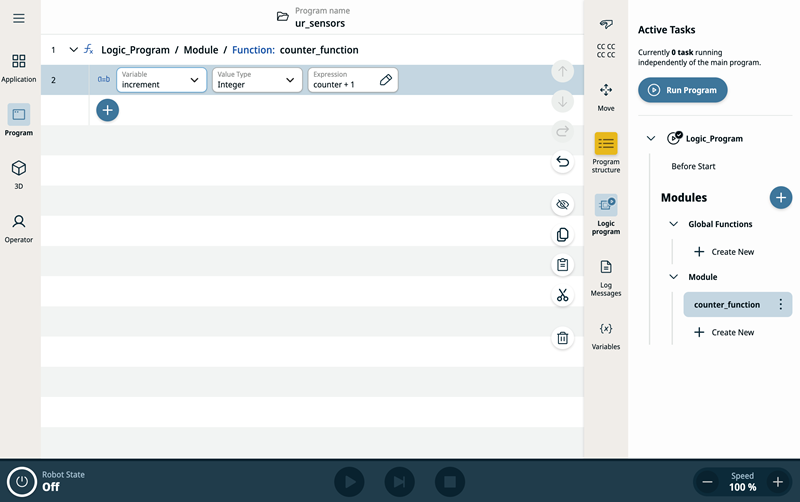
Modules - list of functions and threads available for the program
Exchanging data with the robot program
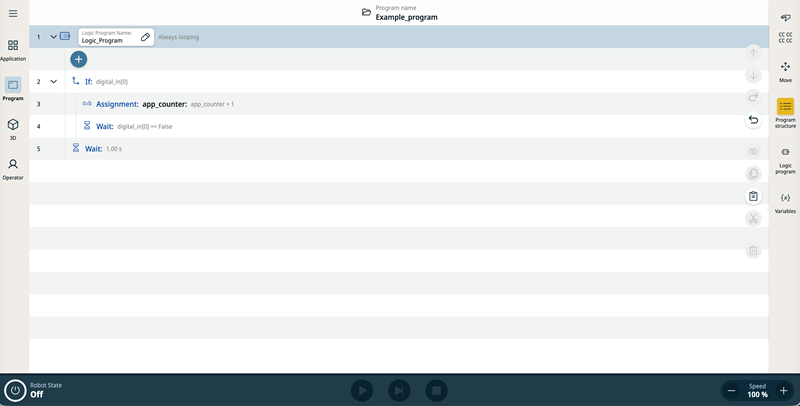
Primary way of communicating with a Logic Program is through Application Variables. Variables can be both set and read from robot and logic program.
Following example counts items flowing to the input buffer of the robot cell and presents counter to the robot program. Count continues while robot arm is powered off.
Reading robot state
Robot state is available through built-in RTDE variables. Those variables can be read using script function get_rtde_value().
Full documentation of available RTDE fields is available in RTDE Guide.
Following example shows how to check if safeguard stop is active
safety_status = get_rtde_value("safety_status")
# check for Safeguard Stop and Automatic Mode Safeguard Stop
is_safeguard_stop_active = (safety_status == 5 or safety_status == 12)
Another example checking if robot program is paused
is_program_paused = get_rtde_value("runtime_state") == 4
There is also URScript Control API that wraps this functionality.
Automatically starting logic program
Program can be selected to start automatically when application is loaded. When auto-start option is selected then logic program will start immediately after application is loaded.
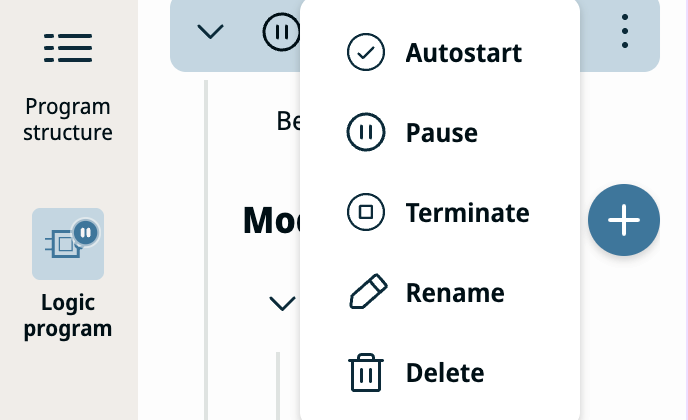
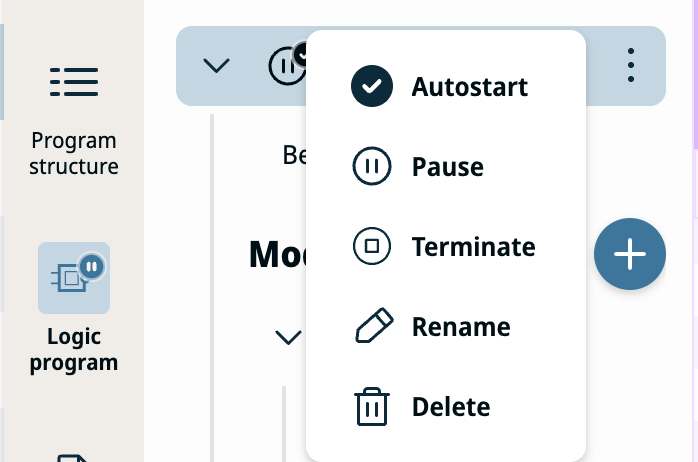
Logic program will also be started automatically when robot controller is powered on and last application is loaded.
Auto-start function works regardless of operational mode or arm status.
When auto-start runs on load, a snackbar confirms that the Logic Program has started.
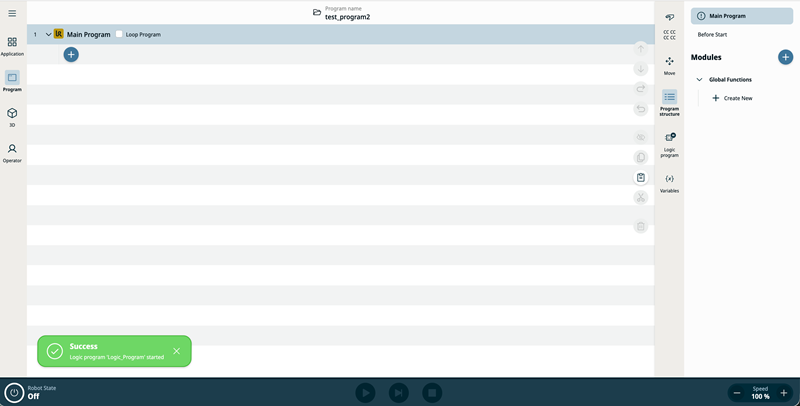
The sidebar badge on the Logic Program icon always shows whether the program is currently running or stopped.
It’s the programmer’s responsibility to make sure that the logic program is safe when robot is powered on and when different applications are loaded.
Logic programs can activate and deactivate external equipment using wired or PLC connections (Modbus, PROFINET, Ethernet/IP, Socket, direct outputs or other interfaces).
Modules and threads
Logic program functionality can be organized in functions. This functionality is identical to robot program.
Each function can be marked as Thread. Note that threads only execute once by default. Check loop checkbox on the thread function to execute thread continuously.
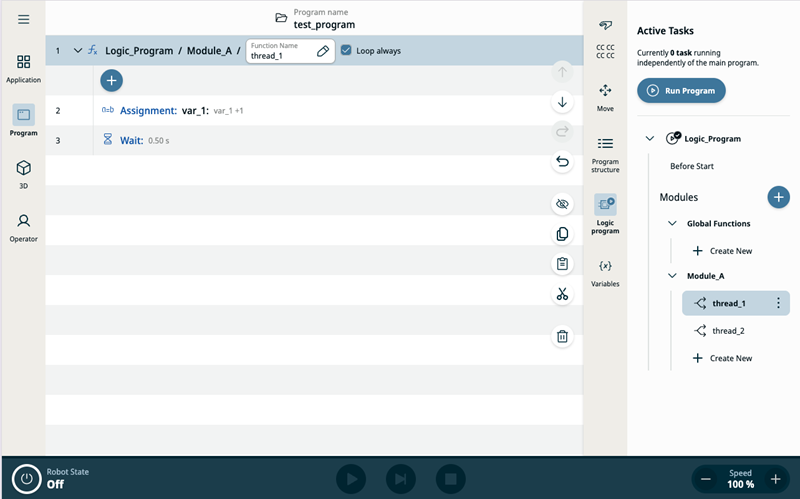
Global Variables in Logic Program
Variable names should not start with prefix _ur_. This prefix is reserved for internal constants.
For compatibility with future improvements, this prefix should also not be used in robot program variables.
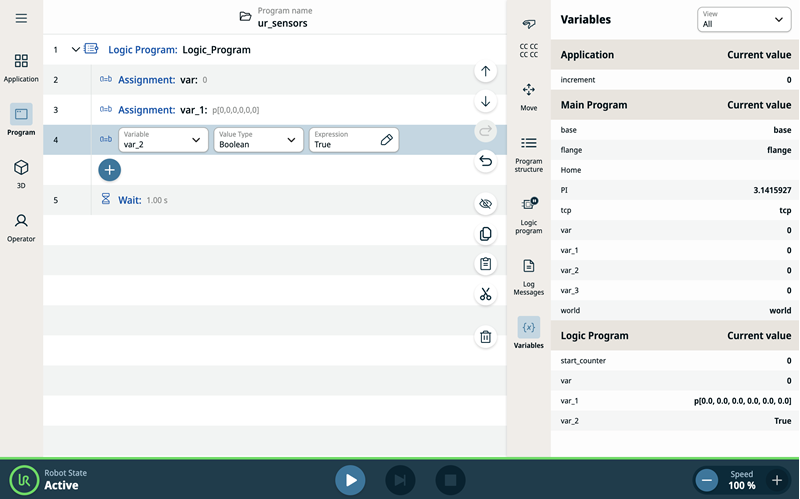
Logic Program variables are shown in the Variables sidebar together with Application and Main Program variables. You can see names and current values of the variables that belong to the active logic program.
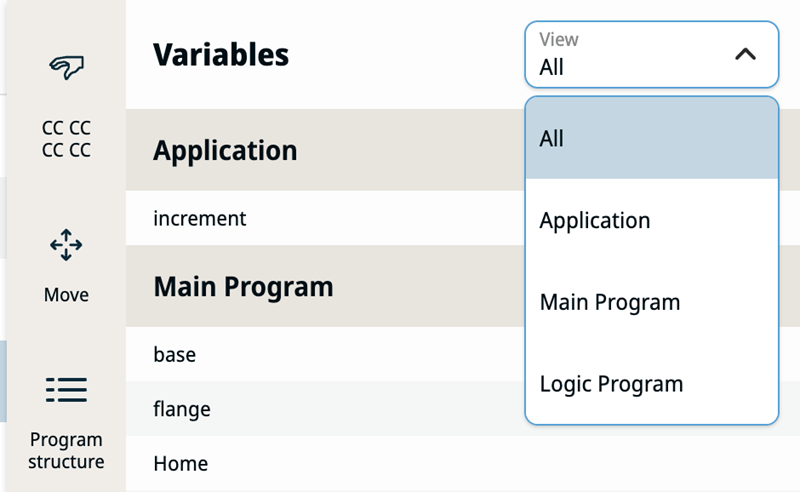
The filter dropdown in the Variables view lets you choose which set of variables is shown: All, Application, Main Program, or Logic Program.
Logic program supports up to approximately 300 simple variables. Exceeding the limit might stop running program.
Control Action in Logic Program
The Control Action command node allows user to add robot control actions to a Logic Program. It is not available in the main robot program. These Control Actions in a Logic Program will execute only when robot is operated in Remote Mode.
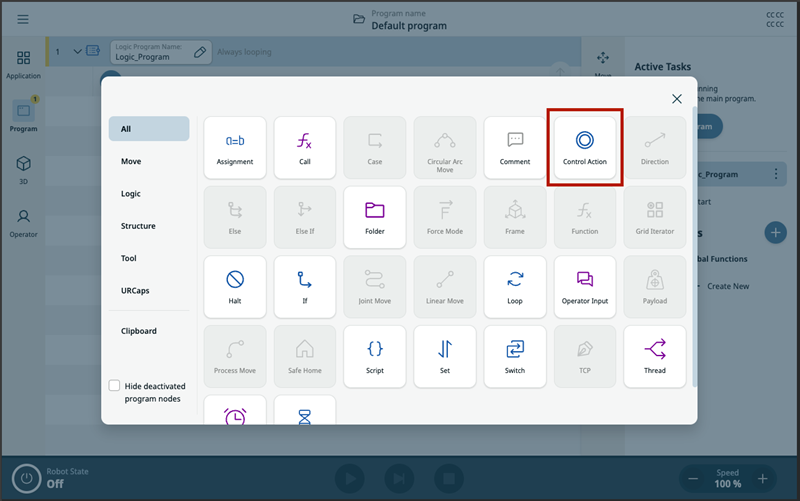
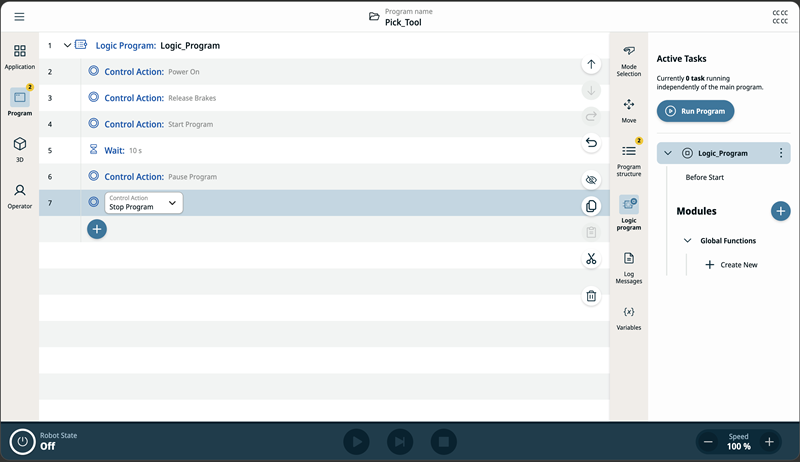
The possible Control Actions that can be added are:
- Power On - Power on the Robot through the Logic Program
- Power Off - Power off the Robot through the Logic Program
- Release Brakes - Release the brakes of the Robot through the Logic Program
- Start Program - Start the default or the currently loaded program through the Logic Program
- Pause Program - Pause the default or the currently loaded program through the Logic Program
- Stop Program - Stop the default or the currently loaded program through the Logic Program
We can create a Logic Program at an Application Level. A Logic program starts executing when PolyScope restarts, reloads or robot is powered on when it is set to Autostart or can be explicitly started.
When PolyScope restarts, reloads or robot is powered on, If a program from an application that has a Logic program has been set as the “Startup Program”, then the Logic program gets loaded and starts executing. Through these Control Actions, user can remotely power on a robot, start and stop a robot program from the Logic Program.
URCap API
Program type in context
Validators and code generators receive the current program type (main or logic) in script, validation, and insertion context, so URCaps can generate different script or apply different validation for Main Program vs Logic Program.
allowedInProgramTypes
Program node behaviors can define an allowedInProgramTypes function. It returns the allows program types, MAIN or LOGIC that a node can be used in. If the behavior is not defined, it will default to MAIN.
getContributedNodeInstancesForURCap(programType?)
ProgramTreeService supports an optional program type filter. URCaps can query their contributed node instances per program type (e.g. to restrict which I/O or nodes are used in Main vs Logic Program and avoid double control).
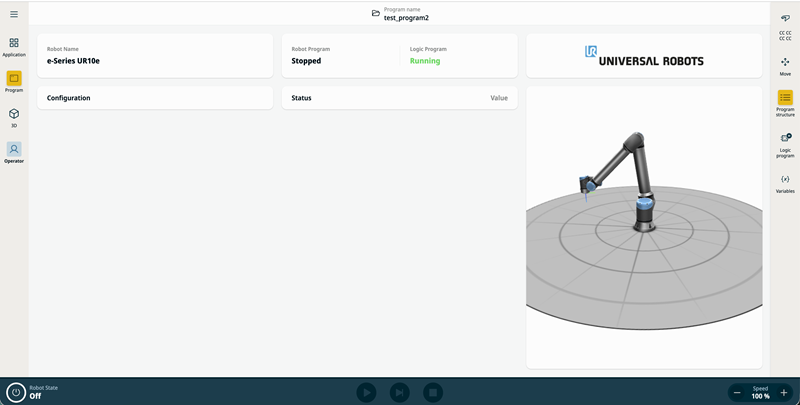
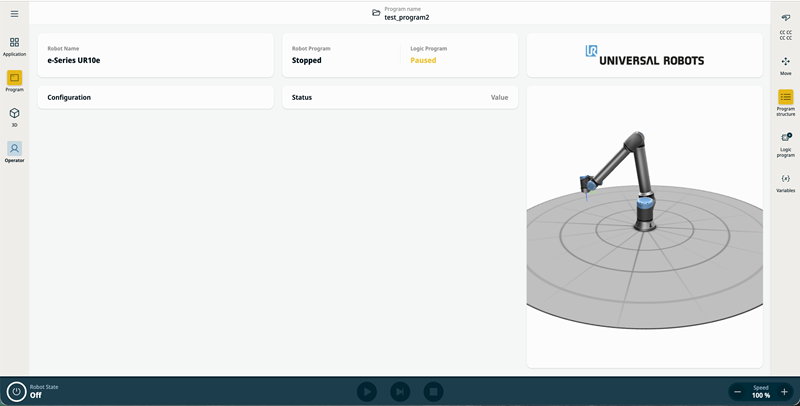
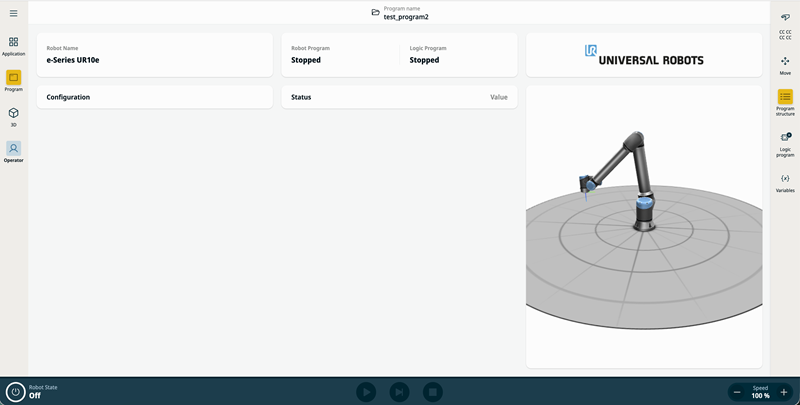
Status of the logic program on the operator screen
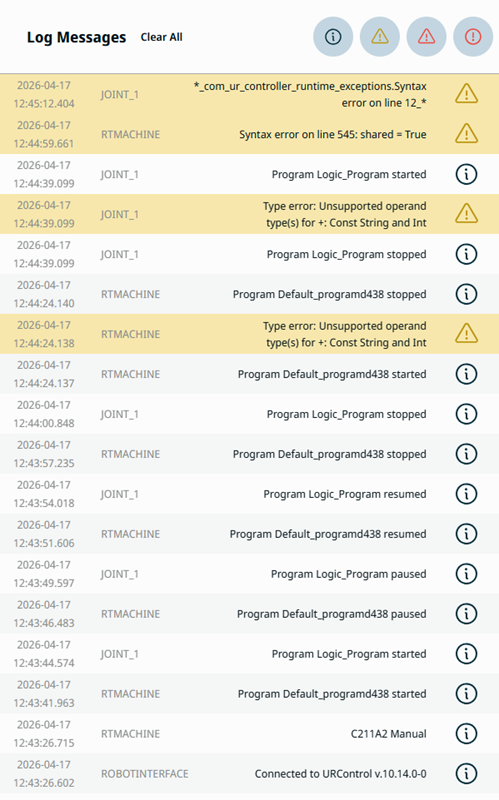
Error messages in robot log
Logic program error messages are visible in the same log as robot program messages.
Source is displayed as Logic Program.
View below shows messages from robot program and logic program interleaved in a single list.
Script functions
New functions
logic_program_set_watchdog(action=’pause’)
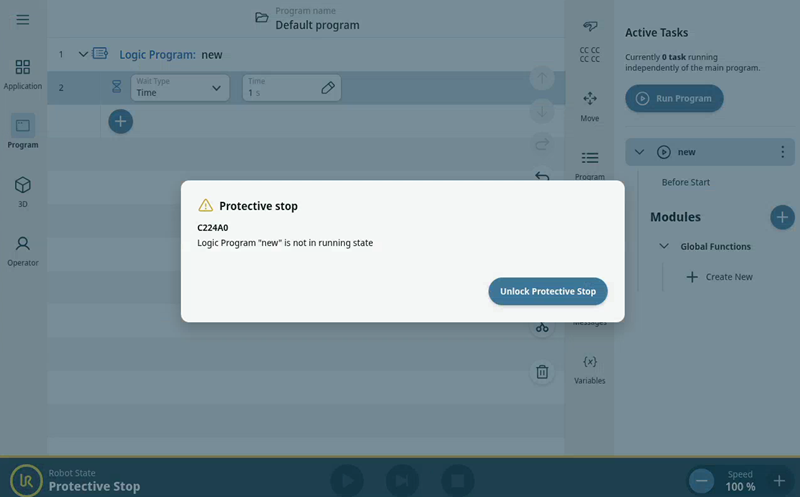
This function should be called only in the robot program watchdog in the robot program. The watchdog will be triggered when the logic program is not running. It should be used if the logic program is an integral part of the robot application.
Example reasons for stopping a logic program:
- programming error (runtime exception)
- halt or pause script commands
- manual stop from Teach Pendant
Parameters:
action: Optional: Either “ignore”, “pause” or “stop” the robot program. The default action is “pause”.
Return Value: None
Example Command: logic_program_set_watchdog("stop")
- action = stop the robot program if logic program stops running
simulator_fault()
This function allows applications in URSim to simulate a safety system fault. This facilitates testing of error handling without a physical setup. The script function can be called either as a primary or secondary program while the robot is in ROBOT_MODE_RUNNING or as a secondary program when the robot is in ROBOT_MODE_POWER_OFF.
Return Value: None
simulator_fault_clear()
This function allows recovering from a simulated fault in URSim. The script function can only be called as a secondary program while the robot is in ROBOT_MODE_RUNNING or ROBOT_MODE_POWER_OFF.
Return Value: None
Sharing resources between robot and logic program
Most elements are managed independently for each program. That includes:
- each program has its own set of global variables
- each program has independent pool of threads
- starting/stopping and errors in robot program do not interrupt execution of the logic program
- “halt” instruction will stop only the program it was executed on
- application variables (“shared” variable type in URScript) are the most effective and thread-safe way of communicating state between robot and logic program.
There are however few limitations that programmer should be aware of:
- logic program threads execute on the same CPU as the robot program.
Execution time of all logic program threads will add to execution time of all robot program threads.
This can lead to “Runtime too much behind” violation in extreme case. - Some communication resources like Modbus signals or GP registers are shared resource.
Writing to the same register at the same time will have unexpected results. Moreover, currently observed behavior can change in the future when underlying implementation is optimized.
Following sections discuss side effects for individual fieldbuses.
Modbus Signals - interaction between robot and logic program
modbus_add_signal(…), modbus_add_rw_signal(…)
There is one Modbus client that is shared between robot program and logic program. Signals created in robot program are visible in the logic program.
If signal with identical parameters is already created then function has no effect.
If signal with the same name, but different parameters is added then it will replace previous signal immediately.
modbus_delete_signal(…)
Deletes Modbus signal for both robot and logic program.
Flexible Ethernet/IP Adapter instances - interaction between robot and logic program
Flexible instances can be used simultaneously in robot and logic programs. Certain provisions must be observed to prevent data access conflicts.
Example scenario:
- Robot program defines bits to open and close the CNC door—both request and status bits.
- Logic program defines bits to monitor machine state and periodically toggles a watchdog bit to signal robot readiness.
eip_reader_factory(…)
Both programs have to open own handles to the same Ethernet/IP instance. Data configured can be different for each handle.
eip_writer_factory(…)
Both programs have to open own handles to the same Ethernet/IP instance. Handles should not write the same data fields.
Limitations
- Subset of URScript instructions are available in the logic program.
- Program execution indicator and breakpoint based debugging are not available for the logic program.
- Interpreter mode is not supported in logic programs. Interpreter mode can still be started in the robot program while the logic program is running.
URScript Control API in Logic Program
The Control API provides URScript methods for controlling the robot arm state and program lifecycle. It allows application to power the arm on and off, release brakes, start/pause/stop robot program and query the current robot state.
Control API methods are available in both the logic program and the main program, and in threads. However, the primary use case is calling the Control API methods from the logic program to control the robot program — for example, an automatic startup routine that powers on the robot, starts the main program, monitors its state, and recovers from errors.
Most Control API methods require the robot to be in remote control mode. State query methods work in both local and remote mode.
Key Features
- Robot power control: Power the robot arm on and off from a logic program.
- Brake control: Apply power to joint motors and release motor brakes to prepare for program execution.
- Program lifecycle control: Start, pause, stop, and resume the main robot program. Allows to implement own input and output actions on interface signals (for example: Modbus signals or general purpose registers)
- State queries: Check remote control mode, arm power, motor power, safety state, and main program state.
- Error reporting: All methods return error codes so the logic program can handle failures gracefully.
Prerequisites
- Methods controlling the arm (power, brakes, program control) require the robot to be in remote control mode. These methods will return -1 if the robot is in local mode.
Known Issues
- UI node does not support assigning API call result to a variable.
Workaround: use Control API script functions directly. - UI node does not support calling status methods.
Workaround: use Control API script functions directly.
Port 80 Handling
Administrators can now control HTTP/HTTPS port access (ports 80 and 443) directly from the PolyScope X user interface. Previously, port 80 was always opened on system boot, and there was no user-facing way to manage it. This feature gives integrators explicit control over the firewall for these ports, which is essential when URCaps or external services need to be exposed — or locked down — on the robot's network interface.
Port 80/443 Toggle in Services Screen
A new toggle has been added to the Services screen that allows administrators to open or close ports 80 and 443 in the robot's firewall. This provides a clear, accessible way to manage HTTP/HTTPS access without needing command-line access to the system.
Persistent Firewall State Across Reboots
The port 80/443 firewall state now persists across system reboots. If an administrator closes port 80 in the Services screen, it remains closed after the robot restarts. Previously, port 80 was always re-opened on boot.
Breaking change: After this software update, the port 80 will be closed by default. Systems that depend on port 80 being open (e.g. for externally available URCaps) must re-enable port 80 in the Services screen after the update.
URCap Connectivity Warning
When port 80 is closed while an externally available URCap is active, the Services screen now displays a clear, actionable warning informing the administrator that port 80 must be open for the URCap to function. The message guides the user to the relevant network settings to resolve the issue.
Performance Optimizations
This release includes targeted performance improvements to program validation and the program loading pipeline, reducing wait times and providing better user feedback during long-running operations.
Validation Performance
The program validation engine has been optimized to reduce lag during program editing. Validation now runs faster without regressions in existing functionality, resulting in a more responsive editing experience — particularly noticeable on larger programs with many nodes.
Faster Program Loading
The program loading pipeline was profiled and optimized end-to-end. Investigation identified bottlenecks in the load sequence, and program upgrade operations were consolidated into the staging area module (removing redundant processing from the active program stores). This reduces the time between selecting a program and having it ready for use.
Improved Program Loading User Experience
Previously, loading a large program could leave the user interface in an unresponsive-looking state with no visual feedback. The loading experience has been reworked in two phases:
Part I — A progress dialog is now displayed while a program is being loaded and processed, similar to the Import URCap flow. The UI is locked during the load sequence to prevent user interaction with a partially loaded program. Additionally, upgraded-node information has been moved from a blocking dialog to a non-intrusive snack bar notification, reducing dialog fatigue.
Part II — The progress dialog now remains visible until the program is fully ready for use, ensuring the operator is never presented with a partially initialized program editor.
Signals discovery in Expression Editor
The expression editor now dynamically discovers and displays I/O signals from all registered sources, replacing the previously hardcoded signal lists. This is foundational work that enables third-party URCaps and platform-contributed sources to expose their signals directly in the expression editor.
Dynamic Signal Discovery
Previously, the expression editor only supported a fixed set of hardcoded I/O entries (e.g. digital_in[0..7], tool_in[0..1], config_in[0..7], analog_in[0..1], and their output equivalents). These have been removed and replaced with a fully dynamic approach.
Input and output signals are now populated from all registered SourcesNode entries at runtime:
- Input signals from sources with direction IN are listed in the expression editor's input tab
- Output signals from sources with direction OUT are listed in the output tab
- Signals are grouped by source name in the dropdown, with a fallback to the source ID when no name is provided
- Each signal's insertable value is resolved by calling generateGetSignal on the source's contribution behaviors — signals that return an empty script are automatically excluded
- Signal labels use the name property, falling back to signalID when no name is provided
What This Means for URCap Developers
Third-party URCap developers can now expose their I/O signals in the expression editor without any hardcoding on the PolyScope X side. As long as a URCap registers its signals through the standard SourcesNode contribution, they will appear automatically alongside built-in I/O sources.
Cursor support with external pointing device
Previously, the mouse cursor was disabled at the operating system level on the teach pendant, making it impossible to use an external mouse even when one was connected. With this change, the mouse cursor is now automatically enabled when an external mouse is plugged into the teach pendant. When the mouse is removed, the cursor is hidden again. This applies across all screens in PolyScope X.
Validation indicators redesigned
Validation errors are now shown with notification count badges and left-border highlights instead of yellow icon buttons, providing a cleaner and less intrusive experience across the sidebar, navigation, program tree, and settings dialogs.
Support for shared Application in new System/Program Manager
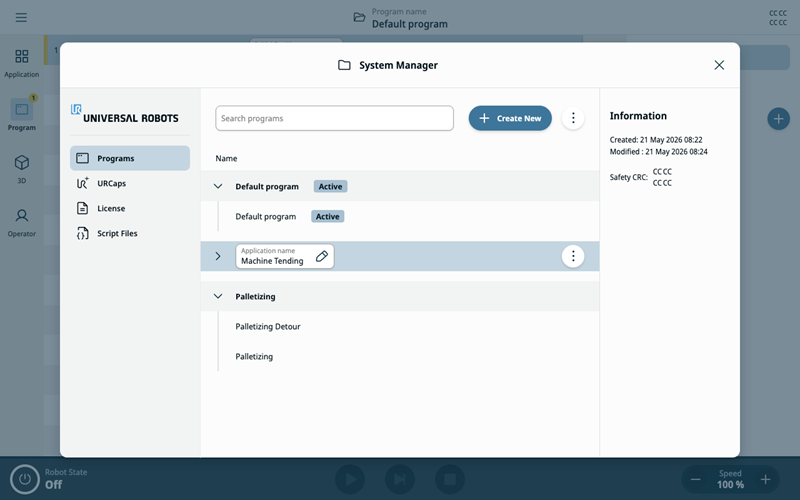
The Programs tab is updated to support handling shared Application. Single Application can now have multiple programs sharing the same Application settings. In the System Manager each Application is presented as a list that can be collapsed.
An Application is marked with bold text and the Active tag when the open program is using that Application.
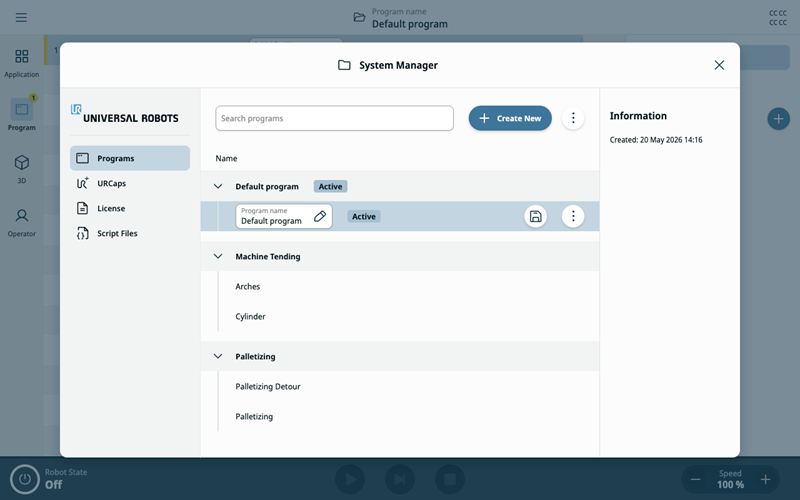
The Application row contains an input for renaming the Application, and a context menu.
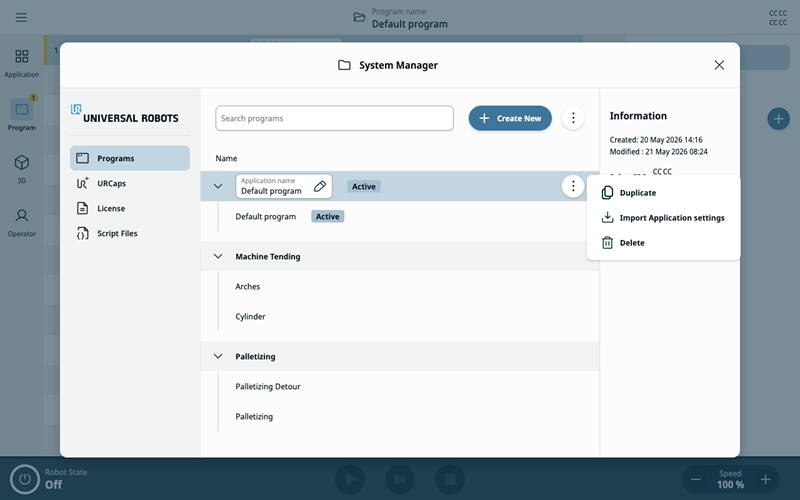
The context menu contains the following actions: Duplicate, Import Application settings, and Delete.
Delete Application
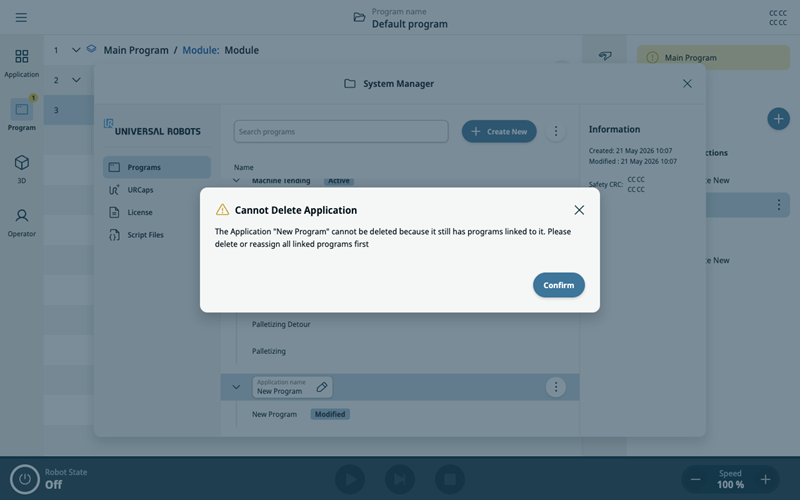
If you try to delete an Application, while it still has programs linked to it, then a dialog will be shown telling you that you need to reassign or delete the linked programs.
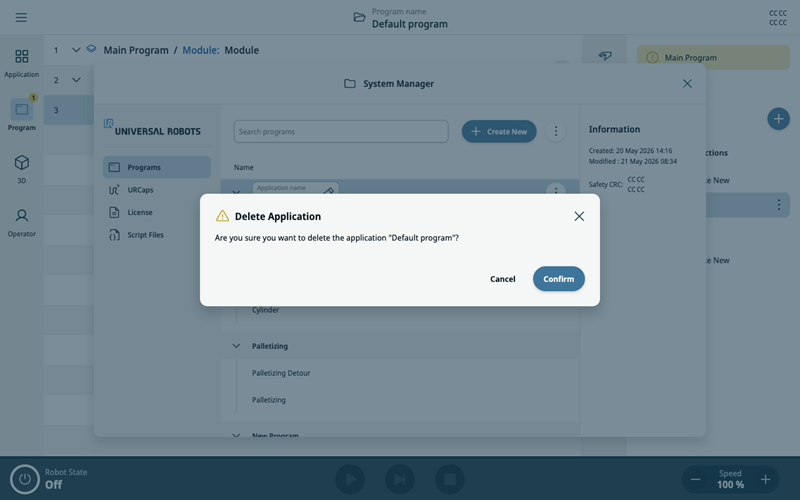
When the Application does not have any Programs linked to it, then a dialog will be shown asking the user if they really want to delete the Application.
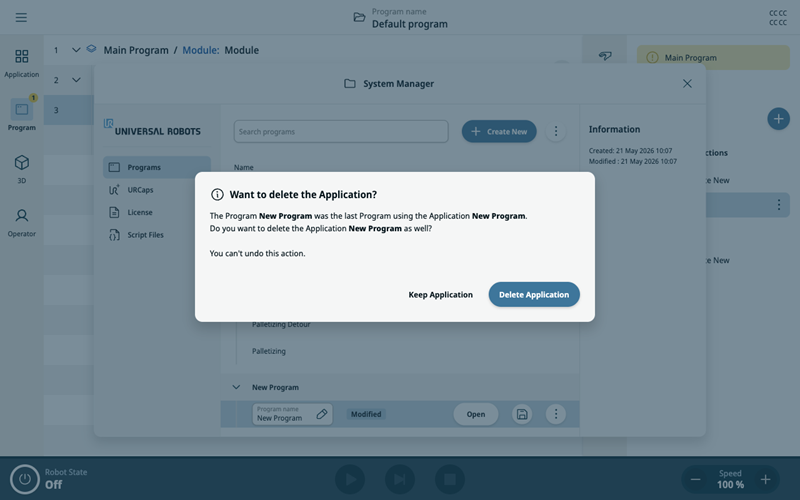
When user tries to delete the last Program linked to an Application, a dialog checks if they want to also delete the Application, removing both Program and Application.
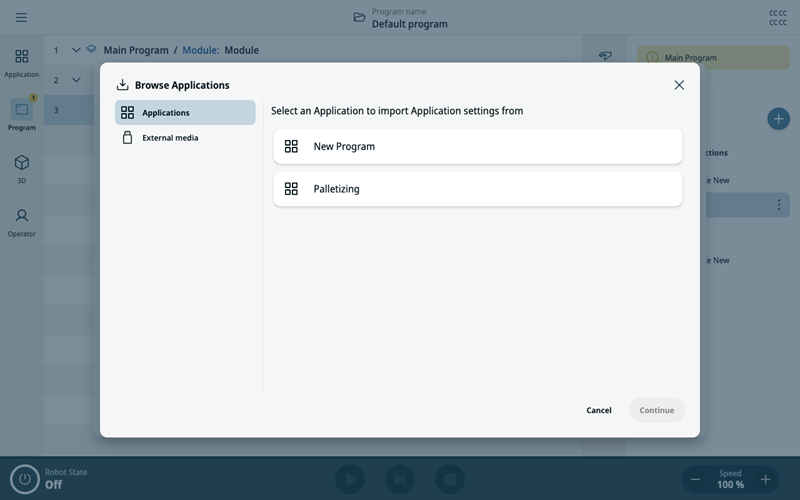
Import Application settings
The import application settings dialog has been re-designed, replacing list of Programs (since one program had one application) with the list of Applications.
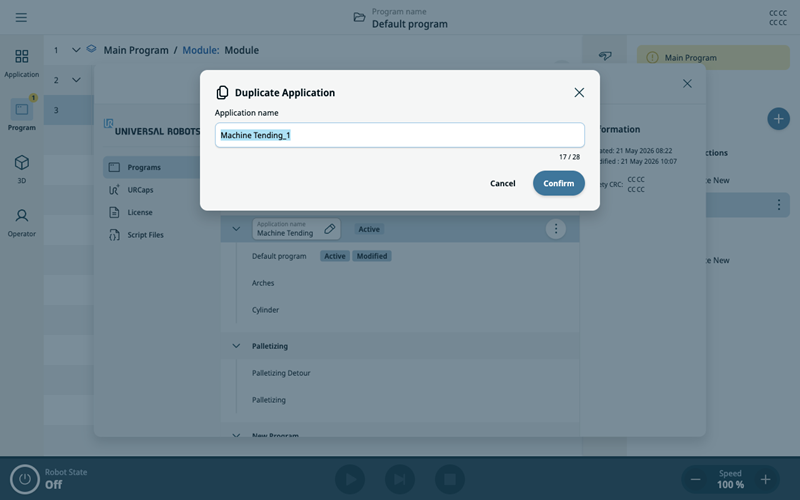
Duplicate Application
It is now possible to duplicate an Application. When duplicating, user is prompted to enter a name for the copy of Application.
Only the Application is duplicated. Programs using the Application are NOT duplicated.
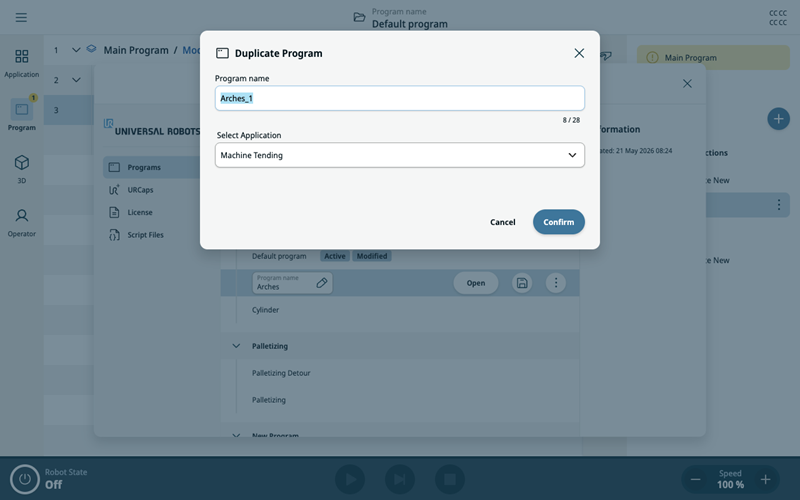
Duplicate Program
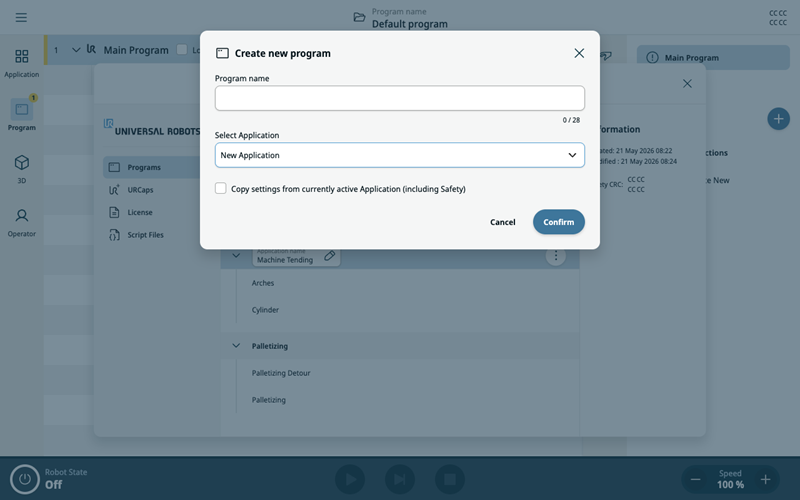
Previous version's Duplicate and Save as functionalities in programs are now combined to Duplicate. The Duplicate program dialog now allows to change the name and assign an Application for the program’s copy. The same dialog is used when creating a new program.
Change Application for existing program
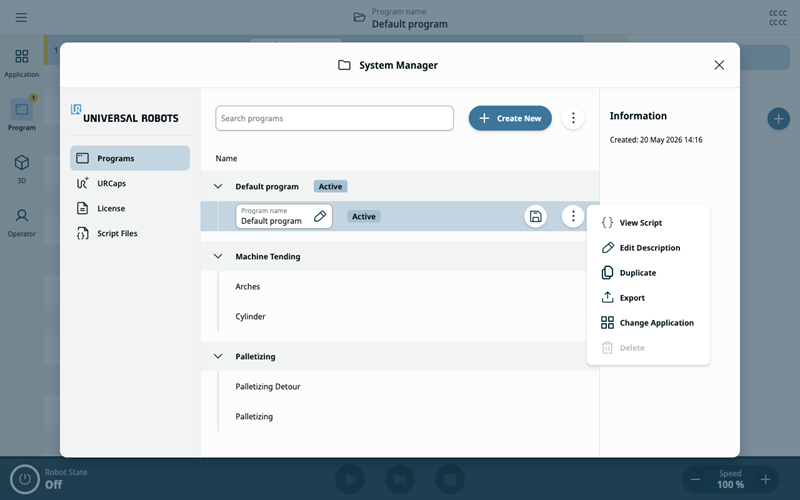
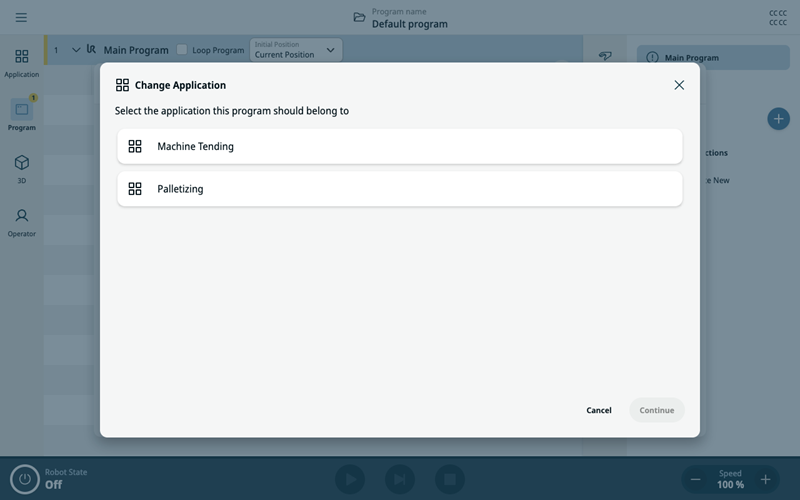
To change a Program’s Application, select the Program and open the context menu. Select Change Application. A dialog containing a list of Applications is shown, excluding the Application of the selected Program. Choose the Application the Program should use, then select Continue. The Program will now use the selected Application.
A valid Program is not necessarily valid in another Application. If the Program uses a grid or TCP, for example, from Application1 but is changed to use Application2 then the Program will be invalid.
It is the user’s responsibility to ensure that the Program behaves as expected.
Create new program and link/create Application
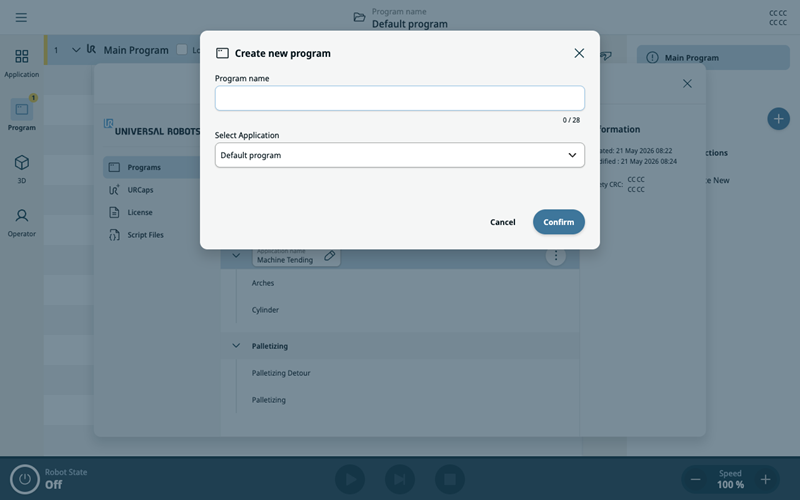
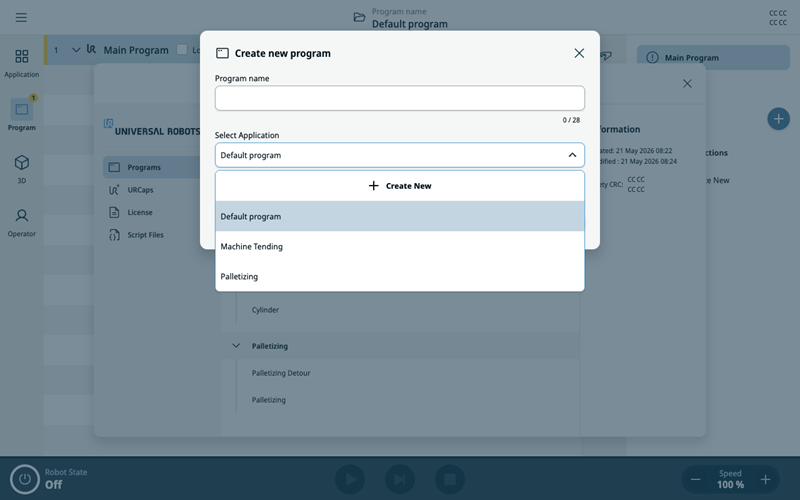
The Create new program dialog has been changed - the description field has been replaced with a dropdown for selecting which Application the Program should be linked to. It is also possible to create a new Application by opening the dropdown and choosing the Create New option. Create New opens a new dialog where a name can be chosen for the new Application. When creating a new Application an additional setting is shown, making it possible to copy the currently active Application settings into the new Application.
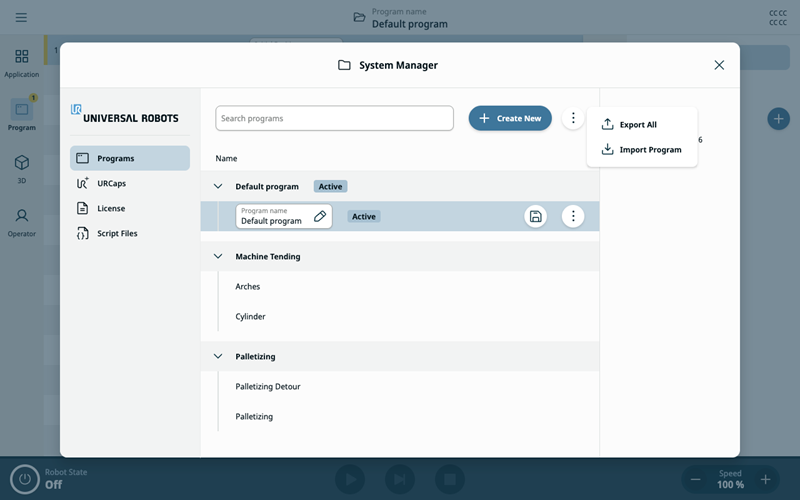
Export All and Import
The Export All and Import program has been moved into a context menu in the program manager. Previously Export All was besides the Create Program button, and the Import program was in the context menu of the Create Program button.
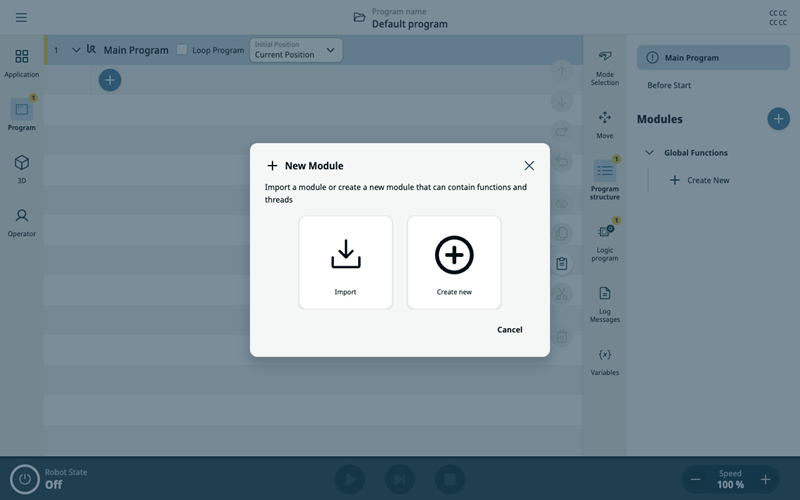
Export and Import of Modules
It is now possible to Export and Import Modules to and from an external media.
When creating a new module, a dialog is shown for Import a module, or Create new module. It is also possible to cancel the dialog, resulting in no new modules being added to the Program.
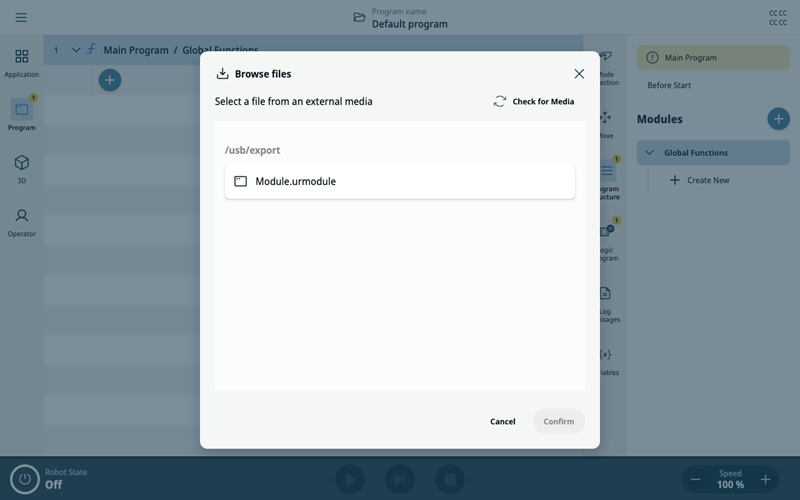
Selecting Import shows a dialog where modules can be chosen to import. Clicking Confirm after choosing the module will add the module to the program.
There are no validation of the program nodes in imported module.
It is not guaranteed that all program nodes that were previously valid in the module of another program will remain valid in the new program.
It is the user’s responsibility to ensure that the module works as expected.
To export a module open the Program structure sidebar and select the module name. Open the context menu of the module and click Export.
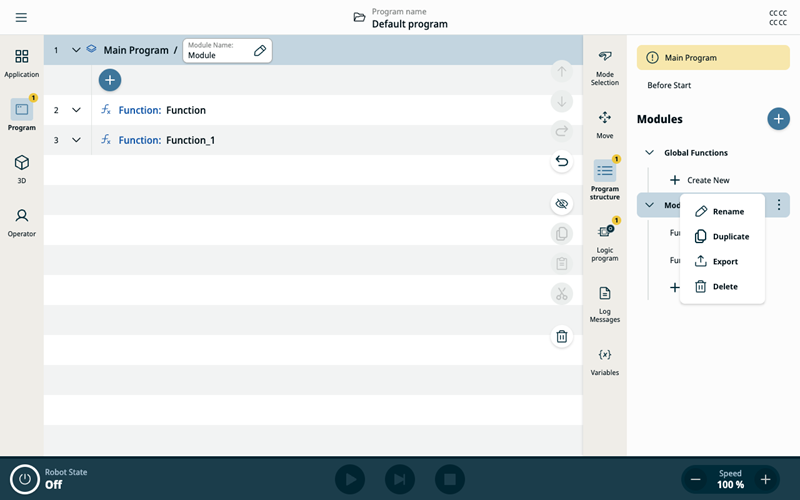
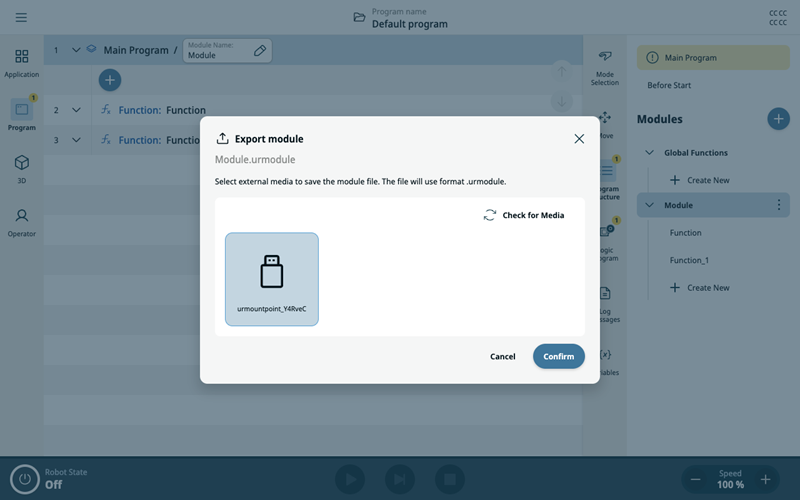
When exporting a module the user is presented with the standard export dialog. The file format for a module is .urmodule. Clicking Confirm will export the module to the selected external media.
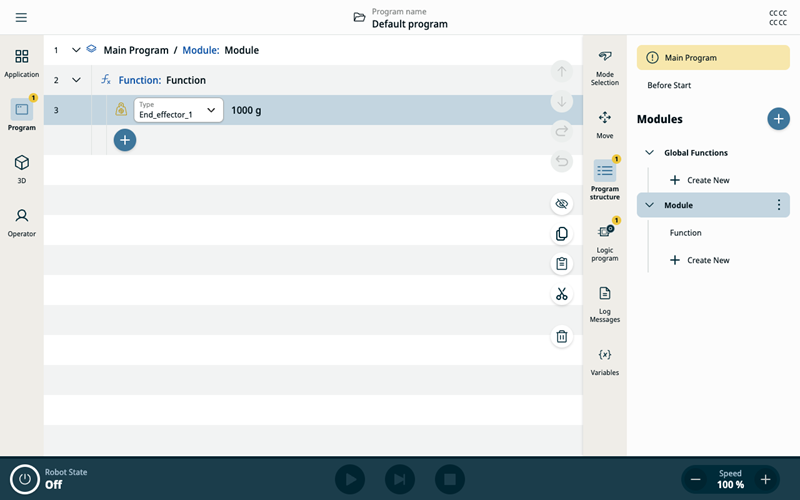
Module is valid when exported
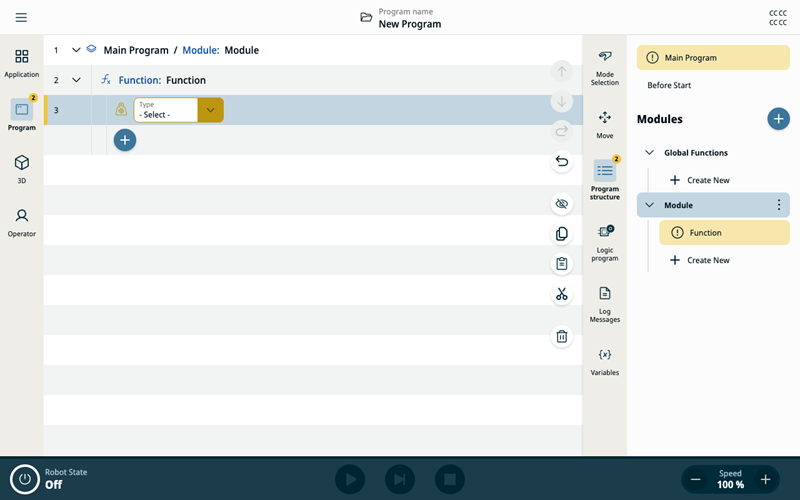
The same module becomes invalid in another program
In a program where End_effector_1 does not exist
Move To First Position
This feature has been added in the Program tab. User can specify a starting position for a particular program. The starting position can be selected from a drop-down menu at the top of the Program page, at the main node level. The drop-down lists the following options:
- Waypoints that are created in the Program.
- Any assignment variables used in the program that are of type waypoint.
- Home Position configured at the application level.
- Current Position, which is the default value for a program if no selection is made.
The user can select any one of these from the dropdown as the starting position for the program to ensure smooth execution of the program without getting into any Protective Stops or other errors.
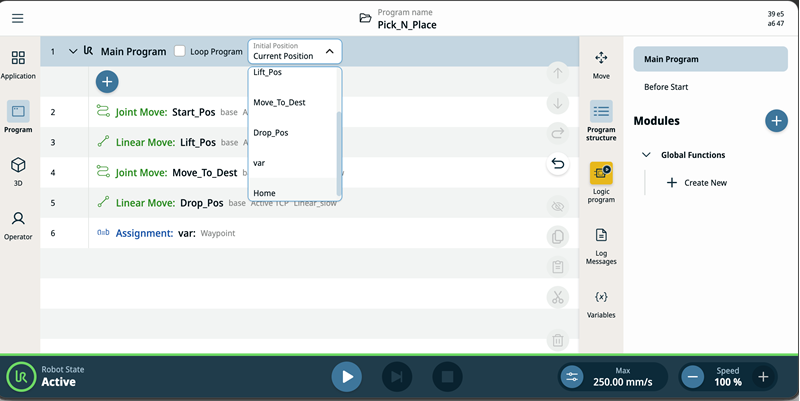
Functionality
- Starting position for the program has been selected as Current Position
- If user has selected the starting position as Current Position, when Play button is clicked, the program execution will start from the current position of the robot. This is the same as the previous behaviour
- If user has specified a starting position as a value other than the Current Position, when the program is executed, two scenarios can occur
- Current Position of Robot is different to the Starting Position
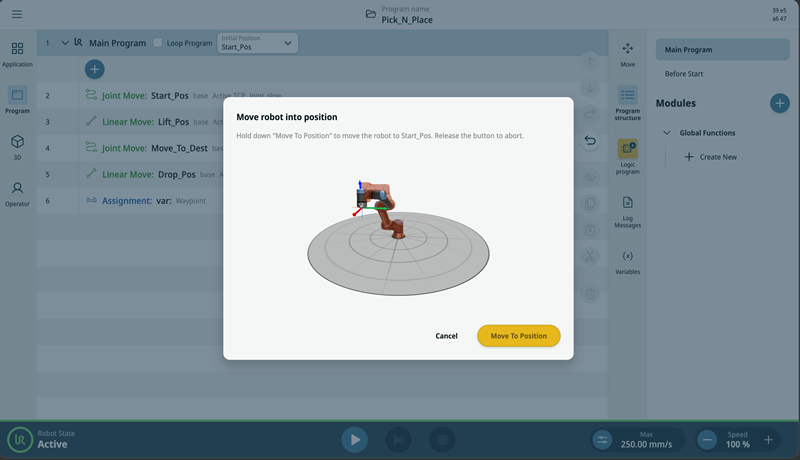
- In this case, a “Move to Position” Dialog is shown when user clicks the Play button
- The user holds the “Move to Position” button to move the Robot gradually to the Starting Position
- Once the Robot reaches the Starting Position, the program can be played
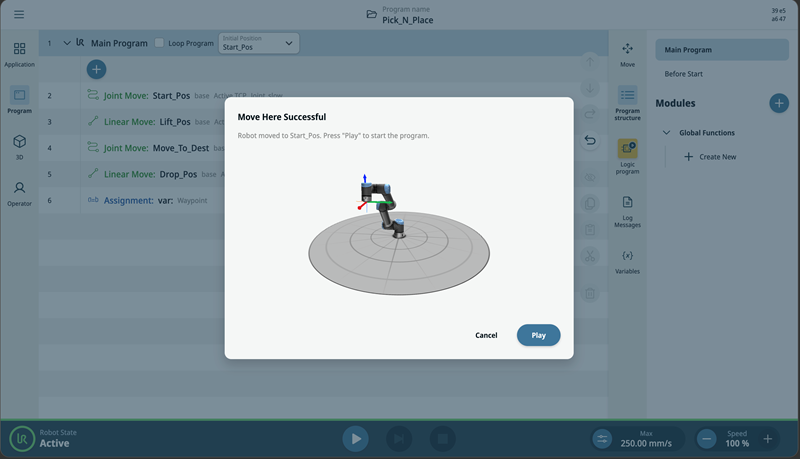
- Current Position of Robot is same as the Starting Position
- In this use case, when user clicks the Play button, the Program execution starts without displaying the “Move Robot to Position” dialog as the Robot is already at the Starting Position
- This will also be the case if user has not specifically selected a Starting Position in the dropdown.
Export To Scripts
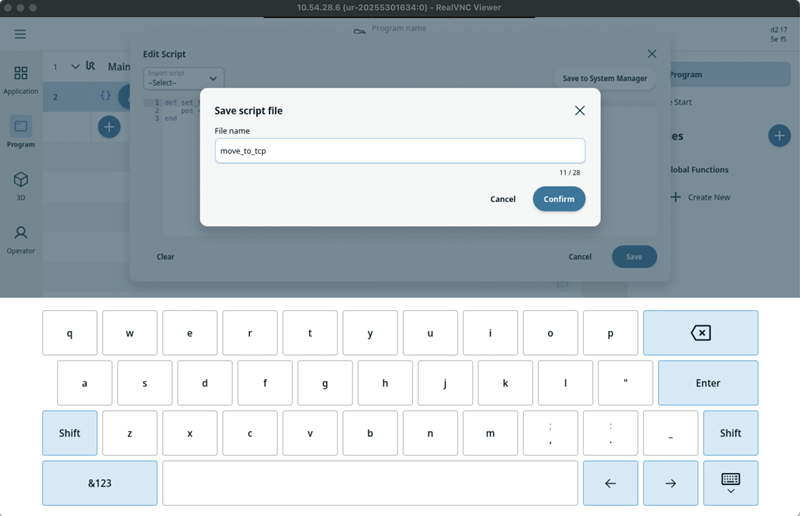
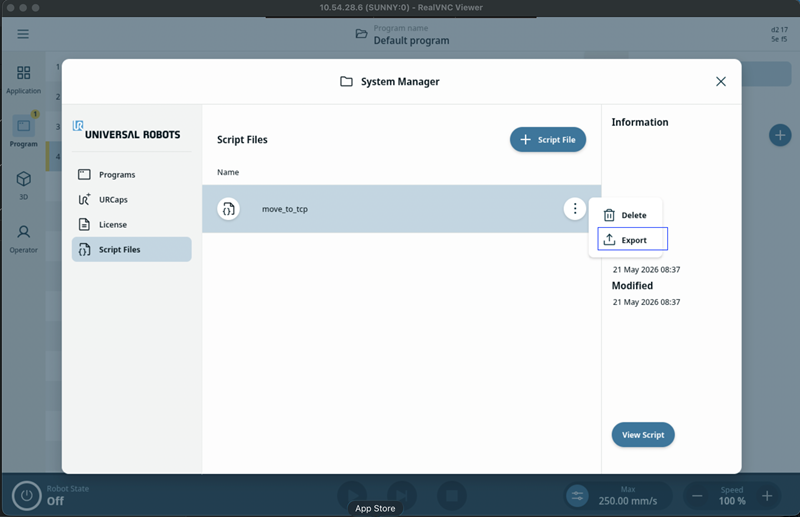
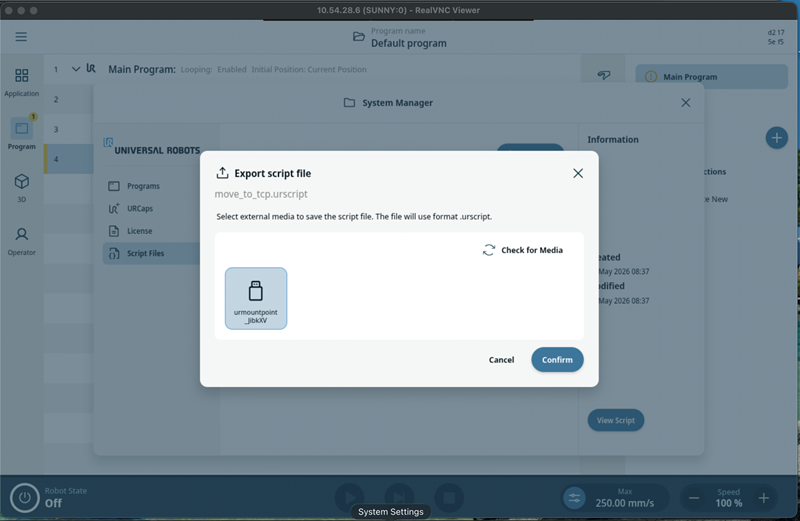
This allows user to Export Script Files to external USB device connected to the Robot or Teach Pendant. Additionally, the contents of a Script Node in the program can be saved to System Manager and then subsequently exported from the System Manager to an external device.
Save to System Manager
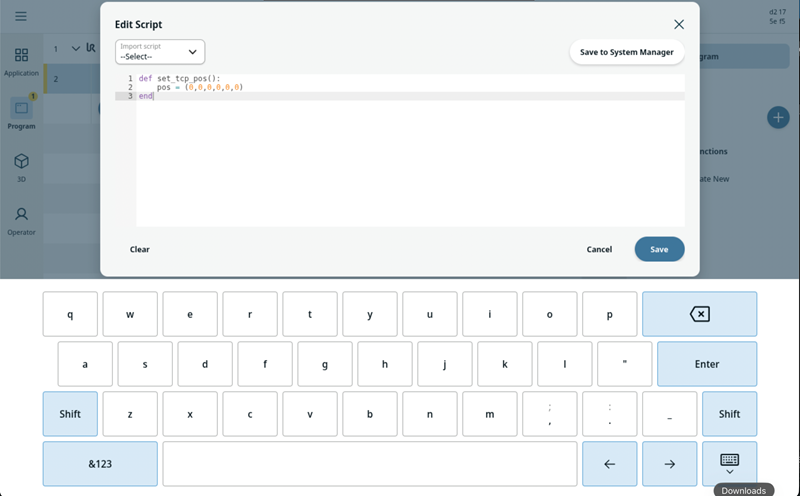
Export to External Device
Startup Program
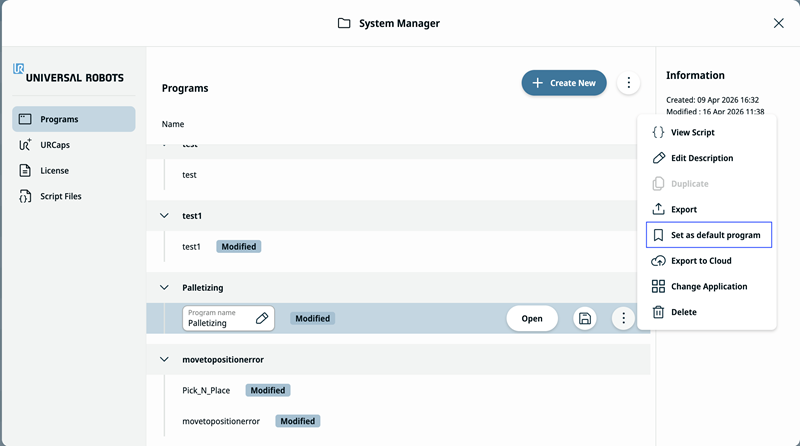
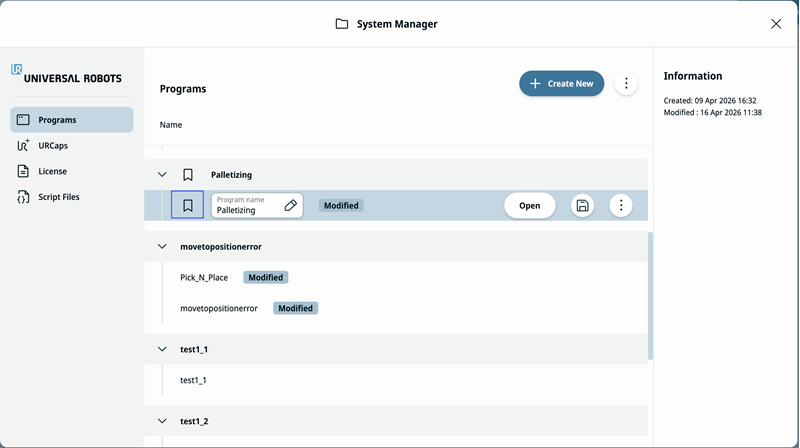
Set as default program option has been added in the System Manager. It allows the user to set a program as a default program. When the PolyScope X restarts or reloads, if a program has been set as default program, that program will be automatically loaded. If no program has been set as default, then the last opened program will be loaded.
Set Default Program
Select a program in the System Manager Page, click on the 3 dots menu and on Set as default program option to set a program as the default program.
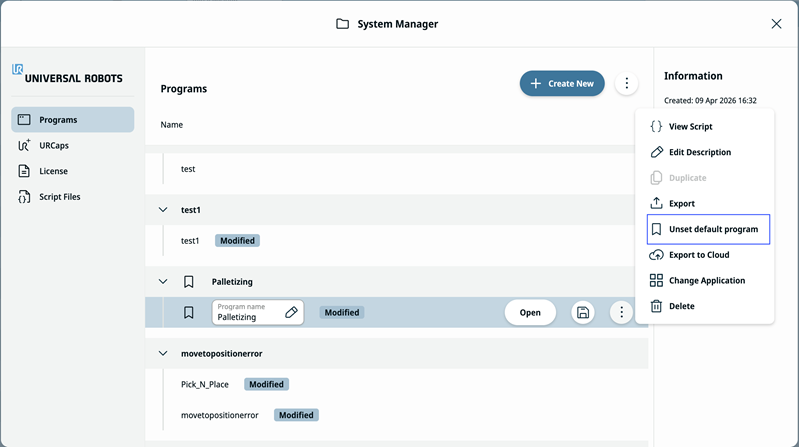
Unset Default Program
Clicking the 3 dots menu for the same program will allow the user to “Unset the default Program” as shown in the figure below. Until another program is set as a default program, PolyScope X loads the last opened program on restart.
Program Organization
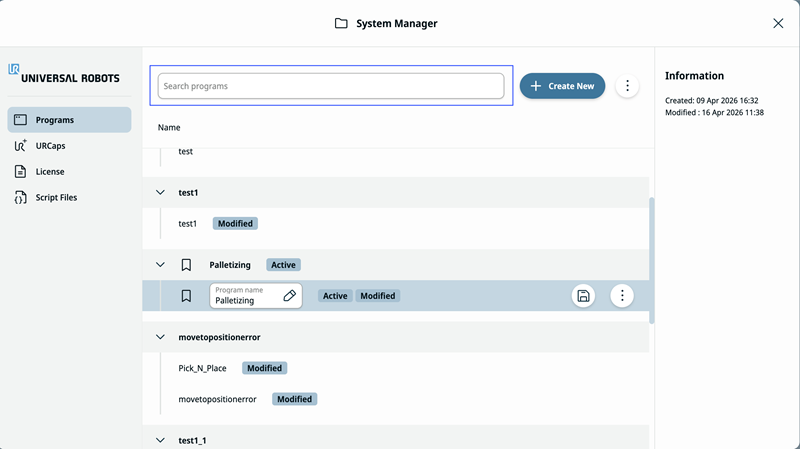
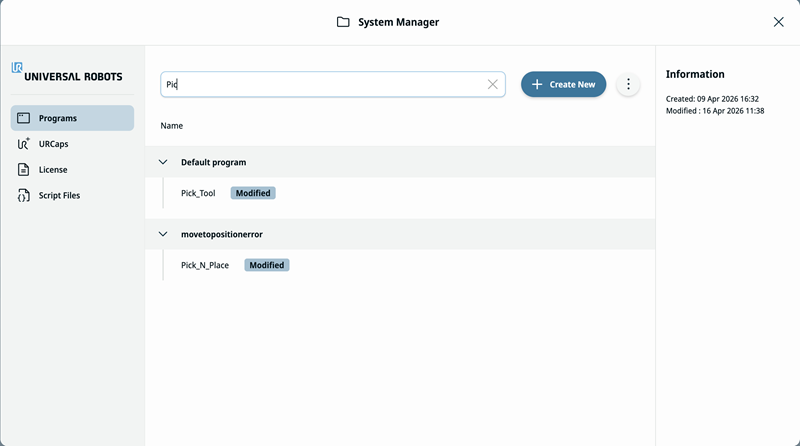
This feature allows user to search for Programs saved in the System Manager by name. It is a substring search hence if any part of a program file name matches the search criteria, the program will be listed in the dialog.
Predictive Search
The Program manager will have a search field. As the user types characters, the filter displays the programs that have these characters in their filename.
API
Robot API
Phase 3 of the Robot API expands the remote automation surface with new endpoints for popup management, operational mode control, flight report diagnostics, system information, robot logging, and remote shutdown. These additions enable integrators to build fully automated cells without manual interaction on the teach pendant.
Popup Management
Show popup — POST /robot-api/popup/v1
A new endpoint to display a modal popup on the teach pendant from an external application. The popup shows a title, a message, and an OK button. It must be dismissed before the user can interact with the rest of the UI. Multiple popups are stacked in order. Requires remote control mode. Returns an error with a descriptive message if the robot is in an error state.
Clear non-safety popup — DELETE /robot-api/popup/v1
Programmatically dismiss the most recently opened popup (one at a time), including popups opened by running programs or by the Robot API itself. Does not clear safety popups (protective stop, safety fault, emergency stop) or user configuration dialogs. Returns 204 on success, 422 if no closable popup is currently shown. Requires remote control mode.
Clear safety popup — DELETE /robot-api/popup/v1/safety
A new endpoint allows external applications to close safety popups shown on the teach pendant UI. This complements the existing DELETE /popup/v1 endpoint (which handles non-safety popups) by targeting safety-specific dialogs separately at a dedicated route. Returns 204 on success, 422 if no safety popup is currently shown. Requires remote control mode.
Important: This endpoint only dismisses the UI popup — it does not change the underlying safety state. For example, dismissing a protective-stop popup does not clear the protective stop itself. The safety system remains unaffected.
Flight Reports & Diagnostics
Generate flight report — POST /robot-api/supportfiles/v1
Triggers generation of a new flight report on the robot. Returns 200 when generation starts, along with instructions on how to retrieve the report once complete. Documented error codes include 408 (timeout), 507 (insufficient disk space), and 429 (too many requests). Requires remote control mode.
Download flight reports — GET /robot-api/supportfiles/v1
Returns all existing flight reports bundled in a single zip file. Returns 204 if no reports are available. Does not require remote control mode.
System Information
Get robot information — GET /robot-api/system/v1/information
Returns the robot's serial number and robot type (e.g. UR8L). Results are cached in memory for fast repeated lookups. Does not require remote control mode.
Get software versions — GET /robot-api/versions/v1
Returns the marketing version and baseline version of the software running on the robot (same values shown on the About screen). Does not require remote control mode.
Logging
Add robot log entry — POST /robot-api/log/v1
Write a custom log entry from an external application into the robot log. Entries appear in the System Info log viewer, are timestamped using system time, logged at INFO level, and tagged with a GUI source. Messages are restricted to 1000 characters and stripped of non-plain-text content. Requires remote control mode.
System Control
Shutdown robot — PUT /robot-api/system/v1/shutdown
Initiates a full OS shutdown of the robot. No confirmation dialog is shown on the teach pendant — the standard shutdown screen is displayed automatically. Returns 202 Accepted when the shutdown command has been accepted. Requires remote control mode.
Endpoint Summary
|
Endpoint |
Method |
Remote Mode Required |
Description |
|
popup/v1 |
POST |
Yes |
Show a popup on the teach pendant |
|
popup/v1 |
DELETE |
Yes |
Clear the last non-safety popup |
|
operational-mode/v1 |
PUT |
No |
Change operational mode |
|
operational-mode/v1 |
DELETE |
No |
Release API control of operational mode |
|
supportfiles/v1 |
POST |
Yes |
Generate a new flight report |
|
supportfiles/v1 |
GET |
No |
Download all flight reports as zip |
|
system/v1/information |
GET |
No |
Get serial number and robot type |
|
versions/v1 |
GET |
No |
Get software versions |
|
log/v1 |
POST |
Yes |
Add a robot log entry |
|
system/v1/shutdown |
PUT |
Yes |
Shut down the robot |
Firmware
There is new firmware bundled/released together with SW 10.14.0 and SW 5.26.0.
N.B. SW 5.26 will be a Long Term Support version, with support through to end 2027.
Hardware compatibility
|
Joint sizes |
Robot type |
HW compatibility updates |
|
e-Series robots |
||
|
0 |
3e |
NOT AFFECTED |
|
1 |
3e, 5e, 7e |
NOT AFFECTED |
|
2 |
3e, 10e, 12e, 16e |
NOT AFFECTED |
|
3 |
5e, 7e, 10e, 12e, 16e |
NOT AFFECTED |
|
4 |
10e, 12e, 16e |
NOT AFFECTED |
|
UR Series robots |
||
|
Sz 2f |
8f, 15f, 18f |
NOT AFFECTED |
|
Sz 2.5f |
20f, 30f |
MUST UPDATE |
|
Sz 3f |
8f, 15f, 18f |
NOT AFFECTED |
|
Sz 4f |
20f, 30f |
NOT AFFECTED |
|
Sz 4f v2 (fast) |
8f, 15f, 18f, 20f, 30f |
NOT AFFECTED |
|
Sz 5f |
20f, 30f |
MUST UPDATE |
Hardware Compatibility and Support
This release introduces firmware support for the updated hardware variants of Joint Size 2.5f and Joint Size 5f.
Robots produced before April 2026 must be updated with this software release when receiving new joints as the replacement parts. You must apply software update before installing the replacement parts.
Use the following table to find robot models corresponding to affected joint sizes:
|
Joint sizes |
e-Series robots |
Status of this software release |
|
0 |
3e |
Not affected |
|
1 |
3e, 5e, 7e |
Not affected |
|
2 |
3e, 10e, 12e, 16e |
Not affected |
|
3 |
5e, 7e, 10e, 12e, 16e |
Not affected |
|
4 |
10e, 12e, 16e |
Not affected |
|
UR Series robots |
||
|
Sz 2f |
15 |
Not affected |
|
Sz 2.5f |
20, 30 |
Must update |
|
Sz 3f |
15 |
Not affected |
|
Sz 4f |
15, 20, 30 |
Not affected |
|
Sz 5f |
20, 30 |
Must update |
Compatibility notice
Please note that PolyScope X (all versions) is only supported on Control box version 5.6 (CB5.6).
To verify your Control box version, please check the serial number label. It will clearly state "CB5.6" in the model name. If the version listed is not CB5.6 or not listed at all, your Control box does not support PolyScope X. If your robot is purchased as being a PolyScope X Robot, but you do not believe you have the right Control box, please contact Universal Robots with this information so we can ensure you have the right hardware.
All e-Series and UR series Robot Models can be upgraded to support PolyScope X. To do so, the existing control box must be replaced with a new control box version CB5.6. The CB5.6 is a drop-in replacement for all previous e-Series and UR series controllers. Please contact Universal Robots or your local Universal Robots Partner to learn more.
Important Notice: Upgrade to Software Version 10.13
Please be advised that downgrading from Software Version 10.13 to any previous version is not supported.
We strongly recommend conducting thorough testing before upgrading production environments to ensure compatibility and stability.
