
Release note Software version 10.12.x.
Applicable for e-Series and UR-Series
For latest release notes of PolyScope 5, please refer to Release note Software version 5.25.x.x
For further information please see the PolyScope X Software Handbook.
Date of release: March 19th 2026.
Download HERE
SW 10.12.1 Release Notes
Release Versions:
- PolyScope X robot image: 10.12.1
- URCap X SDK: Unchanged
- User Manuals: 10.12.0
Key Features
- Improved Force control to work close to singularities
-
Improved motion performance for slow movements on newly manufactured UR3e, UR7e, UR12e, UR16e.
-
25% better path tracking for movements such as welding.
-
-
Improved direct torque control.
Compatibility notice
Please note that PolyScope X (all versions) is only supported on Control box version 5.6 (CB5.6).
To verify your Control box version please check the serial number label. It will clearly state "CB5.6" in the model name. If the version listed is not CB5.6 or not listed at all, your Control box does not support PolyScope X. If your robot is purchased as being a PolyScope X Robot, but you do not believe you have the right Control box, please contact Universal Robots with this information so we can ensure you have the right hardware.
PolyScope X Upgrade Kits are available supporting all current Universal Robot models. Please contact Universal Robots or your local Universal Robots Partner to learn more.
Important Notice: Upgrade to Software Version 10.12
Please be advised that downgrading from Software Version 10.12 to any previous version is not supported.
We strongly recommend conducting thorough testing before upgrading production environments to ensure compatibility and stability.
Hardware Compatibility and Support
This release introduces firmware support for the following updated hardware variants. If your robot includes any of these components, you must update to this version before replacing or installing these parts:
-
UR20 (Joint Size 5)
-
UR30 (Joint Size 5)
Direct Torque Control V2
Direct Joint Torque Control enables low-level torque control. This script function must be called at each timestep; otherwise, the robot will revert to position control.
Based on feedback from the Direct Torque Control V1 feature released in versions 5.23 and 10.10, we have made significant improvements to friction and stiction compensation. Additionally, we have provided access to individually scale the viscous and Coulomb friction parameters for each joint. This enhancement offers greater flexibility to adjust the settings according to specific needs.
direct_torque(torque=[0,0,0,0,0,0], viscous_scale=<[0.9, 0.9, 0.8, 0.9, 0.9, 0.9]>, coulomb_scale=<[0.8, 0.8, 0.7, 0.8, 0.8, 0.8]>)
Arguments:
- viscous_scale: This is an array where you can define the scale of viscous compensation from the friction model, within the range [0–1]. This argument is optional. If not provided, the default scale will be [0.9, 0.9, 0.8, 0.9, 0.9, 0.9].
- coulomb_scale: This is an array where you can define the scale of Coulomb compensation from the friction model, within the range [0–1]. This argument is also optional. If not provided, the default scale will be [0.8, 0.8, 0.7, 0.8, 0.8, 0.8].
Deprecated friction_comp argument:
- The old friction_comp argument is still functional and enables the previous friction model. However, if used, a message will be logged the first time a program utilizes this deprecated argument. It will be ignored if any of the new scale arguments (viscous_scale or coulomb_scale) are provided.
PolyScope X User Interface
Controller
-
Updated the integrated admittance controller used in Force Control to function close to singularities. This fixes issues where the runtime exception “Force mode not possible in singularity” was thrown when the robot was not at a singularity.
-
Adjusted Force Control gains for UR8L and UR18 to better match other robots.
Firmware
Improved motion performance for slow movements
-
Improvements affect UR3e, UR5e, UR7e, UR10e, UR12e, and UR16e produced in 2026 or newer. Improvements are applicable to some older joints.
Bug Fixes
-
Fixed an issue where time_scale_source on the RTDE interface could report 1, even if the robot speed was reduced because of the joint speed safety limit. It now reports the correct source.
-
Fixed an issue where constrained Freedrive could briefly allow excessive speeds under strict safety settings before throttling again.
-
Fixed an issue where the Modbus server could stop replying to function code requests if a client connection was established shortly after controller startup.
-
Reduced likelihood of false positive C283A093 faults while performing protective stop.
Date of release: January 30th 2026.
Download HERE
SW 10.12.0 Release Notes
Release Versions:
- PolyScope X robot image: 10.12.0
- URCap X SDK: Unchanged
- User Manuals: 10.12.0
Key Features
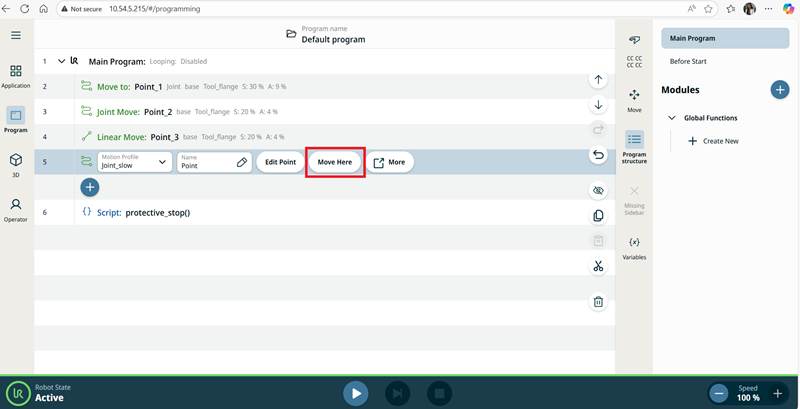
- Added "Move Here" button to Linear Move node and Joint Move node
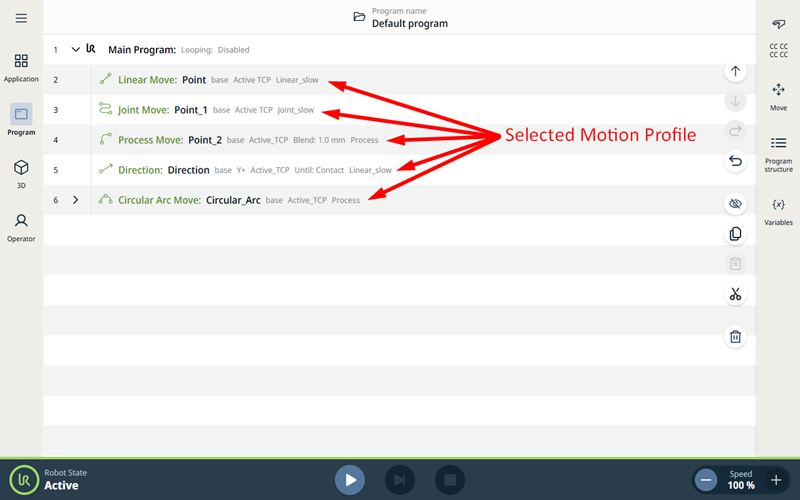
- Display Motion Profile label on Move Nodes
- Teach Pendant Selection - "None" Option in Safety Configuration
- Log Messages as a Sidebar contribution
- About Dialog
- Safety Settings for Wrist Clamping and changes to Safety Limits UI
- URCAPs can now control the tool settings
- PROFIsafe (licensed feature)
- PROFINET update
- Joint Verification Procedure after Joint Replacement
- Safe Home Position
- Logic Program (BETA only)
Compatibility notice
Please note that PolyScope X (all versions) is only supported on Control box version 5.6 (CB5.6).
To verify your Control box version please check the serial number label. It will clearly state "CB5.6" in the model name. If the version listed is not CB5.6 or not listed at all, your Control box does not support PolyScope X. If your robot is purchased as being a PolyScope X Robot, but you do not believe you have the right Control box, please contact Universal Robots with this information so we can ensure you have the right hardware.
PolyScope X Upgrade Kits are available supporting all current Universal Robot models. Please contact Universal Robots or your local Universal Robots Partner to learn more.
Important Notice: Upgrade to Software Version 10.12
Please be advised that downgrading from Software Version 10.12 to any previous version is not supported. We strongly recommend conducting thorough testing before upgrading production environments to ensure compatibility and stability.
PolyScope X User Interface
"Move Here" button in Linear Move node and Joint Move node
The Move Here button is added to move nodes, directly in the program tree. The robot arm could be moved into the node's corresponding position directly from the program tree.
Pressing the "Move Here" button opens the Move robot into position dialog
The button is visible when the waypoint has been taught.
The button is only enabled when the robot is in Normal or Reduced mode.
Motion Profile labels on Move Nodes
The Move nodes in the Program tree now display the Motion profile associated with each node. This feature enables user to see the selected Motion Profile on a Move node.
Move nodes with Custom Motion Profile will display the values for the speed and acceleration instead of the Motion profile name.
This feature is implemented on the following five move nodes: Linear, Joint, Process, Direction and Circular Arc
Safety Configuration withour Teach Pendant connected
Overview: A new option, "None", has been added to the Teach Pendant selection under the Hardware section of Safety settings. This allows robot to be safely powered up without a Teach Pendant connected to the Control Box.
If the robot is a UR-Series robot, an external 3-position enabling device must be configured, before the new safety configuration can be applied.
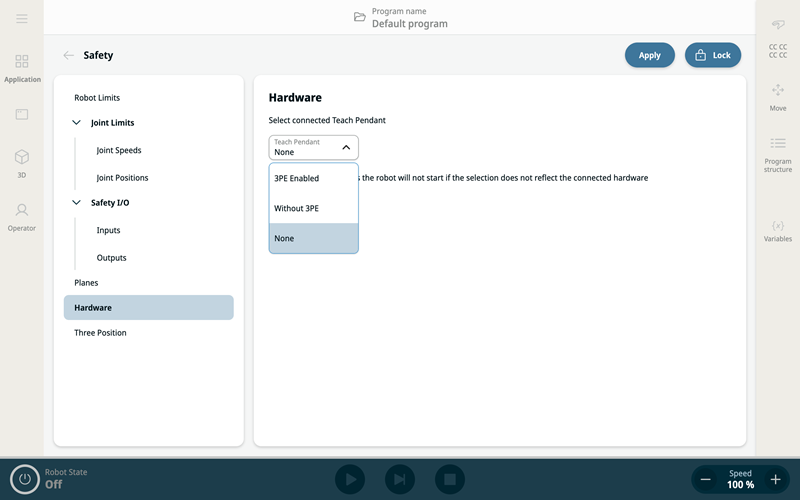
Purpose: This feature supports setups where a Teach Pendant is not required or physically present, enabling more streamlined and flexible deployments—especially in automated or remote-controlled environments.
Key Benefits:
-
Supports headless configurations where no Teach Pendant is used.
-
Simplifies hardware requirements for minimal setups.
-
Improves startup flexibility by removing dependency on Teach Pendant presence.
How to Use:
-
Navigate to Safety > Hardware > Teach Pendant Selection.
-
Select "None" from the available options.
-
Configure a 3-Position Switch (Only required for UR-Series robots)
-
Navigate to Safety > Safety I/O > Inputs
-
Select "3-Position Switch"
-
-
Save and apply the configuration.
-
The robot can now be powered up without a Teach Pendant attached.
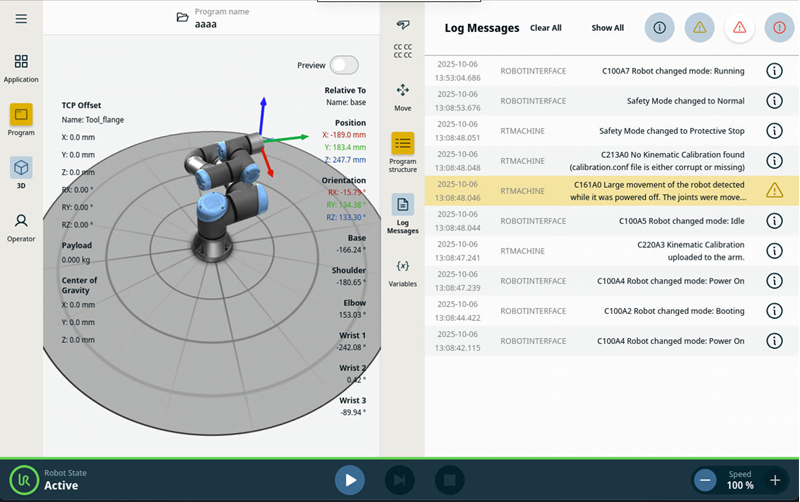
Log Messages in the Sidebar
It is now possible to view log messages in the Sidebar. It can be enabled in both Manual and Automatic Operational Mode.
This feature can be enabled under Application > Sidebar > Log Messages in the context menu when clicking on the three dots and choosing "Activate in Sidebar". Once enabled, a new button will appear in the Sidebar.
About Dialog
The About dialog now displays the complete software version, which includes both the Marketing version and the Baseline version.
Additionally, the dialog has been updated to show the robot model and its IP address, providing users with quick access to essential system information.

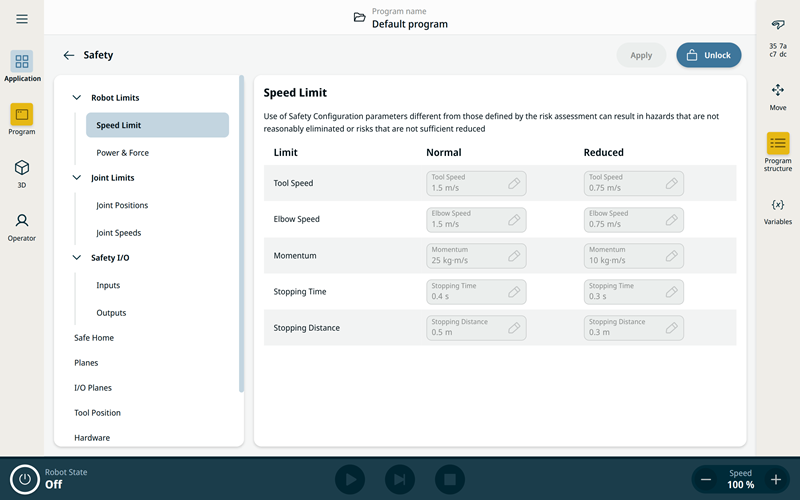
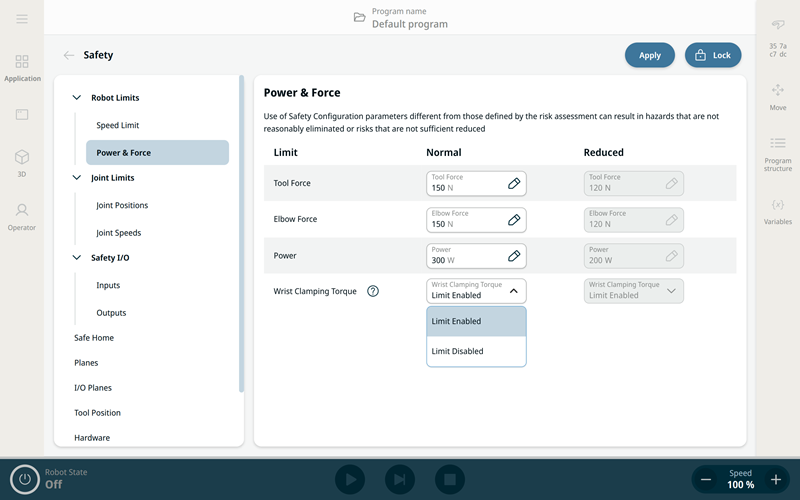
Safety Settings for Wrist Clamping and changes to Safety Limits UI
The Robot Limits settings have been split into Speed Limit and Force Limit.
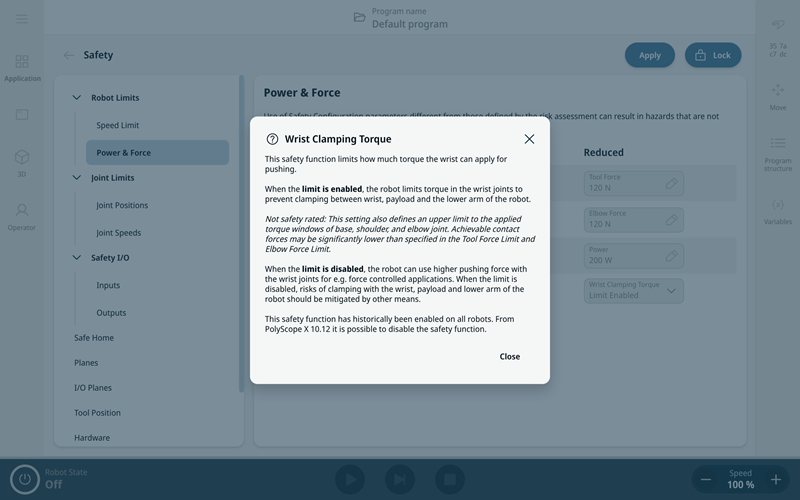
Wrist Clamping Torque Limit
Force Limit has a new setting for enabling or disabling Wrist Clamping Torque which is enabled by default.
This safety function limits how much torque the wrist can apply for pushing.
When the limit is enabled, the robot limits torque in the wrist joints to prevent clamping between wrist, payload and the lower arm of the robot.
Not safety rated: This setting also defines an upper limit to the applied torque windows of base, shoulder, and elbow joint. Achievable contact forces may be significantly lower than specified in the Tool Force Limit and Elbow Force Limit.
When the limit is disabled, the robot can use higher pushing force with the wrist joints for e.g. force controlled applications. When disabled, risks of clamping with the wrist, payload and lower arm of the robot should be mitigated by other means.
This safety function has historically been enabled on all robots. From PolyScope X 10.12 it is possible to disable the safety function.
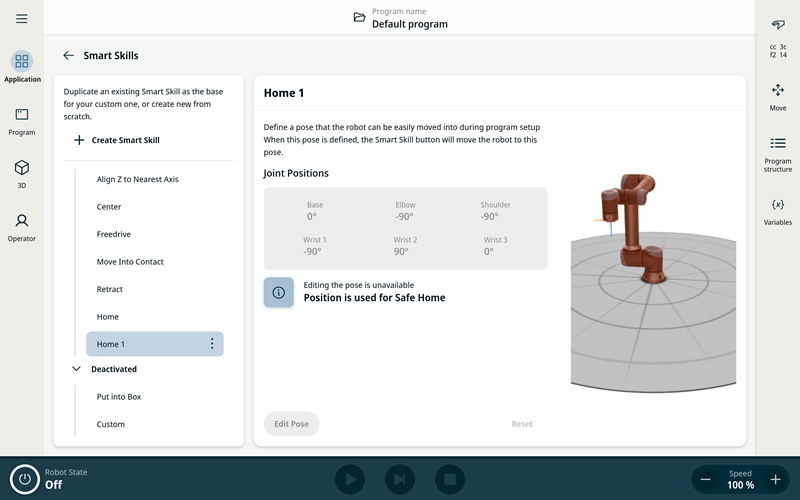
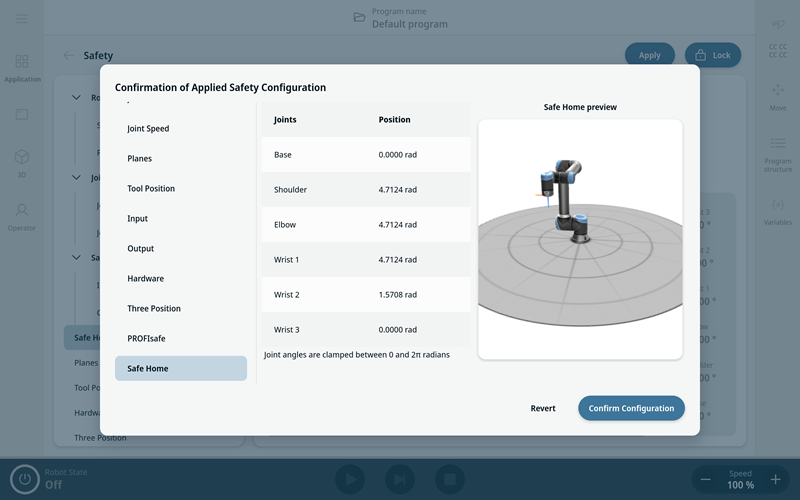
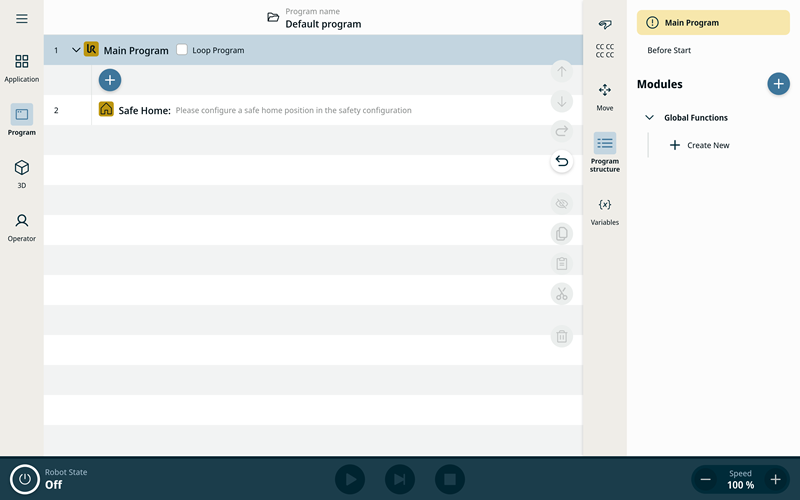
Safe Home
The user can define a safety-rated output that activates when the robot reaches the configured Safe Home position.
In the Safety > Safe Home panel user is presented with a dropdown of available Smart Skills positions, these are positions defined by Safe Home smart skill or user copies of that smart skill. One of these positions can be selected and assigned as the Safe Home position in Safety settings.
After Smart Skill position is selected from the dropdown the 3D view shows a static robot pose defined by the Smart Skill position.
Users can unassign the Safe Home reference by clicking the trash-can icon. This does not delete Smart Skill position.
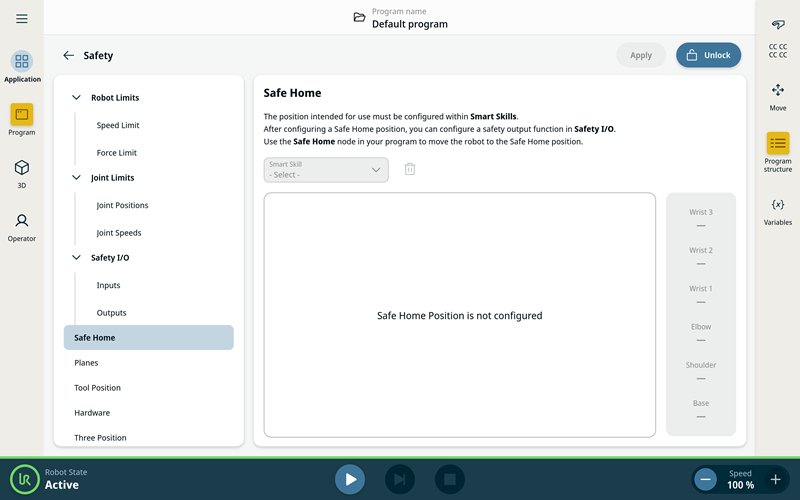
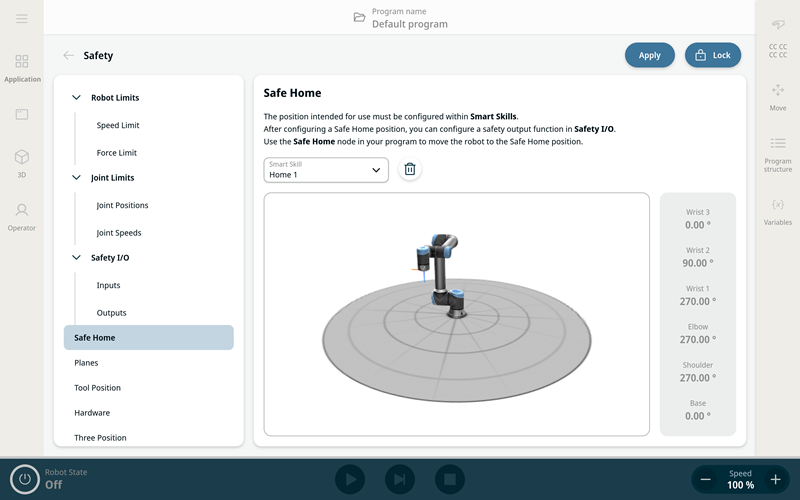
If the smart skill position is assigned as the Safe Home position in Safety > Safe Home following rules are applied:
-
A static message box is shown on the smart skill page for that position.
-
It is not possible to delete or rename the smart skill for that position.
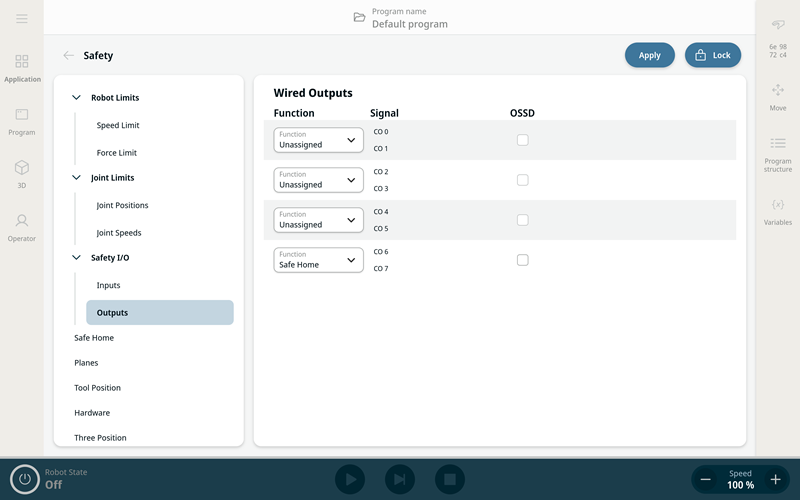
If the Safety > Safe Home has an assigned position the Safety I/O > Outputs function dropdowns will include a new function assignment: Safe Home.
Safe Home can be examined in the table of Function Assignment on the safety overview dialog.
Safe Home as a program node
A new program node called "Safe Home" is added to the "Move" category.
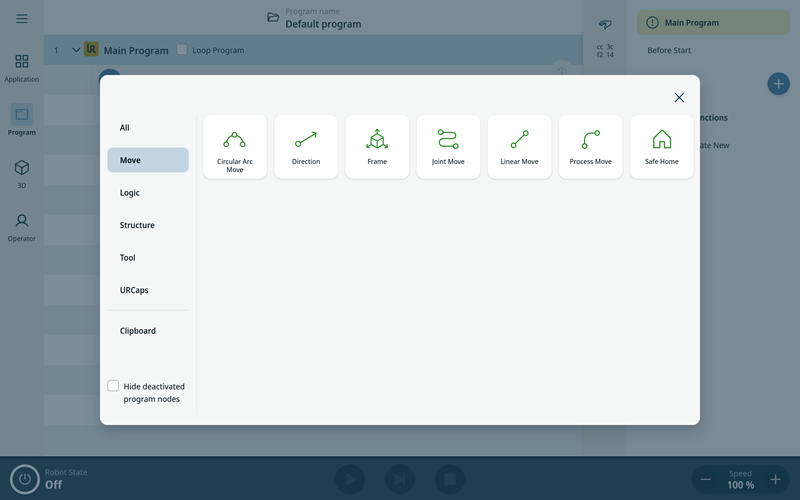
This node has motion profile option just like other move nodes. Moving to Safe Home position is always joint move.
Adding the node without a Safe Home position configured in the Safety settings will mark the node as yellow (incomplete).
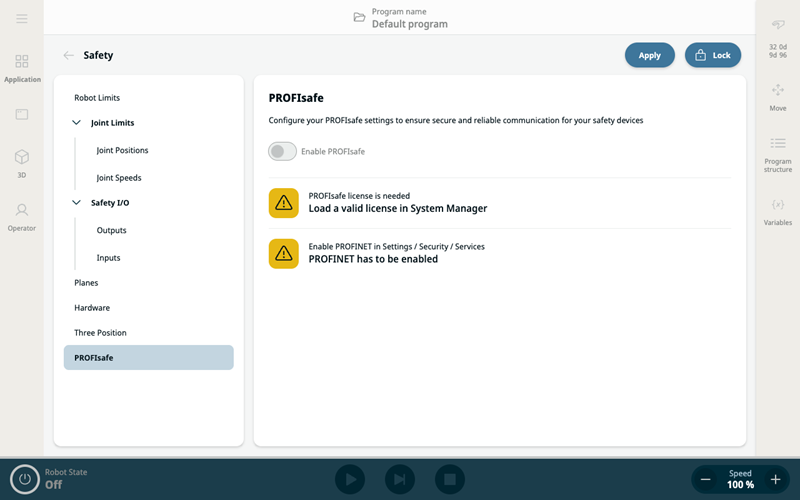
PROFIsafe
 Notice
PROFIsafe is available as a licensed software feature. A license must be purchased from an authorized distributor, then activated in the License Manager in PolyScope X for the feature to become available.
To get a time-limited trial license for application/solution development or demo purposes (not for full-time production purposes or redistribute), please reach out to UR Global Support.
This software release introduces the fail-safe communications interface, PROFIsafe to PolyScope X. The PROFIsafe interface allows robot to exchange messages with a Safety PLC regarding stops, operating mode, and other conditions.
|
The following fail-safe signals can be asserted or read by the Safety PLC |
|
|---|---|
|
PLC to Robot
|
Robot to PLC
|
Refer to the User Manual for further details.
A technical guide is available at the UR Support Site (https://www.universal-robots.com/articles/ur/interface-communication/profisafe-technical-guide-for-e-series/).
PROFIsafe Configuration
On the Safety application screen, a new PROFIsafe section has been introduced for configuring the robot to use PROFIsafe to communicate with a safety PLC.
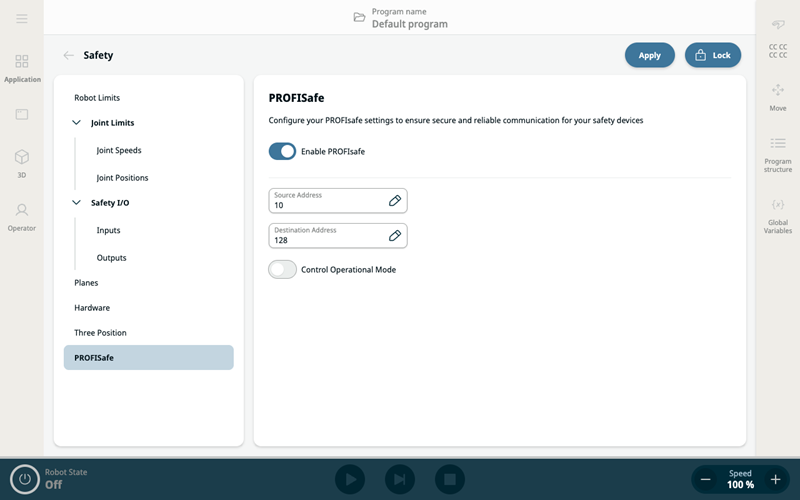
On this screen, a Source Address and Destination Address can be specified. These addresses are used by the robot and the safety PLC to identify each other.
There is also an option to enable the PROFIsafe PLC to control the robot's Operational Mode.
Please note that in order to configure and use PROFIsafe, PROFINET must be enabled by turning on the Profinet Device option on the Security > Services screen in the Settings menu.
PROFINET
This version introduces new profinet version with certification pending against PROFINET specification 2.45.
New GSDML file is available on the Tech Support site: https://s3-eu-west-1.amazonaws.com/ur-support-site/163396/GSDML-V2.45-UR-PROFIsafe-20251201.xml.zip
Backwards compatibility:
-
PLC programs made for previous software versions will run with no changes (Tested with Siemens 1500 and 1200 PLCs)
-
Internal configuration file for profinet is copied and migrated to the new PROFINET version.
-
New PLC programs should use the GSDML file released with this release.
-
Downgrade: All changes made after upgrade will be lost. Backup all data before upgrading.
One outstanding certification issue affects only legacy PROFINET controllers with Ethernet port set to 100 Mbit/s and autonegotiation off.
Updated PROFINET configuration screen shows IP settings and virtual ethernet port MAC address:
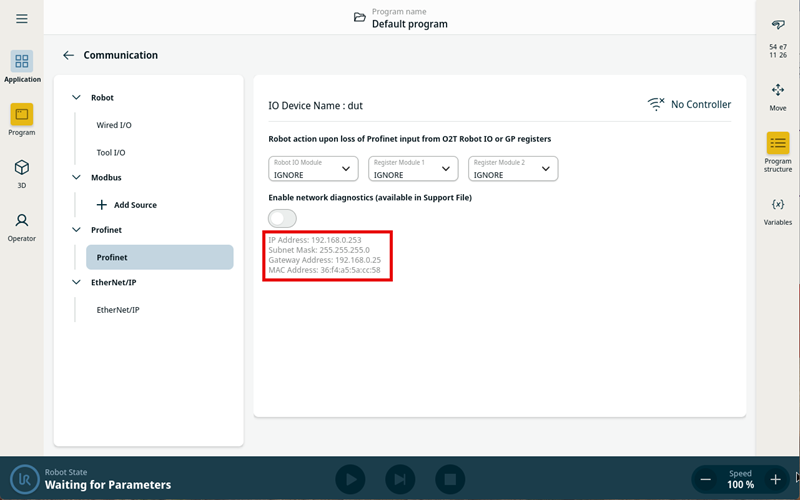
Note that those parameters are different than Polyscope X network configuration.
Joint Verification Procedure after Joint Replacement
After replacing any joint on a robot, the controller requires a Joint Verification process. This procedure ensures that each joint is correctly identified and calibrated in the system. The process now appears automatically during the first power on after a joint replacement.
-
Press POWER ON
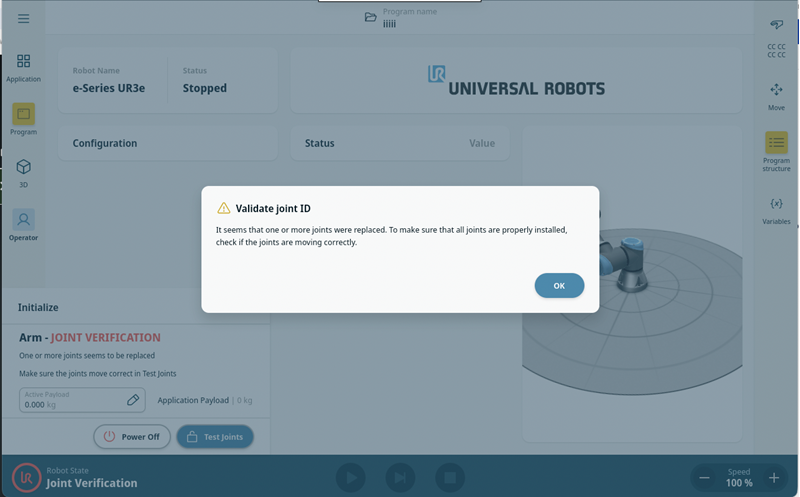
-
A message will appear indicating that the joints need to be validated. Press OK
-
Press Test Joints to start the verification process
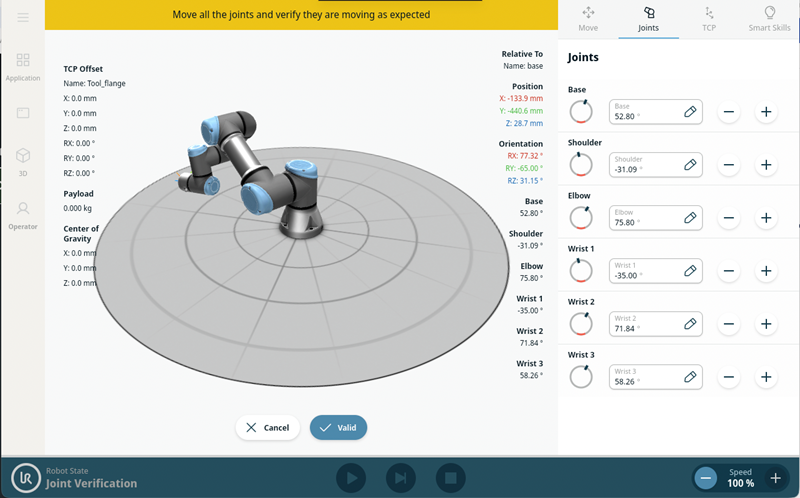
-
Use the arrows corresponding to each joint to move them:
-
If the joint moves as expected → press Valid
-
If the joint moves incorrectly (wrong joint or wrong direction) → press Cancel
-
Logic Program (BETA only)
Logic program feature allows to create a separate program running in the background. Program does not stop when the main program is stopped (either intentionally, or after exception like Emergency Stop).
Application examples:
-
React to external sensor inputs when robot is in stop mode (safeguard, protective stop, estop, main program pause, stop, etc.) or before arm is powered on
-
Maintain fieldbus communication (Modbus, Ethernet/IP, Profinet, Socket, XmlRPC)
-
Allow continuous cell logic opration while interrupted by operator entering safeguard area
-
Report robot state on attached light tower and actively report to production control software (Production PLC, SCADA)
-
Replace PLC controller entirely in some small robot cells
-
Controlled stop and continous monitoring of external equipment (welding, conveyor, glue dispenser) when main program stops or pauses
-
Building custom I/O actions. Custom actions can also be build using remote I/O extenders connected over fieldbus.
Notice: This feature is available as separate on-demand BETA release only.
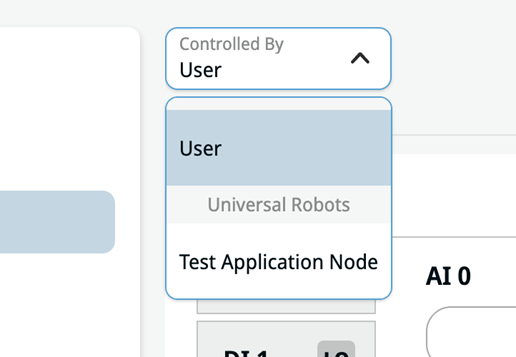
URCAPs can now control the tool settings
On the Application → Communication → Tool I/O page there is now a dropdown that will allow the user to select a URCap that can control the tool settings.
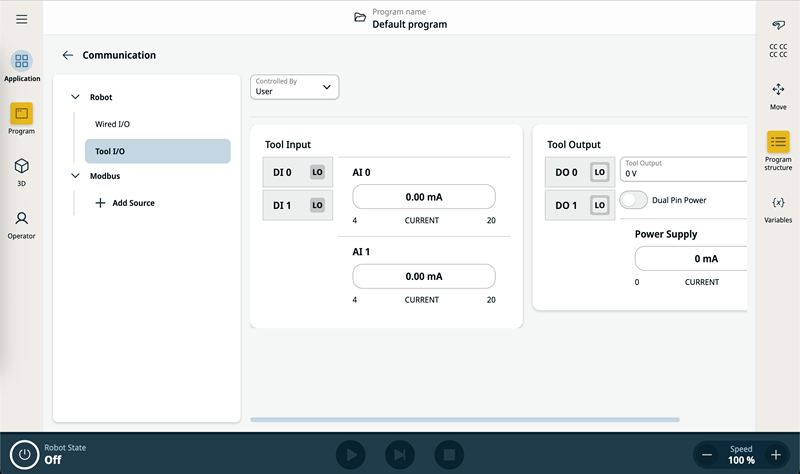
If a URCap has been installed that has this capability, it will be displayed in the list.
When selected, the URCap will be responsible for the following settings:
-
Tool Output. Setting either 0, 12, or 24 V
-
Dual Pin Power. Setting true/false
-
The Domain for analog inputs. Setting Current/Voltage per analog input, as seen in the popover when pressing on one
-
The Power Output for digital outputs. Setting Sinking/Sourcing/'Push/Pull', as seen in the popover when pressing on one
-
The Tool Communication settings. These settings are not available on the user interface, but are the enabled, baud rate, parity, stop bits, rx idle chars, tx idle chars
On selection of a URCap, and controls related to the above settings will be disabled.
The new settings will be applied when an entry is selected in the dropdown, when the program is loaded, and when the program is played.
API
Robot API
Introduction
The Robot API was first introduced in PolyScope X 10.11. For more information, please see the 10.11 Release Notes.
In this version we primarily added getter functionality to the Robot-api giving the integrators the ability to get robot states and programs. Documentation can always be found on a robot by visiting http://[ROBOT-IP]/universal-robots/robot-api/docs
Endpoints Summary
Programs Domain
Provides control over the robot's program library
-
PUT /programs/v1
-
200 Success file uploaded successfully
-
403 Forbidden
-
404 Program not found
-
409 Program is loaded an active
-
422 Validation Error
-
500 Internal Server Error
-
Function: Update existing program from .urpx file
-
Request format: multipart/form-data
-
Response Codes
-
-
POST /programs/v1
-
200 Success
-
400 Program with this name already exists
-
403 Forbidden
-
422 Invalid .urpx file format
-
500 Internal Server Error
-
Function: Import program from .urpx file
-
Request format: multipart/form-data
-
Response Codes
-
-
GET /Programs/v1
-
200 Success
-
500 Internal Server Error
-
Function: Get list of programs on the robot
-
Response format: JSON {programs: Array[ProgramInformation], message:string}
-
Response Code:
-
-
GET /Programs/v1/{name}
-
200 Success program streamed
-
404 Program not found
-
422 Validation Error
-
500 Internal Server Error
-
Function: Download program by name (.urpx file)
-
Request format: url
-
Response Codes
-
System Domain
Robot system related
-
GET /system/v1/controlmode
-
Function: Gets the robots current controlmode
-
Response Format: JSON {mode: 'LOCAL' | 'REMOTE'}
-
Response Codes
-
200 Success
-
408 Request Timeout
-
500 Internal Server Error
-
-
-
GET /system/v1/operationalmode
-
Function: Retrieve the current operational mode of the robot.
-
Response Format: JSON { mode: 'MANUAL' | 'AUTOMATIC' }
-
Response Codes
-
200 Success
-
500 Internal Server Error
-
-
Robot State Domain
Added functionality to get robot state related content
-
GET /robotstate/v1/safetymode
-
Function: Get the current safety mode
-
Response Format: JSON {mode: NORMAL | REDUCED | FAULT | PROTECTIVE_STOP | EMERGENCY_STOP}
-
Response Codes:
-
200 Success
-
408 Request timeout
-
500 Internal Server Error
-
-
-
GET /robotstate/v1/robotmode
-
Function: Retrieve the current robot mode.
-
Response format: JSON {mode: MODE*}
-
*Possible modes:
-
NO_CONTROLLER: Controller is not running
-
DISCONNECTED: Controller is disconnected
-
CONFIRM_SAFETY: Safety confirmation is required
-
BOOTING: Controller is booting up
-
POWER_OFF: Robot is powered off
-
POWER_ON: Robot is being powered on
-
IDLE: Robot is powered on and ready to break release
-
BACKDRIVE: Robot is in backdrive mode
-
RUNNING: Robot is powered and ready to execute a program
-
UPDATING: Robot is updating its firmware
-
-
Response Codes
-
200 Success
-
500 Internal Server Error
-
-
New Tool Control functions in ApplicationBehaviours
There are two new methods added to ApplicationBehaviours that allow a URCAP to specify tool control parameters
toolControllers?: ToolControllers;
This method allows a urcap to specify controllers that will appear in the Controlled By dropdown on the Tool I/O page. The ids returned by the method should be unique and should not change. They will be grouped in the dropdown by the vendorName of the URCAP
toolControlInfo?: ToolControlInfo;
This method allows the urcap to specify the tool I/O parameters if it has been selected in the dropdown
export type ToolOutput = {
dualPinPower: boolean;
voltage: Voltage;
powerOutput: Record<string, PowerOutputEnum>;
};
export interface ToolCommunication {
enabled: boolean;
baudRate: BaudRateEnum;
parity: ParityEnum;
stopBits: StopBitsEnum;
rxIdleChars: number;
txIdleChars: number;
}
export interface ToolControl {
toolAnalogDomainMap?: Record<string, SignalAnalogDomainValueEnum>;
toolCommunication?: ToolCommunication;
toolOutput?: ToolOutput;
}
If these parameters are specified, the appropriate urscript will be generated, and sent to the robot
-
When selected in the dropdown
-
When the program is loaded
-
When the program is played
Controller
-
The RTDE input interface was hardened. The controller is more strictly checking the input data size and will prevent buffer overflows by disconnecting the client. The recipe ID, frequency and string like inputs are sanity checked and rejected if they contain dangerous characters or out of range values. The RTDE receiver now uses an input rate limiter: it allows 10 messages in a burst, but after this it forces a ~2m pace time between message evaluation.
-
Velocity may be scaled down slightly in special scenarios to avoid robot stops. Only if: A Safety Force Limit setting is above 250 N and the base joint moves with high velocity, while elbow or tool are near the rotation axis of the base joint.
Documentation
Enhanced description of the RTDE protocol and data fields. Included possible values for enumeration fields such as robot mode and safety state.
Documentation is available at: https://docs.universal-robots.com/tutorials/communication-protocol-tutorials/rtde-guide.html