

Understanding Protective Stops
Protective Stops are safety driven warnings that occur when the robot approaches its operational limits. This guide explains why they happen and how to prevent them.

What is a Protective Stop?
A Protective Stop is issued when the controller detects that the planned trajectory cannot be followed. The robot decelerates along the path and the program can normally be resumed after the cause is addressed.
Different types of protective stops have different root causes and mitigations.
Common codes raised with Protective Stops:
- C153 and C159 position deviates from path
- C157 and C158 collision detected by joint
- C150 position close to joint limits
- C151 tool orientation close to limits
- C152 position close to safety plane limits
- C154 position in singularity
- C155 robot cannot maintain its position
- C156 wrong payload or mounting detected when entering freedrive
For further information on error codes, please see the Error Codes Directory.
What can cause a Protective Stop?
A Protective Stop can be caused by multiple reasons. To mention a few:
- Wrong payload or wrong mounting.
- External cabling dragging on the robot.
- Collisions
- Startup in cold environments
- Very high accelerations combined with blends
What happens if I ignore a Protective Stop warning?
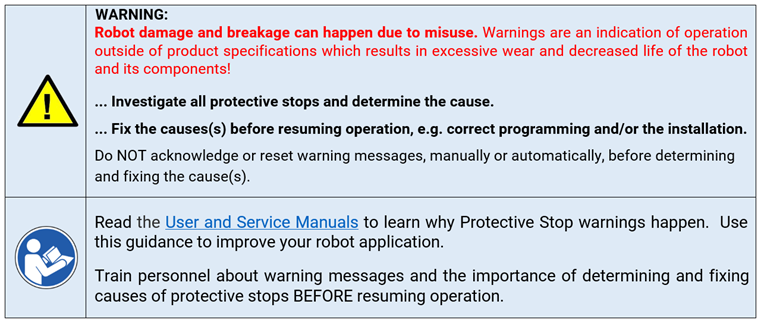
Ignoring Protective Stops is a misuse of the robot. Misuse voids the robot warranty. Misuse can void product certifications. Misuse can result in failure of the robot (or robot component part) which could expose people to risks due to the fault.
An application which has daily Protective Stops is designed incorrectly. Setting up automatic reset of Protective Stop warnings is prohibited. The robot application and/or the program must be modified to operate within robot specifications. Operation within specifications can be achieved by adhering to Universal Robots best practices as detailed in the User and Service Manuals.
The following shall be assured by application validation, training of personnel and supervising the use of robot applications:
- Trained personnel shall review the program and perform troubleshooting to determine the cause of all Protective Stop warning messages.
- Trained personnel shall be informed of this requirement.
- Trained personnel shall be instructed to investigate and fix the cause.
- A deliberate action by a user shall be required to resume operation after inspecting, reviewing and acting upon the cause of the warning.
- If an integrator or end-user programmer has set-up the application program to do automatic acknowledgement and reset of Protective Stops, the robot program/system needs to be corrected immediately.
- Protective Stop warning message, SHALL NOT be reset without a review to determine the fault’s root cause.
- The USER shall determine whether service is needed and how quickly to get service performed.
- The USER shall inform and ensure personnel are trained about the following:
- The use and purpose of protective stops.
- How to investigate and correct the cause of protective stop warning messages.
- Acknowledging and resetting warning(s) to continue operation without fixing the root cause can void the warranty and product certifications. This is misuse where the robot could be damaged or break and possibly cause injury to personnel.

Please download the manuals for reference on Universal Robots’ support site: http://www.universal-robots.com/support. You will also find other reference materials on this website.
What can be done to avoid Protective Stops on your robot? What are the corrective actions?
1. Check installation settings and make sure the following settings are correctly configured:
- Payload
- Tool Center Point
- Center of Gravity (center of weight for the end-effector and part)
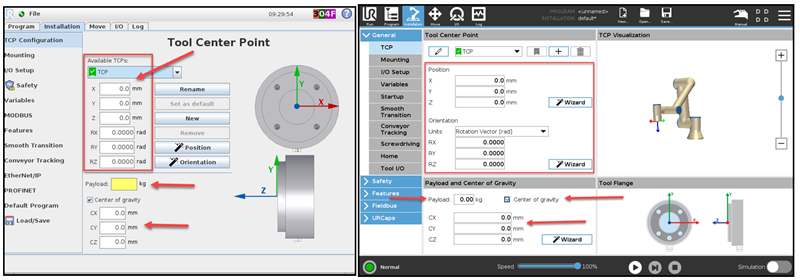
If you are unsure about how to configure and how to adjust/set these important settings in your robot program, request information or training from your Universal Robot’s distributor.
2. Check safety settings and verify if settings are correct according to the results of the risk assessment and validation of the application.
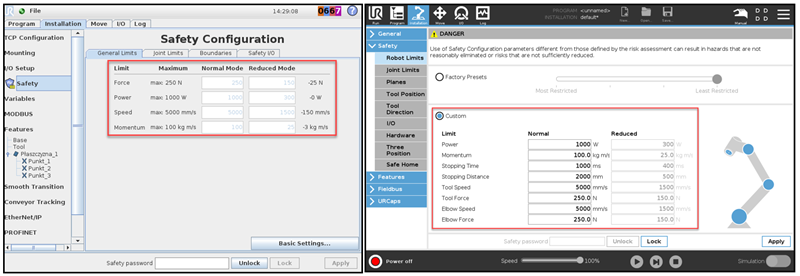
Example of where to find the safety parameter settings that need to be checked
3. Force exertion excess: verify that the robot does not push excessively in pick-up positions, thereby creating unwanted forces that can cause Protective Stops. Re-teach relevant waypoints to avoid collisions. If needed, use the Force command instruction on these positions to allow the robot to reduce the stress generated and thereby reduce the likelihood of Protective Stops.
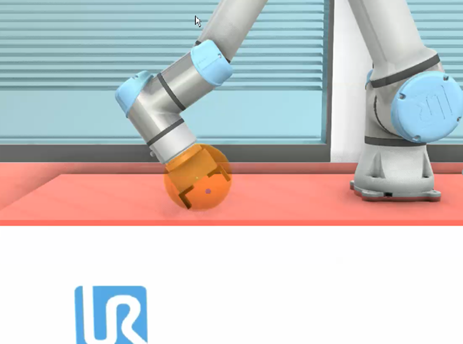
Example of the end-effector getting caught or exerting high forces
4. Acceleration settings: the robot should be programmed to make smooth transitions between points without creating stressful situations where the arm is being over stressed while meeting the cycle time requirements. Blends should be used to optimize paths wherever possible before considering an increase of the acceleration settings. Exceeding the parameter settings can lead to high stress of the joints and cause Protective Stop warnings. Please review all your program’s speeds and accelerations.
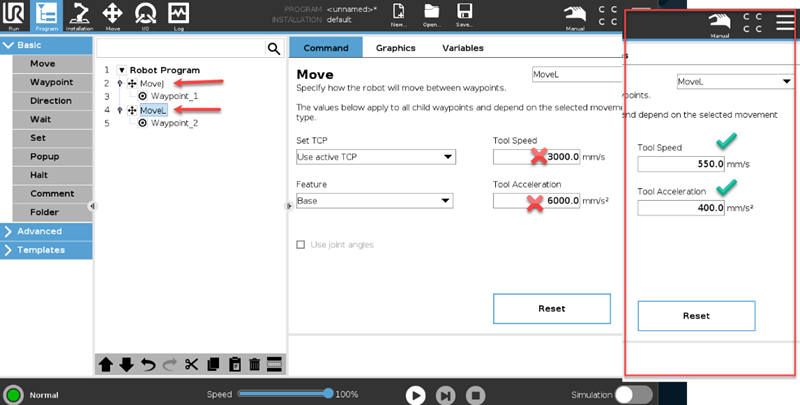
Example of how to change acceleration and speed parameter settings
5. Blend Radius: Using the blend radius resource on MoveJ, MoveL and MoveP allows the robot to go through waypoints without needing to decelerate between all waypoints. This reduces stress on robot joints and reduces application’s cycle time. Adding blends should be the first method to decrease robot cycle time before increasing the speed and acceleration settings. Blends should be added whenever the robot does not need to stop. Input a setting greater than 0mm, but no larger than the next waypoint’s total distance. If a very large blend radius is inserted, it will cause the waypoint to be skipped and the blend will not be executed. Skipping the waypoint will cause a warning message to be generated in the Log File. This warning message will be, “Overlapping Blends in a MoveL, a waypoint was skipped”. The Log Screen must be checked to track the results of the changes and enhancements.

The cycle time can be reduced by using the correct blend radius between waypoints
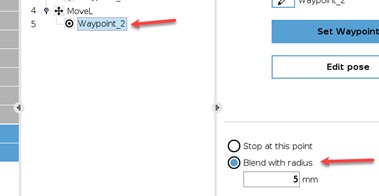
Example of how to add a blend radius. Click on the waypoint and then check Blend with Radius and enter the blend setting
6. Waypoints shifting: If the robot waypoints are being re-taught frequently and Protective Stop warnings are being generated, service is needed. Protective Stop warnings are an indication of faults being detected. To determine if service is needed:Check the robot according to the Inspection Plan in the Service Manual.
-
- Create a preventive maintenance plan for your system and execute it.
- Have the robot serviced by trained personnel, distributor or Universal Robots service center.
7. Mounting surface: The robot must be mounted on a rigid surface capable of withstanding at least ten times the full torque of the base joint (check torque values in Service Manual) and at least five times the weight of the robot arm. The surface mounting shall not introduce vibrations into the robot application. If the robot is mounted on a moving 7th axis, the acceleration and deceleration of that axis must be less than 1m/s2, causing minimal impact to the robot as the moving vibration can cause a Protective Stop warning. This happens because a high acceleration is applied due to forces and momentum applied. Refer to the User Manual for more instructions.
8. Wait command and “Check Expression Continuously”: On software versions prior to 3.12 (CB3) and 5.6 (e-Series), using wait commands or enabling "Check Expression Continuously" during robot motion may generate a Protective Stop. This can occur when the robot abruptly changes or interrupts its planned trajectory, creating high forces that trigger the Protective Stop.
If the use of a wait command or "Check Expression Continuously" is necessary, consider using stopl() or stopj() to bring the robot to a controlled stop before executing the next program section.
Note: This behavior was addressed in software version 3.12 (CB3) and 5.6 (e-Series) and is not expected to occur on later software versions.
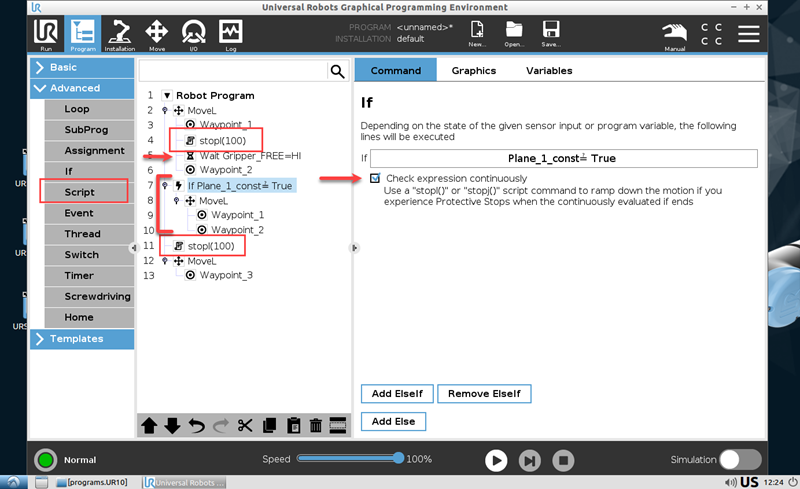
Example of the usage of a script command stopl() and stopj()
9. Thread used too much time: If a Thread parallel command is used and the update frequency exceed the robots, the runtime interpreter will read this Thread command sequence as an infinite loop. To avoid this situation, use a wait command of short duration or add a sync() script function to avoid runtime errors that result in Protective Stop warnings. This occurs inside the Robot Program thread as well in case there is not a wait, sync(), loop, if/else or move command being executed.
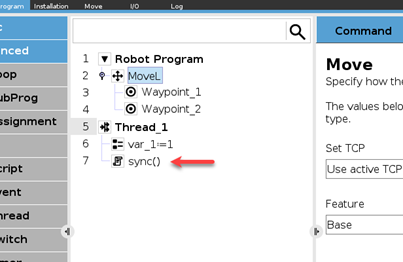
Example of sync() script usage
10. Force limits: For troubleshooting purposes, reduce the force limit in your robot safety settings to find motions in the program that are close to causing Protective Stops. Run your production program to identify the motion stopping positions. Once these motions are identified, use the recommendations in 1 through 13 above to correct the program and application. Afterwards, return the force limits back to their original settings as determined in the validation of the risk assessment.
What can be checked by you to troubleshoot the stops?
- Check installation settings and make sure the following settings are inputted correct:
- Payload
- Tool Center Point
- Center of Gravity (center of weight for the end-effector)
- Mounting
- Check safety settings and verify if settings are correct according to the risk assessment on the application.
- Verify that the robot does not push excessively in pick-up place positions, thereby creating unwanted forces that can cause protective stops. Re-teach relevant waypoints for higher precision.
- As a way of troubleshooting, reduce force limit in safety settings to find motions in the program that are close to protective stops. Once these motions are identified, reduce speeds and/or accelerations accordingly and set force limits back to original settings.
- If risk assessment allows it, the force limit in the safety settings can be increased. Try increasing in steps of 5N until issue is resolved. No more than 25N should be necessary to resolve it.
- If a very hard or multiple collisions has occurred, it highly recommended to check if any of the joints has become loose. Check Service Manual for Inspection Plan.
- If waypoints has start shifting/moving and need to be re-taught and protective stop is increasing, it could be a joint has become loose. Check Service Manual for Inspection Plan.
If you have no success with above guidelines, please contact the Distributor from where the robot has been purchased in order to get additional help.
Prior to contact, kindly make sure to provide the following:
- Description of application and where the protective stop occurs.
- Videos and pictures of application, specially of end-effector.
- Backup of programs and installation file
- Backup of log history and crash report