
Using a barcode reader directly with the robot
This article describes how to connect a Modbus enabled barcode reader, and use it in a program.
Examples are valid for:
CB3 Software version: 3.2.18744
This how to uses a barcode to move to different positions, based on what barcode is read. This can e.g. be used to do different subprograms based on what object the robot is working with, or to pick or place different objects differently.
This example uses a Cognex Dataman 260 barcode reader. Barcode readers with similar communication capabilities might work similarly.
Examples have been made using Cognex' software DataMan Setup Tool 5.6.0 SR1.
Note that other makes of barcode readers may behave differently and may not work directly with UR robots.
The target is to move to different positions, depending on what barcode is read.
The example is split into two sections:
- Barcode reader is auto-triggered, robot waits for new data
- Barcode reader is trigged by the robot, robot confirms new data
Setting up the barcode reader
Always consult the documentation provided by the vendor of the barcode reader.
Below is only a brief explanation of the settings used for below examples.
- Setup the barcode reader to have a static IP-address, and be on the same subnet, as the robot.
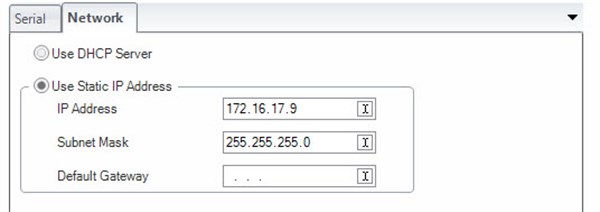
(Image from Dataman Setup Tool 5.6)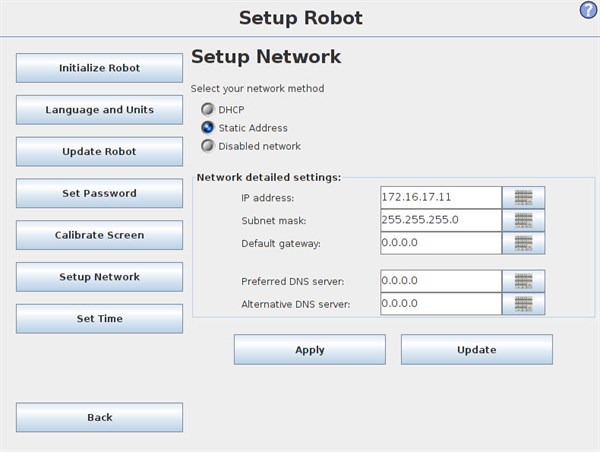
- Setup the barcode reader to communicate over Modbus TCP.
Settings below are not crucial, and other might be used.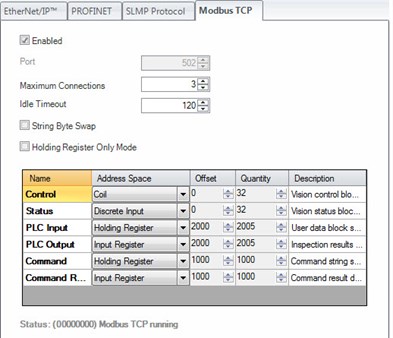
(Image from Dataman Setup Tool 5.6)
According to Cognex' Communications and Programming Guide, the barcode reader and robot can communicate over Modbus TCP, using the Control (bit) register, Status (bit) register and Output data registers (integers). Other registers may be used depending on barcode reader and complexity of application.
Setting up the robot (installation)
Setting up Modbus channels are covered in this article.
The following modbus channels are relevant for below example:

| Address | Type | Name | Explanation |
| 2001 | Register input | Trig_ID | ID no. of next data to be read. |
| 2002 | Register input | Res_ID | ID no. of last data read |
| 2003 | Register input | Res_Code |
Indicator of the success of the read. |
| 2004 | Register input | Res_Length | Length of the reault in bytes (ASCII chars) |
| 2005 | Register input | Result_0 | First and second ASCII char |
| 2006 | Register input | Result_1 | Third and fourth ASCII-char |
| 2007+ | Register input | Result (2-N) | More ASCII chars |
| 0 | Digital Output | Trigger_Enable | Set high to enable triggering with below output. |
| 1 | Digital Output | Trigger | Set high to trigger barcode reader. |
| 2 | Digital Output | Buffer_Enable | High = buffering of results enabled. Low = no buffer. Consult documentation. |
| 3 | Digital Output | Res_Ack | Acknowledge that the result have been read. Clears "New_Res_Available". |
| 0 | Digital Input | Trig_Ready | High = trigger is ready. Low = trigger not ready or disabled. |
| 11 | Digital Input | New_Res_Available | High if a new result is available. |
Addresses are subject to change, by the offset defined in the Modbus TCP setup of the barcode reader defined in above section.
The result from the barcode reader is formattet as an ASCII string.
See ASCII-values at following link: www.asciitable.com
Result is outputtet into MODBUS registers. These can contain 16-bit integers, as ASCII chars are only 8 bits, two chars can be stored in each register channel.
Examples of barcodes:
| Barcode (QR) | ASCII-string | Register outputs |
 |
"1" |
Res_Length = 1 |
 |
"2" | Res_Length = 1 Result_0 = 50 |
 |
"UR3" | Res_Length = 3 Result_0 = 21077 = "UR" Result_0_low_byte = 85 = "U" Result_0_high_byte = 82 = "R" Result_1 = 51 = "3" |
 |
"UR5" | Res_Length = 3 Result_0 = 21077 = "UR" Result_1 = 53 = "5" |
| |
"UR10" |
Res_Length = 4 |
Autotriggering
This section covers how to use the barcode reader with the robot, when the barcode is automatically taking new scans within a given time.
First setup the barcode reader to automatically scan for new barcodes, and send the result over Modbus TCP.
Consult documentation provided by vendor of barcode reader.
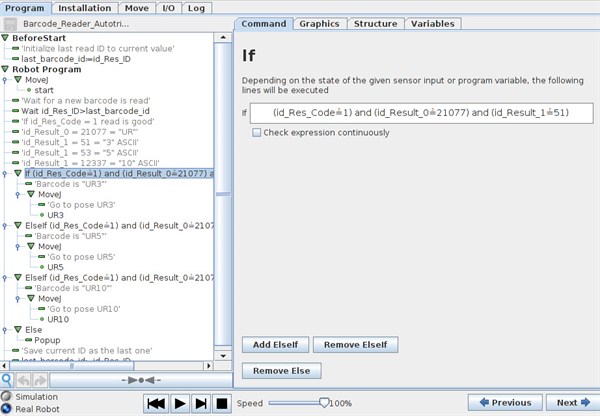
In the robot program, start out by saving the "Res_ID" value to a local variable "last_barcode_id".
Wait for the barcode reader to increment "Res_ID" to a value higher than the last value.
Thus we know that a new barcode is read and stored.
Based on what barcode is read, either "UR3", "UR5" and "UR10" the robot shall move to three different positions.
In the if-statement, we have three statements:
Res_Code = 1, thus the read is good
AND
Result_0 = 21077, thus first two chars are "UR"
AND
Result_1 is either 51 ("3"), 53 ("5") or 12337 ("10").
If all these statements are true, the robot will move to either positions UR3, UR5 or UR10.
If none of the statements are true, thus we have read a barcode that is not equal to the above mentioned or the read is bad, thus we create a popup, to inform the user of the false barcode.
After the sequence, we save the current result ID to our "last_barcode_id" variable.
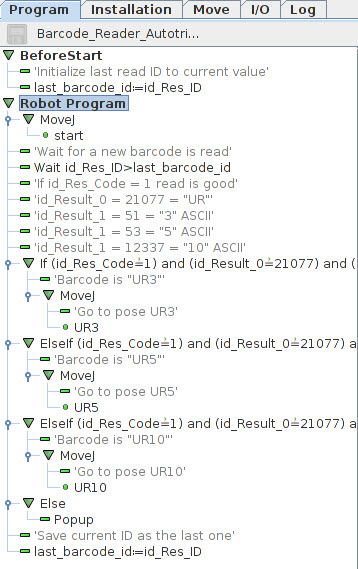
See attached program "Barcode_Reader_Autotrigger.urp" and "default.installation".
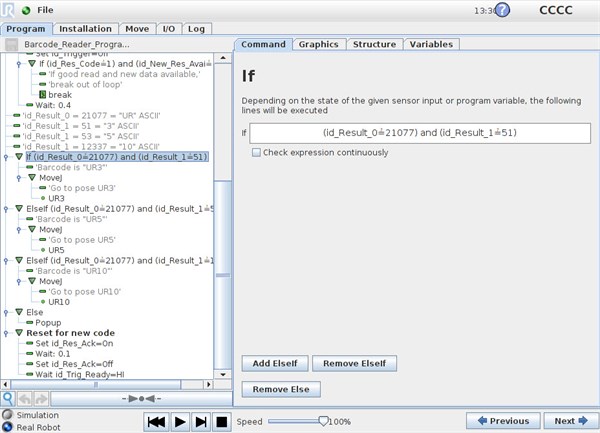
Barcode reader triggered by robot
This section covers how to have the robot trigger the barcode reader, to scan a new available barcode.
First, setup the barcode reader to wait for a trigger-signal to scan a new barcode, and send the result over Modbus TCP.
Consult documentation provided by vendor of barcode reader.
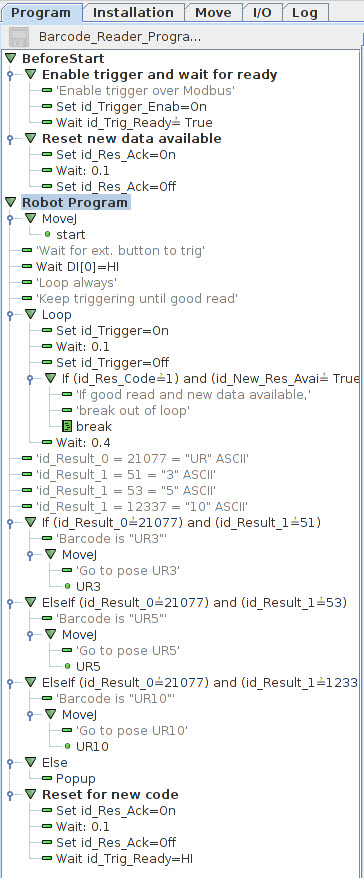
In the program BeforeStart sequence, we set the Trigger_Enable bit high, to allow us to trigger the barcode reader over Modbus.
Afterwards we wait for the Trig_Ready to be high, thus the barcode reader confirms that we can trig over Modbus.
Thereafter we clear the current value stored in the result, by setting Res_Ack to high, to confirm current data is received.
In the Robot Program, we first wait for an external signal, that a new item is ready for scan.
This could be an external sensor, telling the robot that a new item is in front of the barcode reader.
When we want to scan for a new barcode, a loop is made.
The Loop-command is set up to loop continously.
First we set the Trigger bit high, to trigger the barcode reader, we wait for a short delay, and thus set the Trigger bit back to off.
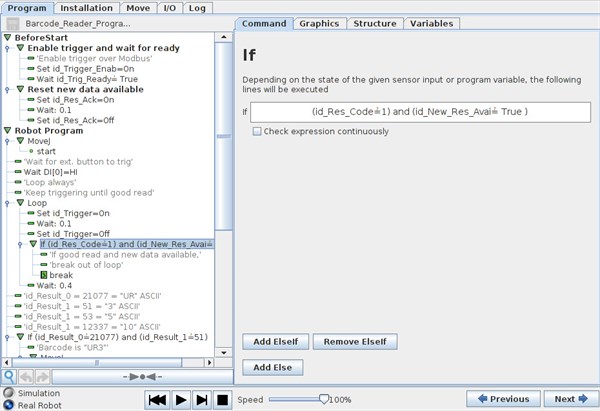
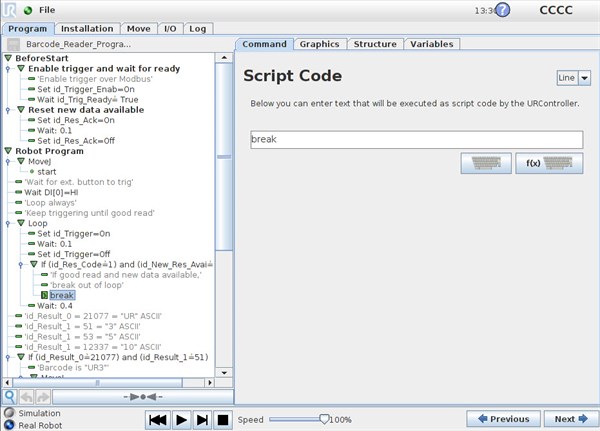
After the trigger, we use an If-statement to test the Res_Code = 1, thus we have a good read AND that New_Res_Available = True, so new data is stored. If both statements are true, we issue the "break" script command. This command will break out of the "Loop".
If no good read is made, the loop will make the barcode reader try again until a good read is confirmed.
This section is not strictly necessary, but provides confirmation, that a new code is actually read.

Based on what barcode is read, either "UR3", "UR5" and "UR10" the robot shall move to three different positions.
In the if-statement, we have two statements:
Result_0 = 21077, thus first two chars are "UR"
AND
Result_1 is either 51 ("3"), 53 ("5") or 12337 ("10").
If all these statements are true, the robot will move to either positions UR3, UR5 or UR10.
If none of the statements are true, thus we have read a barcode that is not equal to the above mentioned or the read is bad, thus we create a popup, to inform the user of the false barcode.
After the sequence, we clear the result, by setting Res_Ack to high, to confirm the data is read.
And if necessary wait for the Trig_Ready to be high, so we are sure the barcode reader is ready to scan again.
See attached program "Barcode_Reader_Programtrigger.urp" and "default.installation".