
URCaps deployment options
/URCaps deployment to PolyScope
This article describes how to deploy your URCap to a PolyScope environment, either on a physical robot, or a simulated environment.
URCaps are, as described in the URCaps Tutorial, built and deployed using Maven.
There are a number of different ways, to deploy your URCap to PolyScope during development, and the preferred approach depends on your setup.
For a production URCap, there are some other steps, that you should take as well.
We will consider the HelloWorldSwing example in this article, but the approach is similar for any URCap.
The options of deploying a URCap is as follows:
- Manual deployment.
- Deployment to a URSim, in the same environment as the IDE / Maven.
- Deployment to a URSim running in a separate VM.
- Deployment to a physical robot, connected on the network.
Manual deployment is the approach used for production URCaps, distributed to customers etc.
Options 2-4 are preferred during development, and the choice depends on your setup.
/Deployment and the POM-file
URCaps are OSGi bundles, and they are built and deployed with the tool Maven.
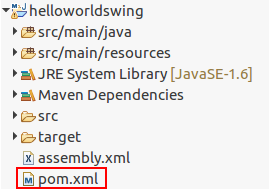
As an OSGi bundle, the pom.xml file determines the build and deployment of the URCap.
The pom.xml file is contained in every URCap project, and contains XML-formatted meta information about the robot.
The pom-file contains meta information about the URCap, such as:
- <name>
The name of the URCap, e.g. "Hello World Swing".
This is the name which the URCap is listed under, when user lists installed URCaps. - <version>
The version number of the URCap.
Increment this, when adding features of fixing bugs before build, to keep track of your releases.
By default this is 1.0-SNAPSHOT, but for production code of beta releases could be changed to e.g. 1.2.4, or 1.0.0-BETA. - <urcap.symbolicname>
The symbolic name of the URCap.
This is used to determine if two URCaps are identical. If so, they will receive the same DataModel, and a suplicate version will be removed, before installing a new instance of this URCap.
Example: com.ur.urcap.example.helloworldswing or com.yourcompany.yourproject.urcapname - <urcap.vendor>
The legal owner of the URCap software. Typically your company name. - <urcap.contactAddress>
The post address of the legal owner of the URCap, typically also the entity holding the copyright. - <urcap.copyright>
The copyright properties of the URCap. - <urcap.description>
A short textual description of the URCap and what it does.
Is displayed to the user, when listing installed URCaps. - <urcap.licenseType>
The type of license this URCap is protected by.
Is displayed to the user, when listing installed URCaps.
Note: Following the license type, it is also possible to supply a license file, describing the legal license in full.
This file is stored in the project "resources/META-INF/LICENSE" document.
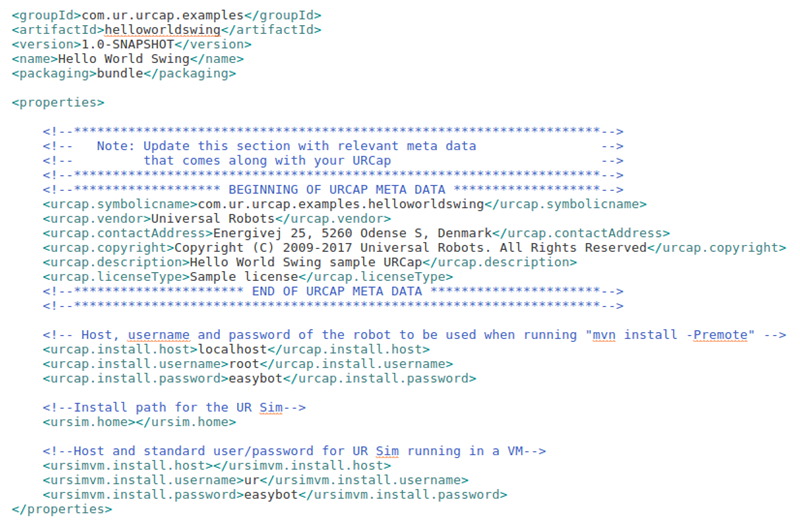
Following the meta-information about the URCap itself, comes the properties relevant to the deployment of the URCap.
These properties apply to deployment methods 2-4. These are the settings that need to be altered, when wishing to deploy to either of the scenarios.
The pom-file also contains information about which dependencies should be included in the build.
This can be obtained by using the <Embed-Dependency> tag, for including other valid OSGi bundled in the build.
/Manual deployment
Manual deployment is the method used, when you want to build your URCap, in a form where you can share this with co-testers over email, or for distribution to end-users.
In this approach, the URCap is build into a ".urcap" file, which can be shared, and installed on any compatible robot.
- Start a new terminal (CTRL+ALT+T).
- Navigate to the URCap folder, e.g.:
cd sdk/sdk-1.3.55/samples/swing/com.ur.urcap.examples.helloworldswing/ - Execute the Maven build command:
mvn install - Project now builds, and returns "BUILD SUCCESS"
- The URCap-file is now built, and can be found in the /target/ folder in the URCap directory.
Copy the .urcap-file, and place it onto e.g. a USB drive.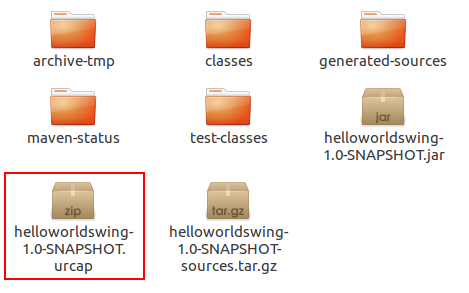
Note that the URCap version name is applied to the file in the format <artifactId>-<version>, e.g. "helloworldswing-1.0-SNAPSHOT.urcap" - To install this URCap to a physical robot, connect the USB drive to the robot.
To install this URCap to a simulator, copy the file to the /programs/ folder within the appropriate URSim directory. - In PolyScope, go to the URCaps Setup menu.
For PolyScope 5.0+: Hamburger Menu (top right) > Settings > System > URCaps
For PolyScope 3.3+: Setup Robot > URCaps - Click the + icon, and locate the URCap file
- PolyScope will prompt to be restarted, to proparly load the URCap.
Restart PolyScope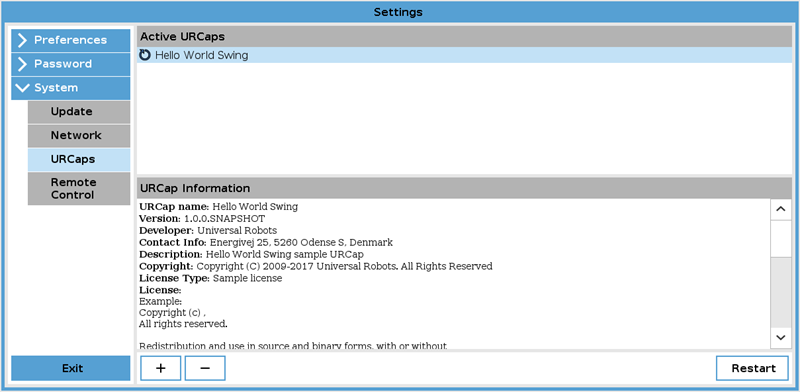
- Enjoy the URCap!
/Deployment to URSim
This is the choice to make, when the URCap code and the Maven tool are placed in the same environment as the URSim you want to deploy to.
This is applicable to the URCaps Starter Package, where the URSim, the Eclipse IDE and Maven are all in the same virtual machine.
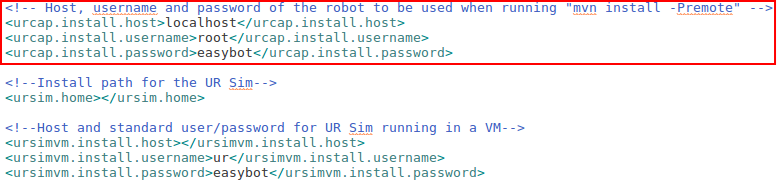
When deploying to a URSim in the same environment as Maven and the URCap code, the pom-file need to be updated to specify the location of the URSim to deploy to.
This is done using the tag <ursim.home>.
- In your IDE, open the pom.xml file.
- Locate the <ursim.home> tag:
- Update the POM.xml file <ursim.home> tag, to include the install path of the URSim to deploy to.
E.g. if deploying to URSim 3.6.0 installed in the location "/home/ur/ursim/ursim-3.6.0.30512/":
<ursim.home>/home/ur/ursim/ursim-3.6.0.30512/</ursim.home> - Save the updated pom.xml file.
- Start a new terminal (CTRL+ALT+T).
- Navigate to the URCap folder, e.g.:
cd sdk/sdk-1.3.55/samples/swing/com.ur.urcap.examples.helloworldswing/ - Execute the Maven command to build, and deploy to URSim.
mvn install -P ursim - Project now builds, and deploys the URCap to the URSim.
If the URSim was already running, it needs to be restarted, for the changes to take effect. - You can now start the URSim, and enjoy the URCap!
/Deployment to URSim inside a separate VM
This is applicable, if you want to deploy your URCap to a URSim running in a separate virtual machine.
E.g. if your URCap code, Maven and your IDE are on your host desktop, and you wish to deploy to a virtual machine running a URSim.
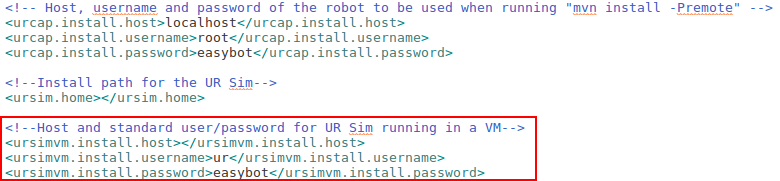
When deploying to a URSim running in a separate environment from the location of Maven and the URCap code, the pom.xml file needs to be updated to reflect the host and login credentials of the virtual machine. This is done using the tags <ursimvm.install.host>, <ursimvm.install.username> and <ursimvm.install.password>.
- In your IDE, open the pom.xml file.
- Locate the <ursimvm.install.*> tags:
- Update the POM.xml file <ursimvm.install.*> tags, to include the properties of the VM.
E.g. if the VM has IP address 192.168.0.1, username "ur" and password "easybot":
<ursimvm.install.host>192.168.0.1</ursimvm.install.host>
<ursimvm.install.username>ur</ursimvm.install.username>
<ursimvm.install.password>easybot</ursimvm.install.password> - Save the updated pom.xml file.
- Start a new terminal (CTRL+ALT+T).
- Navigate to the URCap folder, e.g.:
cd sdk/sdk-1.3.55/samples/swing/com.ur.urcap.examples.helloworldswing/ - Execute the Maven command to build, and deploy to URSim.
mvn install -P ursimvm - Project now builds, and deploys the URCap to the URSim in the virtual machine.
If the URSim was already running, it needs to be restarted, for the changes to take effect. - You can now start the URSim, and enjoy the URCap!
/Deployment to physical robot over Ethernet
This method is preferable, if you want to test your URCap on a physical robot, which is connected to your computer over Ethernet LAN.
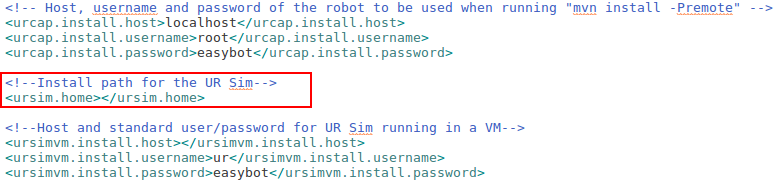
When deploying to a physical robot connected over Ethernet LAN, the pom.xml file needs to be updated to reflect the IP address and login credentials of the robot. This is done using the tags <urcap.install.host>, <urcap.install.username> and <urcap.install.password>.
- In your IDE, open the pom.xml file.
- Locate the <urcap.install.*> tags:
- Update the POM.xml file <urcap.install.*> tags, to include the properties of the robot.
The default username of the robot is: root
The default password of the robot is: easybot
E.g. if the robot is connected with IP address: 172.16.17.1:
<urcap.install.host>172.16.17.1</urcap.install.host>
<urcao.install.username>root</urcap.install.username>
<urcap.install.password>easybot</urcap.install.password> - Save the updated pom.xml file.
- Start a new terminal (CTRL+ALT+T).
- Navigate to the URCap folder, e.g.:
cd sdk/sdk-1.3.55/samples/swing/com.ur.urcap.examples.helloworldswing/ - Execute the Maven command to build, and deploy to URSim.
mvn install -Premote - Project now builds, and deploys the URCap to the robot.
Note: The robot automatically reboots PolyScope, when a URCap is deployed. Please assure to save any work on the robot, before deployment. - Enjoy the URCap on your robot.
Note:
If the robot does not have a fixed IP, of the IP changes often, the IP can also be specified when running the "mvn install" command, by overwriting the <urcap.install.host>-tag.
E.g. with a robot IP of 172.16.17.15:
mvn install -Premote -Durcap.install.host=172.16.17.15