
ProfiSafe Technical Guide for e-Series
Use this guide to help you connect your UR robot to other devices using PROFIsafe
Examples are valid for:
- e-Series Software version: 5.25 and up or 10.12 and up
- TIA Portal v16
- PROFIsafe GSDML version: v2.45
NOTE: Newer software versions can behave differently.
For information on configuring and using PROFINET see the following article on the Support Site.
Specifications
Here is an overview of some important information to get started.
PLC (used in example)
- Siemens S7-1500F
- 1516F-3 PN/DP
- TIA Portal v16
Robot
- Valid for all e-Series robots running Polyscope v.5.25+ only with PROFISafe license
-
New GSDML file version 2.45 is valid for Polyscope 10.13/5.26 and onwards.
-
Previous file version 2.42 should be used with earlier Polyscope versions.
-
Latest Polyscope software is backwards compatible with GSDML version 2.42.
-
Sample Programs:
The files listed are available for download at the bottom of this page and are used in the example (.zal16 project library files are compatible with TIA Portal v16:
GSDML File
Features
Safety Stops Types
|
Trigger |
Reaction |
Function |
|
Emergency Stop |
Stop Category 1 |
Stop by commanding motion and then removal of power |
|
Safeguard Stop |
Stop Category 2 |
Stop by commanding motion power remains on |
|
Limit Violation |
Stop Category 0 |
Stop by immediate removal of power |
|
Fault Detection |
Stop Category 0 |
Stop by immediate removal of power |
Safety Signals
A control message received from the safety PLC contains the information in the table below.
Robot Inputs, PLC Outputs
|
SignaL |
Description |
|
E-Stop by system |
0: Asserts the system e-stop. |
|
Operational mode |
0: Activates either manual mode |
|
Reduced |
0: Activates the Reduced safety limits. |
|
Reset safeguard stop |
Resets safeguard stop state, on 0-to-1 transition, when the 'safeguard stop' is already set to 1. |
|
Reset safeguard stop auto |
Resets safeguard stop auto state, on 0-to-1 transition, when the 'safeguard stop auto' is already set to 1. |
|
Safeguard stop |
0: Asserts the safeguard stop. |
|
Safeguard stop auto |
0: Asserts safeguard stop if the robot is operating in Automatic mode. |
A status message sent to the safety PLC contains the information in the table below.
Robot Outputs, PLC Inputs
|
Signal |
Description |
|
Stop, cat. 0 |
0: Robot is performing, or it has completed, a safety stop of category 0; A hard stop by immediate removal of power to the arm and the motors. |
|
Stop, cat. 1 |
0: Robot is performing, or it has completed, a safety stop of category 1; A controlled stop after which the motors are left in a power off state with brakes engaged. |
|
Stop, cat. 2 |
0: Robot is performing, or it has completed, a safety stop of category 2; A controlled stop after which the motors are left in a power on state. |
|
Violation |
0: Robot is stopped because the safety system failed to comply with the active safety limits defined. |
|
Fault |
0: Robot is stopped because of an unexpected exceptional error in the safety system. 1: Robot is not experiencing an unexpected exceptional error in the safety system. |
|
E-stop by system |
0: Robot is stopped because of one of the following conditions: * a safety PLC connected via PROFIsafe has asserted system level e-stop.
1: Robot is not in system e-stop |
|
E-stop by robot |
0: The robot is stopped because of one of the following conditions:
1: Robot is not in e-stop by robot |
|
Safeguard stop |
0: The robot is stopped due to one of the following conditions: * A safety PLC connected via PROFIsafe has asserted the safeguard stop.
1: The robot is not stopped due to Safeguard Note: This signal follows the safeguard reset semantics. A configured safeguard stop reset functionality must be used to reset this signal. |
|
Safeguard stop auto |
0: The robot is stopped because it is operating in Automatic mode and because of one of the following conditions:
1: The robot is not stopped due to safeguard stop auto The signal follows the safeguard reset semantics. A configured safeguard stop reset functionality must be used to reset this signal. |
|
3PE stop |
0: Robot is stopped because it is operating in Manual mode and because of one of the following conditions:
1: Robot is not stopped because of a 3-position enabling device |
|
Operational mode |
Indication of the active operational mode of the robot. |
|
Reduced mode |
0: Reduced safety limits are active. |
|
Active limit set |
The active set of safety limits. |
|
Robot moving |
0: Robot is moving. If any joint moves at a velocity of 0.02 rad/s or higher the robot is considered in motion. |
|
Safe home position |
0: Robot is at rest (robot not moving), and in the position defined as the Safe Home Position. |
PLC Safety Output Signals
|
FOutputs(PLC) |
Description |
Address (Telegram1) |
Address (Telegram2) |
|
ESTOP_OK |
Set Robot E-Stop |
%Q480.0 |
%Q980.0 |
|
SAFEGUARD_STOP_OK |
Set Robot Safeguard Stop |
%Q480.1 |
%Q980.1 |
|
RESET_SAFEGUARD |
Reset Robot Safeguard Stop |
%Q480.2 |
%Q980.2 |
|
SAFEGUARD_STOP_AUTO_OK |
Set Robot Safeguard Automatic Stop |
%Q480.3 |
%Q980.3 |
|
RESET_AUTO_SAFEGUARD_STOP |
Reset Robot Safeguard Automatic Stop |
%Q480.4 |
%Q980.4 |
|
SAFE_REDUCED_MODE_DEACTAVE |
Deactivate Robot Reduced Mode |
%Q480.5 |
%Q980.5 |
|
SPARE1 |
NOT USED |
%Q480.6 |
%Q980.6 |
|
SPARE2 |
NOT USED |
%Q480.7 |
%Q980.7 |
|
MODE_SELECTOR |
Only Telegram1, 0=MANUAL, 1=AUTO |
%Q481.0 |
%Q981.0 |
PLC Safety Input Signals
|
Finputs (PLC) |
Description |
Address (Telegram1) |
Address (Telegram2) |
|
SS0_ACTIVE |
Robot in StopCat0 |
%I480.0 |
%I980.0 |
|
SS1_ACTIVE |
Robot in StopCat1 |
%I480.1 |
%I980.1 |
|
SS2_ACTIVE |
Robot in StopCat2 |
%I480.2 |
%I980.2 |
|
VIOLATION_ACTIVE |
Robot has a collision |
%I480.3 |
%I980.3 |
|
FAULT_ACTIVE |
Robot controller fault |
%I480.4 |
%I980.4 |
|
SYSTEM_ESTOP_ACTIVE |
Robot gets external E-Stop |
%I480.5 |
%I980.5 |
|
ROBOT_ESTOP_ACTIVE |
Robot has internal E-Stop |
%I480.6 |
%I980.6 |
|
SAFEGUARD_STOP_ACTIVE |
Robot in Safeguard Stop |
%I480.7 |
%I980.7 |
|
SAFEGUARD_STOP_AUTO_ACTIVE |
Robot in Safeguard Automatic Mode Stop |
%I481.0 |
%I981.0 |
|
3PE_ACTIVE |
Dead man switch pressed |
%I481.1 |
%I981.1 |
|
SPARE1 |
NOT_USED |
%I481.2 |
%I981.2 |
|
SPARE2 |
NOT_USED |
%I481.3 |
%I981.3 |
|
SPARE3 |
NOT_USED |
%I481.4 |
%I981.4 |
|
SPARE4 |
NOT_USED |
%I481.5 |
%I981.5 |
|
SPARE5 |
NOT_USED |
%I481.6 |
%I981.6 |
|
SPARE6 |
NOT_USED |
%I481.7 |
%I981.7 |
|
AUTOMATIK_MODE_ACTIVE |
Robot is in Automatic mode |
%I482.0 |
%I982.0 |
|
MANUAL_MODE_ACTIVE |
Automatic is not in use =>Robot in Manual Mode |
%I482.1 |
%I982.1 |
|
REDUCED_MODE_ACTIVE |
Robot in reduced mode |
%I482.2 |
%I982.2 |
|
LIMITS_REDUCED_MODE_ACTIVE |
Robot in reduced mode |
%I482.3 |
%I982.3 |
|
LIMITS_RECOVERY_MODE_ACTIVE |
Robot in recovery mode |
%I482.4 |
%I982.4 |
|
ROBOT_MOVING |
Robot is moving |
%I482.5 |
%I982.5 |
|
SAFE_HOME |
Robot is in Safe home |
%I482.6 |
%I982.6 |
|
SPARE7 |
NOT_USED |
%I482.7 |
%I982.7 |
Telegrams
The available telegrams are :
- Telegram 1– Allows for access to mode selector signals. Automatic & Manual modes
- Telegram 2 – Same as telegram 1 without access to mode selector signals
- Each telegram is available with a 3- or 4-byte CRC depending on which PLC is used
Example Library Contents
Included in the example library, Universal Robots_FailSafe_Library.zal16, is the following:
- UR_Standard_FBs -
- Function blocks for Universal robots
- Hardware Configuration
- A preconfigured robot with all IO modules.
- PLC Tags
- Tag table for a robot.
- Tag table with test signals.
- UDTs
- UDTs for IO structure and the function blocks.
- URExample Project
- A sample project to test the possibilities
Setup and Walkthrough
Global Library
The Global Library contains the required elements for PROFINET and PROFIsafe to communicate with a UR robot.
- Function Blocks
- Hardware Configurations
- PLC Tags
- UDTs
- Example project
Import the Global library into TIA portal to add the robot with PROFIsafe device.
To import the Global Library:
- Install and open TIA Portal
- Navigate to Global libraries
- Click Open Global library
- Browse to the Universal Robots_FailSafe_Library.zal16 file downloaded from the support site
- Select a folder to save the Library file
Setting up the Example project in TIA Portal
- Install and Open TIA Portal
- Open Universal Robots_FailSafe_Example.zap16 project file downloaded from the support site
- Choose destination folder to save project
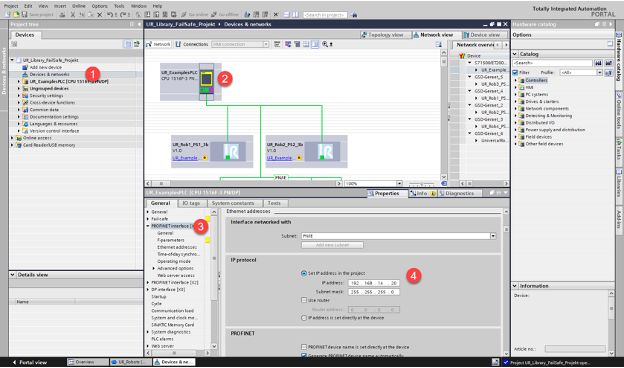
- Once the project is open, open the Devices & networks to assign IP Addresses
- To set IP address for PLC
- Double click on the PLC and enter the Device View
- In the Properties window select the ProfiNet interface used (X1 or X2)
- Select Ethernet addresses
- Enter the desired IP address and Subnet mask
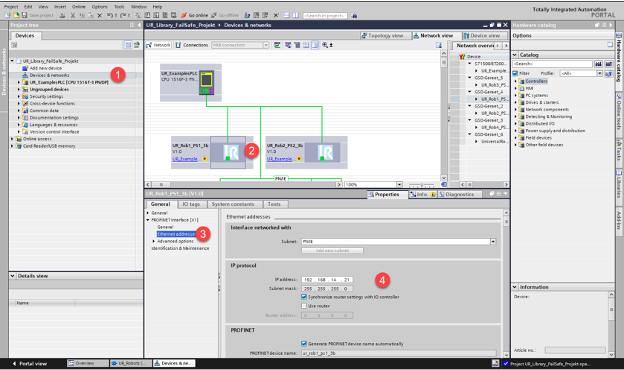
- To set IP address for Robot
- Double click on the UR_Rob device and enter the Device View
- In the Properties window select the ProfiNet interface [X1]
- Select Ethernet addresses
- Enter the desired IP address and Subnet mask
- To set IP address for PLC
- The PROFIsafe parameters for the Robot need to be set
- Double click on the UR_Rob device and enter the Device View
- In the Device overview tab select the Safety telegram used
- In the Properties window, select PROFIsafe in the General Tab
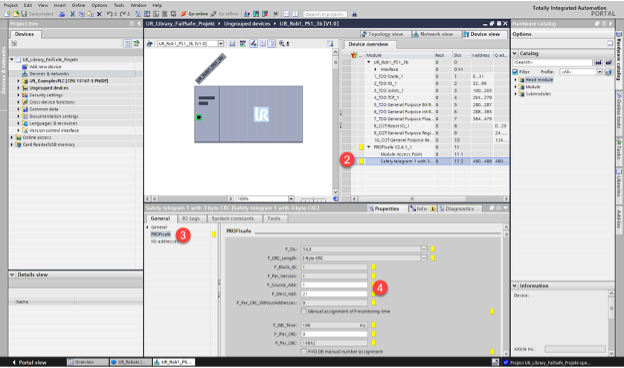
These are the available PROFIsafe parameters that can be modified
|
F_Source_Add |
The Safety address(F-Address) of F-Host (PLC) |
|
F_Dest_Add |
The Safety address(F-Address) of F-Device (Robot) |
|
F_WD_Time |
With selectable checkbox |
|
F_iPar_CRC |
CRC used for iParameters (Dynamic Parameters)
Ex: |
|
F-I/O DB-number |
With selectable checkbox |

The following table lists the PROFIsafe read only parameters.
|
F_SIL |
Failsafe Safety Integrity Level |
|
F_CRC_Length |
Byte length of CRC used in the configuration |
|
F_Block_ID |
The block ID label of the robot failsafe device |
|
F_Par_Version |
Version of the failsafe parameters |
|
F_Par_CRC_WithoutAddress |
Value = “0” |
|
F_Par_CRC |
The calculated CRC value for the F-Device |
|
F-I/O DB-name: |
Name of the F-I/O DB dependent on the telegram used. |

Setting up the Example project in Polyscope
- Set up IP address on robot controller
- Enable PROFINET Installation Tab-> FieldBus-> PROFINET
- Enable
- Configure the behavior if the PROFINET communication is lost for the
- Robot IO Module
- Registers module 1
- Registers module 2
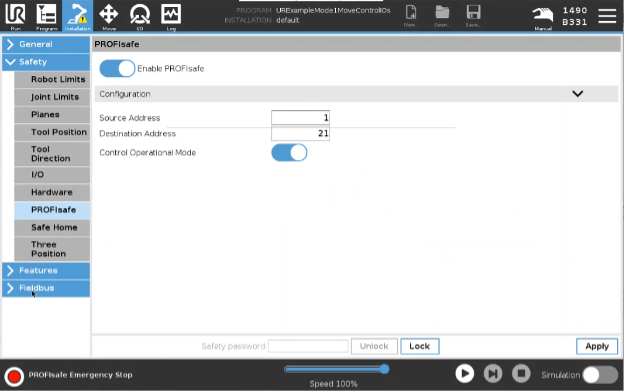
- Enable ProfiSafe functionality on robot controller
- Installation Tab-> Safety-> PROFIsafe
- Enable
- Set Source Address (PLC)
- Set Destination Address (Robot)
- Enable Control Operational Node
Features and Common Functions
Features of the example project include the following components, that are intended to provide an example of available safety functions. The Provided examples are selections of code that can be used as apart of the complete safety solution. Additional programming and verification of safety functions is required.
- Program Blocks
- F-Blocks-> Main_Safety_RTG1 [FB1]
- Safety related block and functions
- Network Descriptions
- 1: Enabling of Fail-Safe IO
- 2: Reintegration of Safety functions
- 3: Safety Signals
- 4: Telegrams
- UR_Examples->FBs
- Non-safety related block and functions
- (Outside of the scope of this article) Included in the ProfiNet support article
- F-Blocks-> Main_Safety_RTG1 [FB1]
- PLC Tags
- PLC Tags for specific telegram in use
- Safe_Telegram1
- Safe_Telegram2
- PLC Tags for specific telegram in use
Common functions of the example project include steps that detail how to implement common safety functions, such as: triggering and recovery from a Safety Stop (Emergency & Protective), integration, and reintegration of the safety communication etc. These highlight the necessary steps needed to preform these functions. Additional programming and verification of safety functions is required.
- (Re)Integrate the robot safety communications
- Enable robot
- Network 1: %M30.5 “ENABLE_ROBOT_1”
- Toggle bit (CTRL+F2 to enable and CTRL+F3 to disable)
- Reintegrate and Acknowledge Safety
- Network 2: Reintegrate Ack Safety: %M30.4 “ACK_SAFETY”
- Toggle bit (CTRL+F2 to enable and CTRL+F3 to disable)
- Test bits
- Network 3: set Safety Signals
- %M30.0 – “ESTOP”
- %M30.1 – “SAFEGUARD_STOP”
- %M30.2 – “AUTO_SAFEGUARD_STOP”
- %M30.3 – “REDUCED_MODE”
- %M30.4 – “AUTO_MODE”
- Enable robot
- Clearing Safety Stops
- Safety Stop needs to be reset (LOW)
- Toggle %M30.4 “ACK_SAFETY”
- Clearing Emergency Stops – Using UR_Robots[FB3] example
- Assuming Robot is in Automatic mode with Remote Control enabled
- Reset Emergency Stop bit
- Reset %M30.0 – “ESTOP”
- Set PowerON Bit
- Set UR_Robots[FB3] – Network 3: %M1.1 – “PowerOn”
- Acknowledge Safety error
- Pulse %M30.4 – “ACK_Safety”
- Brake Release
- Set UR_Robots[FB3] – Network 3: %M1.2 – “Brake Release”
- Close Safety PopUp
- UR_Robots[FB3] – Network 3: %M6.4 – “Dashboard13”
- Restart/ resume program