
Conveyor tracking: using encoder that outputs a Modbus register
Track linear conveyor using encoder that outputs a Modbus register
Track linear conveyor using encoder that outputs a Modbus register
Step-by-step guide of how to setup conveyor tracking and pick part from conveyor
The conveyor tracking functionality adjusts robots paths to the motion of a conveyor.
Conveyor tracking for linear and circular conveyors is available from software version 1.8.
This example is based on setup on a CB2 controller but can also be used on CB3 and e-Series.
Initial setup:
- Determine the desired conveyor tracking type
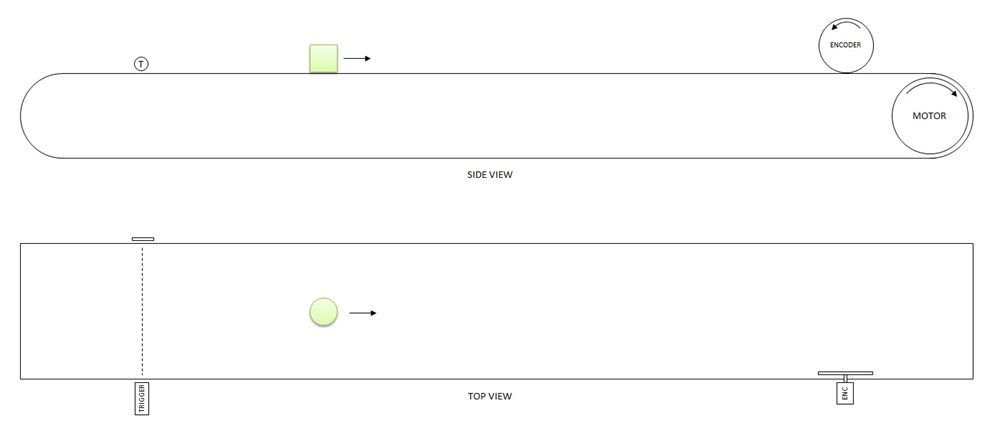
In this sample the robot will await a trigger signal (photo sensor).
When trigger is activated, the robot will move along a linear conveyor with same speed and pickup an object.
Conclusion: conveyor tracking type will be linear tracking.
- Specify encoder type
Selected encoder type is a single-turn absolute encoder from AMCI.
Product type is AMCI NR25F-B2E11AE04, which supports Modbus TCP.
Resolution is 16 bit, ie. 65535 pulses per revolution.
Datasheet for encoder: nr25-ethernet-rotary-encoder.pdf
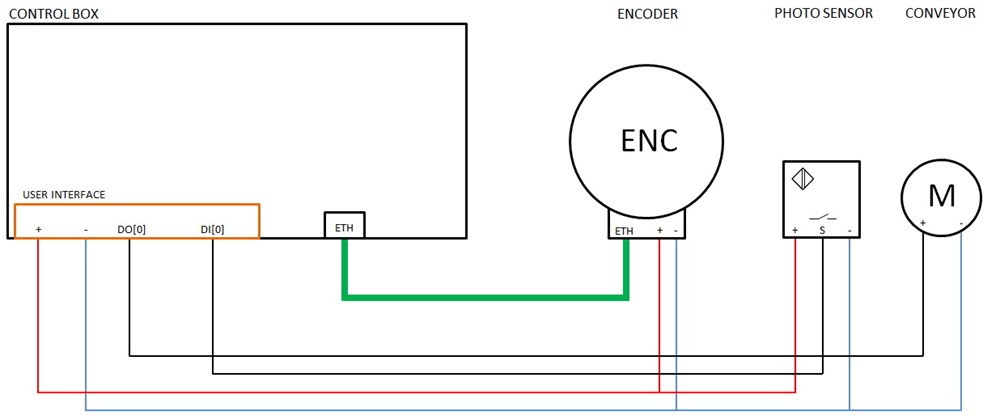
- Hardware interface
Next is to specify the interface to the hardware that is used in the application. One digital input is needed for the photo sensor. Two digital outputs are needed for respectively start/stop the conveyor and open/close the gripper.
| Description | Signal | ||
|---|---|---|---|
| Trigger | DI[0] | ||
| Conveyor START/STOP | DO[0] | ||
| Gripper ON/OFF | DO[8] |
Encoder will be supplied by internal 24V power supply from control box. Feedback from encoder will be a Modbus TCP register, which requires an ethernet cable between encoder and controlbox.
Schematic drawing:
- Modbus TCP Setup
First the Modbus communication to the encoder must be setup.
The following addresses has been selected for this application:| Description | IP | Subnet | |||
|---|---|---|---|---|---|
| Control box | 172.16.17.10 | 255.255.255.0 | |||
| Encoder | 172.16.17.50 | 255.255.255.0 |
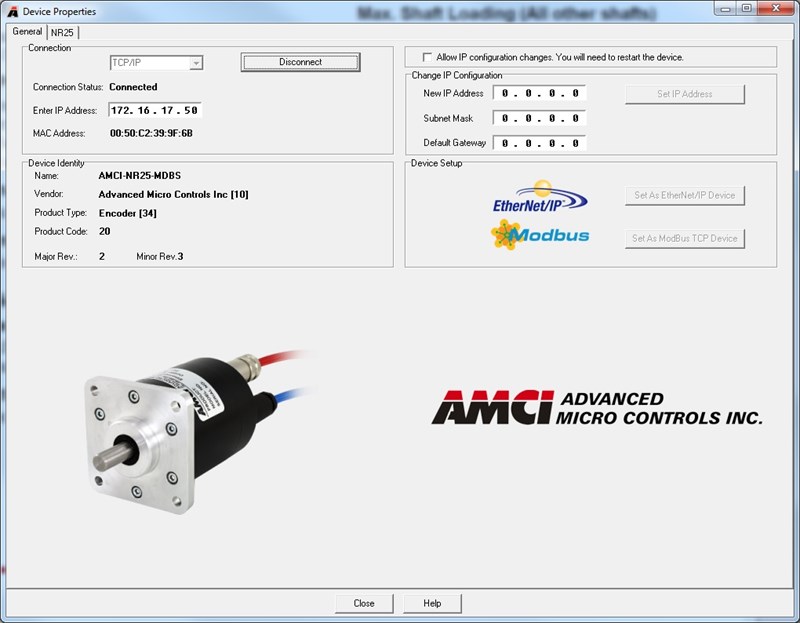
IP-address of encoder is setup using AMCI's Net Configurator. The software can be downloaded from AMCI's website
NOTE: Universal Robots is only providing a download link to vendor. Link can be changed without prior notice by vendor. Consult documentation of encoder in order to use the software.
IMPORTANT: Under Device Setup, set communication protocol as Modbus TCP.
Next is to setup IP-address of control box. Go to SETUP ROBOT\SETUP NETWORK and enter the following information:
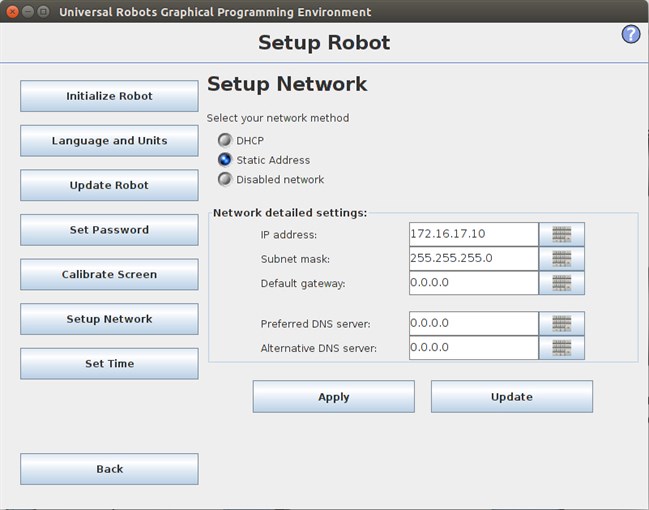
Save settings by pressing APPLY SETTINGS
Finally setup IP-address of encoder. The encoder datasheet contains information about the register available and their addresses.
On page 72 in datasheet for encoder, there it can be found that register with address 0 contains the 16 bit position value.
Go to INSTALLATION\MODBUS CLIENT and add a Modbus server, by pressing the + button and add a register input with address 0:

Confirm that the round dot left of the register turns green, then communication is ok.
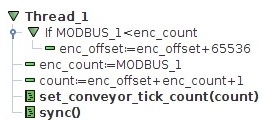
First we will need a thread to read the encoder position.
On previous page, it is described how to save the encoder reading from a variable and use this variable to define the conveyor tick count:
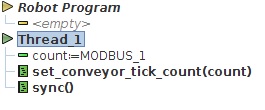
As the encoder in this application is single-turn, it is required to make some program logic in order not to reset the conveyor tick count everytime the encoder has turned one full revolution:
Encoder reading will be saved in a variable named enc-count, and value will be between 0 and 65535 (16 bit).
enc-count and actual register value are continuously compared.
If the register is reset at some point, then an offset of 65535+1 (16 bit + 1) is added to a variable offset named enc-offset.
The combined value of enc_offset and enc_count is incremented and used for setting the conveyor tick count with the script code set_conveyor_tick_count().
Next the direction of the conveyor must be determined.
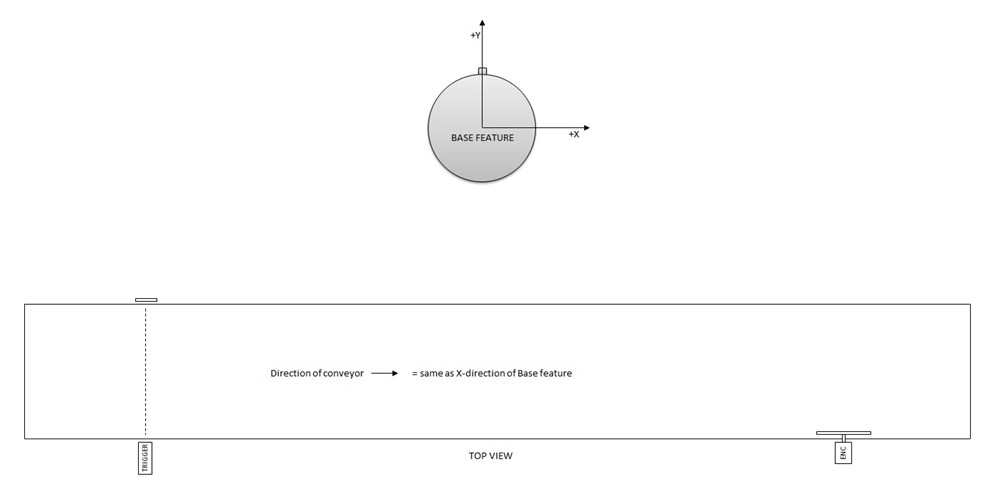
Direction will be determined with a pose variable p[x,y,z,rx,ry,rz], where the direction can be scaled accordingly.
In this case the direction will be parallel to the X-axis of the robots Base frame, so the variable should look like this:| direction = p[1,0,0,0,0,0,0] |
| direction = p[0,1,0,0,0,0] |
| direction = p[1,1,0,0,0,0] |
So by scaling X, Y and Z value of the pose variable you can specify the direction of conveyor relative to the Base-frame of robot.
Another option to specify the direction of the conveyor is to teach two waypoints along the conveyor and use the script code pose_sub() for automatically calculate the direction.
| direction = pose_sub(Waypoint_1,Waypoint_2) |
- Encoder pulses
Finally the amount of encoder pulses must be defined as ticks per meter.
We will use an integer variable for that purpose.
| tpm = rpm * ppr * no_of_channels |
Where rpm = rotations of encoder disk per meter and ppr = pulses per revolution
On the encoder used there is mounted a disc with a radius of 77 mm.
| tpm = (1000/(2*phi*77)) * 65535 = 135457 |
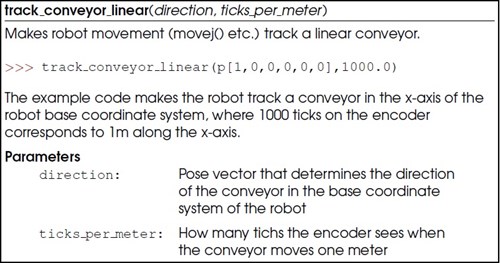
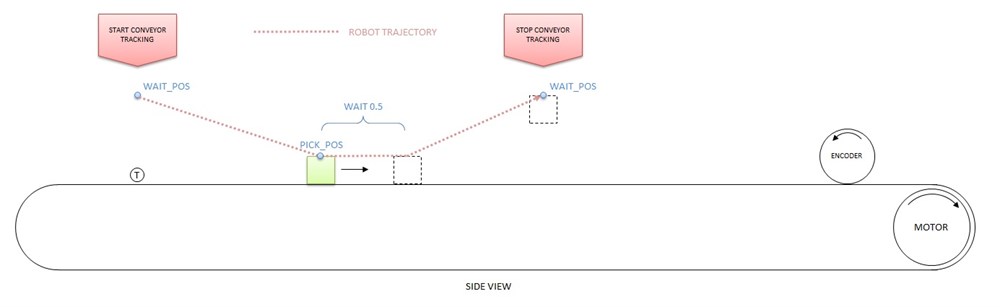
Then we can use the two values for starting the conveyor tracking using the script code track_conveyor_linear(direction, ticks_per_meter):
The script code will be inserted after the robot has detected the part with the trigger signal
A little delay is also inserted in order to syncronize the start of the robot with the position of the object (or the trigger sensor can be physically adjusted if preferred)|
WAIT trigger WAIT 0.15 track_conveyor_linear(direction, tpm) |
Robot will then follow the speed of conveyor until conveyor tracking is stopped using the script code stop_conveyor_tracking()
![]()
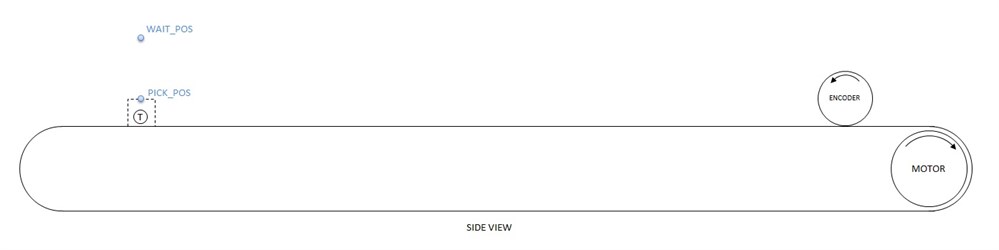
In order for the robot to pickup the object, it is required to insert two positions in the program, a WAIT position and a PICK position.
These positions can be recorded vertically in the same position with only difference the Z-height:
When program is running and conveyor tracking activated in the program, you will see that the robot follows the conveyor speed while picking up the object:
NOTE: direction and tpm will most likely have to be adjusted/optimized in order to obtain the correct speed and to ensure that robot moves parallel with conveyor.
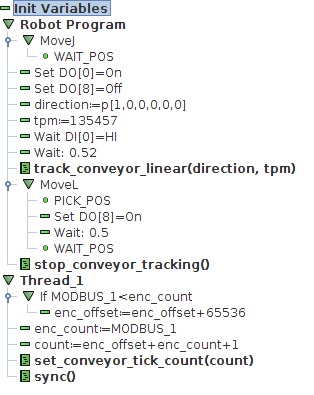
This is how the final sample program looks:
Download sample program at the buttom of the page. File name is track_conveyor_linear_modbus_register.zip
Important: It is required to download and load this installation file as it contains the Modbus setup
We have also attached a small video example. File name is Conveyor_tracking.mp4