
ActiNav Remote access - Ixon
In this article we describe integrating IXON cloud’s router solution with ActiNav
Introduction
Remote Access and Control of ActiNav is possible through a variety of 3rd party programs. Here, we describe integrating IXON Cloud’s router solution with ActiNav.
Prerequisites
- IXON IXrouter3
- Short (1 - 2 ft, 30 - 60 cm) Ethernet cable
- Long (25 ft / 7.5 meter) Ethernet cable - depending on installation
- USB drive
- Two (red/ black) 16-12 AWG wires with ferrules crimped (3 ft) - Electrical wires for powering IXON router from UR controller
Setup Procedure
- Connect the IXON router to the UR Controller and AMM.

- Disconnect existing Controller-AMM Ethernet connection from the UR controller, and connect it to the IXON router instead
- Connect new short Ethernet cable from UR controller to IXON router
- Connect new long Ethernet cable from IXON router to external Ethernet connection.
- Install IXON router inside of UR controller.
2. Power router using robot controller:
- The IXrouter3 comes with a female 4-pin plug-in connector with screw connection. The optimal wire diameter is 1.5mm² (16AWG - 12AWG). Connect + and – terminal pins on IXON to any of the available UR Controller’s 24V and GND pins
3. Create an IXON Cloud account
- You can create your personal account on portal.ixon.cloud by clicking on Create account at the bottom of the login page. A company account will automatically be created where you will be able to register your IXrouters.
- Step by Step instructions: https://support.ixon.cloud/hc/en-us/articles/360015206319
4. Register the IXrouter
- Now that you have an account, you can create a configuration file that will tell the IXrouter how to connect (i.e. via Ethernet cable, Wi-Fi etc.).
- Go to the [Fleet Manager] by clicking on the 9 dots in the top right. After that, go to [Tools] in the left menu and press [Start configuration]. Simply follow the steps and download the configuration file.
- Load the configuration file into the IXrouter by copying the ixrouter.conf file onto a USB drive and placing it in the IXrouter. The IXrouter will do the rest and automatically register under your company.
- Once registered, you can activate it.
- Step by Step instructions: https://support.ixon.cloud/hc/en-us/articles/360014815879
- When configuring your Ixrouter it's important to remember that you are placing a device in a critical part of ActiNav’s network, between the AMM and the UR controller. To keep communications flowing, IXON’s IP will need a matching subnet, 192.168.0.X. While following step e’s instructions with the link, set the LAN IP address like in the image below. The IP address can not be 192.168.0.1 or 192.168.0.2 but can have any last digit as long as 192.168.0.X remains the same.

- Alternatively, the IP configuration can be done after a device is configured as well. You would have to navigate to the IXON Cloud, go to Fleet Manager > Devices > Select your device > Network > LAN, select the device, and change the LAN IP address as shown below:
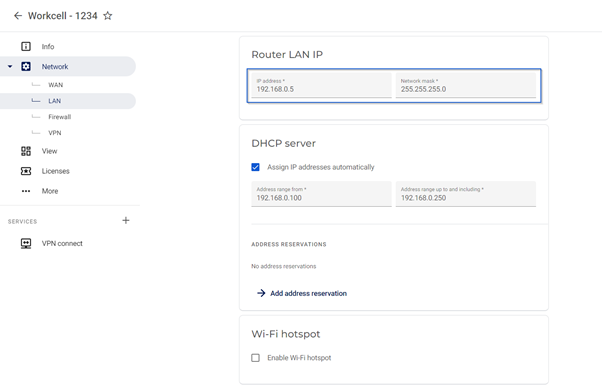
- Disable source NAT. This option can be found lower on the same page

5. Install the IXON connector URCap
- The "IXON connector" URCap will add a VNC server to your UR robot, enabling you to remotely view and control your UR robot's teach pendant.
- Go to the IXON Connector page on the robot, enable the VNC server, and enter a VNC server password with a recommended length of 6-8 characters.


6. . Install VPN client on your remote PC by navigating in the IXON Cloud to Fleet Manager > Tools > VPN client > Download installer.

7. Refresh the page and connect to your device by navigating to the Portal in IXON Cloud and pressing Connect. Alternatively, the connection can be established in Fleet Manager as well.

8. Once successfully connected to IXON router
9. Your device is now online and can be viewed by users that are given access to the device
- Step by Step Instructions: https://support.ixon.cloud/hc/en-us/articles/360015875160
10. Connecting to device remotely
- Use a VNC viewer application (https://www.realvnc.com/en/connect/download/viewer/) to display/ control UR teach pendant screen on the remote PC. Open VNC Viewer app and type-in the robot IP and, enter the password (same as the one from URCap page) to access teach pendant screen:
