IMMI I/O in regular program nodes
This section describes how to use IMMI inputs and ouputs in regular program nodes.
Using the IMMI I/O overview
The IMMI I/O screen provides indicators for inputs signals and options for controlling output signals. The options to control the output signals are, by default, only availabe in robot programming mode. This can be reconfigured as desired in the I/O setup tab found on the Installation screen.
On start-up, the 24V signals are high. All other signals are low.
In Automatic mode, all signals are high by default.
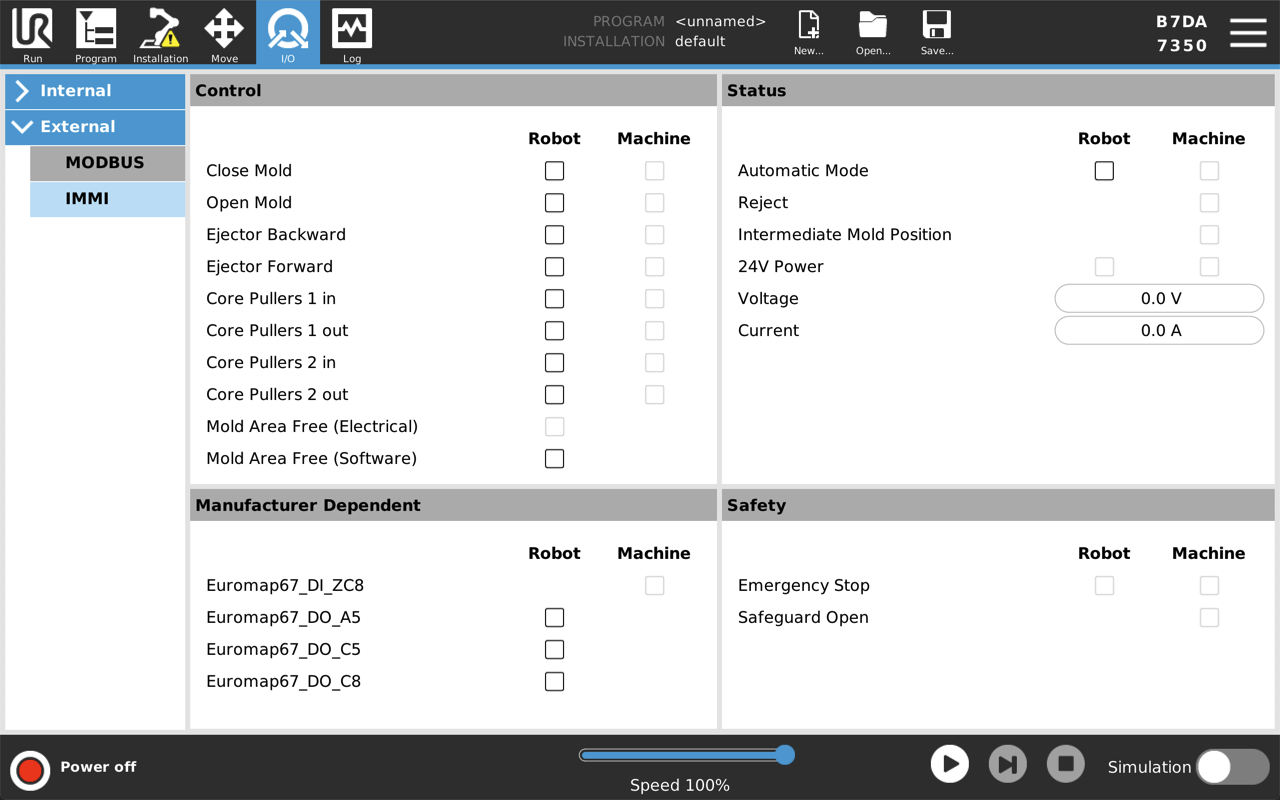
IMMI I/O overview
Control
These signals are used by the program structures to control the interaction between the robot and the IMM.
- The Mold Area Free (MAF) cannot be controlled in the robot column screen. The MAF output is set high under the condition that the electrical supervision signal of the mould area and the MAF signal from the software are both high. The MAF signal from the software can be controlled by the respective button.
- Status: These signals are used to view and control the robot's operational mode and the IMM. The bars showing voltage and current consumption represent the values delivered by the IMMI module to the IMM and the light guard if used.
- Manufacturer Dependent: These signals are optional, but can be used, as needed, for specific purposes by the IMM manufacturer.
Safety
In the robot column, the Emergency Stop indicator cannot be controlled from this screen. It simply indicates the robot is emergency stopped.
The emergency stop signal from the machine indicates whether the IMM is emergency stopped. The Safeguard Open input shows the state of the "Safety devices" signals specified in the EUROMAP 67 standard.
If a program structure does not include I/O signals, but still intended for use in a robot program, you can use the Action and Wait nodes described in the following section.
How to use IMMI I/O in regular program nodes
Wait
- On PolyScope, in the Header, tap Program.
- Under Basic, select Wait.
- In the Command panel, under Wait, select Wait for Digital Input to access the IMM input options.
Set
- On PolyScope, in the Header, tap Program.
- Under Basic, select Set.
- In the Command panel, under Select any of the following options
- Set Digital Output: Select from a list of outputs from robot to IMM.
- Set: Select outputs and use expressions together.
- Set Single Pulse: Select outputs and define pulse duration.
Expression
You can accesss the Expression Editor from multiple nodes.
- Tap the desired node and select the f(x) text field to open the Expression Editor.
For more information, refer to the robot User Manual available on the support website: