Freedrive Panel

Description

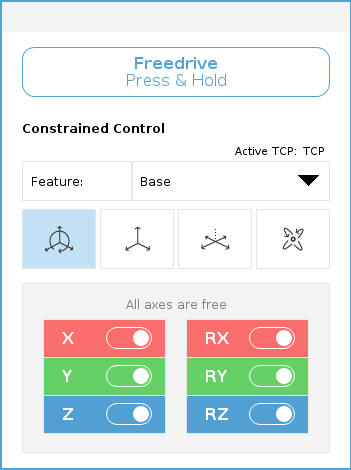
When the robot arm is in Freedrive, a panel appears on PolyScope, as illustrated below.


To access the Freedrive Panel
  1. In the Header, tap the Move tab.

  2. At the bottom of the screen, tap Freedrive.

    The Freedrive Panel opens.

  3. Press and hold the Freedrive button inside the Panel.

    You can the robot arm manually, similar to pressing the Freedrive button located on the Teach Pendant.

A LED indicates when the robot arm approaches a singularity position. The LED is detailed in the following section.


LED in Freedrive panel

The LED on the status bar of the Freedrive panel indicates:

  • When one or more joints are approaching their joint limits.

  • When the robot arm’s positioning is approaching singularity. Resistance increases as the robot approaches singularity, making it feel heavy to position.


Freedrive Panel icons

You can lock one or more of the axes allowing the TCP to move in a particular direction, as defined in the table below.


All axes are free

Movement is allowed through all axes.

Plane

Movement is only allowed through the X-axis and Y-axis.

Translation

Movement is allowed through all axes, without rotation.

Rotation

Movement is allowed through all axes, in a spherical motion, around the TCP.


Moving the robot arm in some axes when a tool is attached, can present a pinch point.

  • Use caution when moving the robot arm in any axis.